Table of Contents
Advertisement
Quick Links
6/21/24, 9:02 AM
Seakeeper Ride | Commissioning Instructions
Seakeeper Ride | Commissioning Instructions
1. Introduction
Updated 10/25/2023
Following installation, the Seakeeper Ride system must be con gured prior to operation. This process
is performed by the Original Equipment Manufacturer (OEM/boat builder) or a professional
Seakeeper certi ed installer if they performed the installation.
Note: Scan the QR code below to access Seakeeper Ride BILT 3D instructions. BILT App will assist in
familiarization with the Seakeeper Ride components and includes a speci c section for
commissioning.
ATTENTION! Changing these critical settings can render the system non-functional and create an
unsafe operating condition. Please proceed only if you have read and understand this manual in full.
https://manuals.seakeeper.com/ride/seakeeper-ride-commissioning-instructions/?print=true
Seakeeper Ride | Commissioning Instructions – Seakeeper Manuals
1/41
Advertisement
Table of Contents

Subscribe to Our Youtube Channel
Related Manuals for Seakeeper Ride


Summary of Contents for Seakeeper Ride
- Page 1 Seakeeper certi ed installer if they performed the installation. Note: Scan the QR code below to access Seakeeper Ride BILT 3D instructions. BILT App will assist in familiarization with the Seakeeper Ride components and includes a speci c section for commissioning.
- Page 2 For Seakeeper Ride systems installed by end users, follow the steps below to commission your new system. The full procedure should take approximately 10 minutes if the boat is in a proper location before starting.
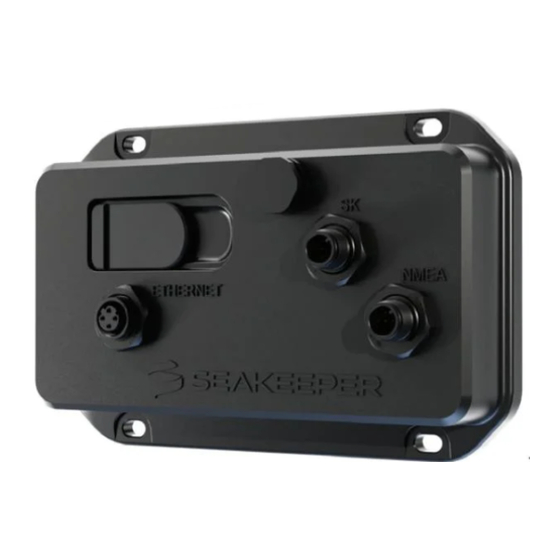
- Page 3 Seakeeper Ride | Commissioning Instructions – Seakeeper Manuals 2. Software Module Switches For Seakeeper Ride to connect properly to the Multifunction Display (MFD), the switches on the Software Module must be in the correct positions. Access the switches by removing the rubber covering on the upper left side of the Software Module.
- Page 4 6/21/24, 9:02 AM Seakeeper Ride | Commissioning Instructions – Seakeeper Manuals https://manuals.seakeeper.com/ride/seakeeper-ride-commissioning-instructions/?print=true 4/41...
-
Page 5: First Installation
The Advanced Mode, shown below, will remain available for users that have updated their Seakeeper Ride system prior to September 1, 2023. The following steps shown will show the new Seakeeper Ride User Interface if the system has been updated after September 1, 2023. (Software 2023.9.1 or newer) -
Page 6: Software Version
6/21/24, 9:02 AM Seakeeper Ride | Commissioning Instructions – Seakeeper Manuals Software Version Install Instructions Note: Boat must be stopped when performing install instructions. https://manuals.seakeeper.com/ride/seakeeper-ride-commissioning-instructions/?print=true 6/41... -
Page 7: System Validation
6/21/24, 9:02 AM Seakeeper Ride | Commissioning Instructions – Seakeeper Manuals System Validation This step ensures all components are updated to the latest software and may take a few minutes. Software Module Orientation WARNING: Software Module Orientation mounting position and selection is critical to safe operation of your boat. Incorrect mounting and orientation selection may result in unsafe boat handling. - Page 8 6/21/24, 9:02 AM Seakeeper Ride | Commissioning Instructions – Seakeeper Manuals the installation. This selection will align the boat motion with the Seakeeper Ride components and correctly control your boat’s attitude. Visual con rmation of the Software Module’s location on board should be done at this step to ensure correct positioning on the boat.
-
Page 9: Controller Configuration
Distribution Module. Plug in the Port Side Actuator cable to the Distribution Module and select the Port Controller Cable Routing. Note: Due to engineering e orts to make the Seakeeper Ride equipment more versatile for ease of installation, the Controllers must follow a Con guration procedure that tunes them for proper operation. - Page 10 6/21/24, 9:02 AM Seakeeper Ride | Commissioning Instructions – Seakeeper Manuals https://manuals.seakeeper.com/ride/seakeeper-ride-commissioning-instructions/?print=true 10/41...
- Page 11 Diagnostics tests the mechanical travel, direction of motion, and communication of the Seakeeper Ride system prior to sea trialing. Please pay attention to which Controller side (Port or Starboard) you are diagnosing, so the movement of the controller matches the indicated movement on the Ride App Screen Note: Diagnostics will be completed twice to check that both Actuators are functioning correctly.
- Page 12 6/21/24, 9:02 AM Seakeeper Ride | Commissioning Instructions – Seakeeper Manuals https://manuals.seakeeper.com/ride/seakeeper-ride-commissioning-instructions/?print=true 12/41...
- Page 13 6/21/24, 9:02 AM Seakeeper Ride | Commissioning Instructions – Seakeeper Manuals Note: In order to proceed you MUST achieve full deployment in order to select the ‘Next’ button. https://manuals.seakeeper.com/ride/seakeeper-ride-commissioning-instructions/?print=true 13/41...
- Page 14 6/21/24, 9:02 AM Seakeeper Ride | Commissioning Instructions – Seakeeper Manuals Note: In order to proceed you MUST retract deployment to Zero position in order to select the ‘Next’ button. https://manuals.seakeeper.com/ride/seakeeper-ride-commissioning-instructions/?print=true 14/41...
- Page 15 Note: Refer to the TCC (Trim Command Curve) instructions here – https://manuals.seakeeper.com/ride/seakeeper-ride-trim-command-curve/ You have now fully Commissioned the Seakeeper Ride system, and it is ready for the water! Press the three-line icon on the bottom right of the MFD screen and select the ‘Home’ icon to return to the home screen and use your Seakeeper Ride system.
-
Page 16: Service Menu Items
Seakeeper Ride | Commissioning Instructions – Seakeeper Manuals 4. Service Menu Items The Service Menu Items can be utilized for adjusting certain parameters of your Seakeeper Ride system. To access the Service Menu Items, choose the button with three lines on the bottom right of the MFD, then choose tool icon on the bottom right. -
Page 17: System Status
The pass code is 339037. System Status This item indicates if the Con guration (system set up) for your Seakeeper Ride system has been completed. The Con guration Conditions must be satis ed in order for the Seakeeper Ride system to function properly. -
Page 18: Attitude Calibration
Attitude Calibration adjusts the sensors in the Seakeeper Ride system to match the detected horizon, providing a target attitude used during Auto Mode operation. Once Seakeeper Ride is in operation, the system will adjust the boat’s attitude to match the horizon as calibrated during this step. - Page 19 Seakeeper Ride | Commissioning Instructions – Seakeeper Manuals Controller Zeroing When Seakeeper Ride is at rest, the Blade will be up not interrupting water ow behind the seal plate. As the control system dictates, the Blade rotates down and it creates lift at the transom stabilizing the boat.
- Page 20 6/21/24, 9:02 AM Seakeeper Ride | Commissioning Instructions – Seakeeper Manuals Controller Zeroing will have a second section located on the second page of the Service Item Menu for the Starboard Controller. Plug in the Starboard Actuator so that both Actuator Cables are plugged into the Distribution Module.
- Page 21 Diagnostics will test the mechanical travel, direction of motion, and communication of the Seakeeper Ride system prior to sea trialing. Please pay attention to which Controller side (port or star) you are diagnosing, so the movement of the Controller matches the indicated movement on the Ride App Screen Note: Diagnostics will be completed twice to check that both Actuators are functioning correctly.
- Page 22 6/21/24, 9:02 AM Seakeeper Ride | Commissioning Instructions – Seakeeper Manuals https://manuals.seakeeper.com/ride/seakeeper-ride-commissioning-instructions/?print=true 22/41...
- Page 23 6/21/24, 9:02 AM Seakeeper Ride | Commissioning Instructions – Seakeeper Manuals Note: You must fully deploy the Blade before you press Next. https://manuals.seakeeper.com/ride/seakeeper-ride-commissioning-instructions/?print=true 23/41...
-
Page 24: Factory Reset
6/21/24, 9:02 AM Seakeeper Ride | Commissioning Instructions – Seakeeper Manuals Note: You must retract the Blade fully to its Zero position before you press ‘Next’. Factory Reset https://manuals.seakeeper.com/ride/seakeeper-ride-commissioning-instructions/?print=true 24/41... - Page 25 Seakeeper Ride equipment not functioning until a full commissioning is completed again. The Seakeeper Ride Factory Reset feature will wipe the entire Ride system and restore it to factory default settings. By pressing ‘RESET’, the system will restart, and a full reinstallation procedure will be required.
- Page 26 Controllers may have limited range based on these factors. Refer to the table below for more information and see the Seakeeper Ride Operation Manual Section 2.1 and Section 2.2 for home screen controls. If the Seakeeper Ride system has not been commissioned previously, then please follow the Section 3 – First Installation Commissioning steps. https://manuals.seakeeper.com/ride/seakeeper-ride-commissioning-instructions/?print=true 26/41...
- Page 27 This step must be performed on the rst start of the Seakeeper Ride System to make the system operational. Only under extenuating circumstances will the Advanced Mode need to be accessed following the rst start. The operator...
- Page 28 Seakeeper Ride | Commissioning Instructions – Seakeeper Manuals 5. Even if the Con guration Condition shows Satis ed, the con guration must be completed before the Seakeeper Ride system is operational. See the following steps below. 6. To begin the Con guration Mode, select Enabled.
-
Page 29: Angle Calibration
Seakeeper Ride | Commissioning Instructions – Seakeeper Manuals 6. Angle Calibration Angle calibration adjusts the sensors in the Seakeeper Ride system to match the detected horizon, providing a target attitude used during Auto Mode operation. Once the Seakeeper Ride is in operation, the system will adjust the boat’s attitude to match the horizon as calibrated during this... - Page 30 6/21/24, 9:02 AM Seakeeper Ride | Commissioning Instructions – Seakeeper Manuals 1. From the Home Screen, press the Settings icon on the bottom right of the display. 2. Select the Install screen in the top right of the display. 3. Select Angle Calibration.
- Page 31 Note: Both options must be selected before choosing the option you want in order for the system to recognize your selection. The Inertial Measurement Unit (IMU) provides angle and speed information to the Seakeeper Ride system to allow for dynamic damping of the boat’s motions. The IMU Orientation programs the system to be aware of the IMU’s relation to the boat.
- Page 32 6/21/24, 9:02 AM Seakeeper Ride | Commissioning Instructions – Seakeeper Manuals 8. Controller Configuration Controller Con guration will program the Software Module to determine three (3) critical items: The side of the boat the Controller is on The fully retracted position...
- Page 33 6/21/24, 9:02 AM Seakeeper Ride | Commissioning Instructions – Seakeeper Manuals 5. Select Assign. 6. Move the Blade such that it is ush with the Seal Plate (right). 7. Select Zero. 8. Select the Cable Routing Side based on if the Actuator Cable is on the port or starboard side of the Controller.
- Page 34 6/21/24, 9:02 AM Seakeeper Ride | Commissioning Instructions – Seakeeper Manuals 9. Unplug the port side Controller from the Distribution Module. 10. Repeat steps 2-9 for the starboard Controller. Use the arrows on the screen to alternate between port and starboard after plugging in the Controllers.
- Page 35 6/21/24, 9:02 AM Seakeeper Ride | Commissioning Instructions – Seakeeper Manuals 9. Exiting Advanced Mode To exit advanced mode: 1. Under Con guration Mode, select Disabled 2. Select Exit Advanced. Rebooting the system after any con guration to make sure all settings are saved and applied.
-
Page 36: Testing The System
GPS connection. Testing is best done with the boat out of the water, allowing the Controllers to be seen more clearly. If the Seakeeper Ride system does not perform as indicated in any of these steps, return to the previous sections and repeat the associated procedures as necessary. - Page 37 Note: The speed of the boat, GPS connection, and the system being in Auto or Manual mode will all in uence how Seakeeper Ride behaves. Even if Seakeeper Ride is set up correctly, the Controllers may have limited range based on these factors. Refer to the table below for more information, and see the Seakeeper Ride Operation Manual Section 2.1...
- Page 38 6/21/24, 9:02 AM Seakeeper Ride | Commissioning Instructions – Seakeeper Manuals Auto Mode Manual Mode trimmed with the directional arrows. Blades will deploy as Blades can be moved to the Connected, Good Signal described above in the maximum range allowed by ‘Speed’...
- Page 39 The default TCC setup is designed to work well for all boats equipped with Seakeeper Ride. If Seakeeper Ride is being commissioned at an OEM boat builder and a desired TCC setup is known for a particular model of boat, those settings may be applied at this time. Otherwise, it is recommended to wait to customize the TCC until testing the performance of the boat in the water.
- Page 40 6/21/24, 9:02 AM Seakeeper Ride | Commissioning Instructions – Seakeeper Manuals For more information on the TCC and instructions on customization, see Section 3.3 of the Seakeeper Ride Operation Manual. https://manuals.seakeeper.com/ride/seakeeper-ride-commissioning-instructions/?print=true 40/41...
-
Page 41: Troubleshooting
However, there may be issues resulting from an incorrect electrical installation, which could include, a loose wire, incorrect wiring, missing components, etc. Visit the tables in the Seakeeper Ride Troubleshooting Guide to help identify possible causes of the issue and nd the solution.
Need help?
Do you have a question about the Ride and is the answer not in the manual?
Questions and answers