Table of Contents
Advertisement
Quick Links
Advertisement
Table of Contents

Related Manuals for AmScope PZ300 Series


Summary of Contents for AmScope PZ300 Series
- Page 1 POLARIZING MICROSCOPE PZ300 SERIES INSTRUCTIONS This instruction manual is for the operation guide, troubleshooting and maintenance of PZ300 Polarizing Microscope. Please study this manual thoroughly before operating and keep it with the instrument.
-
Page 2: Table Of Contents
PZ300 SERIES Catalogue Before Use ……………………………………………………………………………….1 1. Nomenclature …………………………………………………………………………………..3 2. Assembling 2-1 Assembling scheme.……………………………………………………….……………3 2-2 Assembling step…………………………………………………………………………4 …………………………………………………………………………….……..6 3. Operation 3-1 Mono-polarizing observation 3-1-1 Setting illumination…………………………………………………………6 3-1-2 Adjusting focus…………………………………………………………….6 3-1-3 Adjusting focusing tension……..……………………………..……………..7 3-1-4 Adjusting the diopter..………………………………………..…………….7 3-1-5 Adjusting the interpupillary distance...…………………………………….7 3-1-6 Using the eye-cap...………………………………………………………7... - Page 3 PZ300 SERIES Before using 1. Operation 1. As then microscope is a precision instrument, always operate Handing position it with care, avoiding physical shake during the operation. 2. Do not let the microscope exposed in the direct sun light, neither in high temperature, damp, dusty or acute shake place.
-
Page 4: Nomenclature
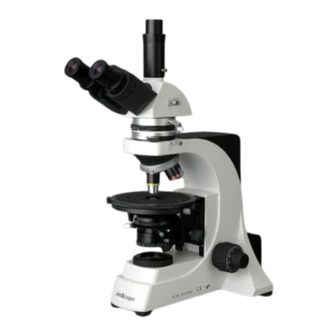
PZ300 SERIES 1. Nomenclature Interpupillary Eye-Cap Diopter adjustment ring Eyepiece Binocular head distance pointer Midst head Objective nosepiece Coarse focusing knob Objective Stage clip Light group Rotatable stage Condenser (with polarizer group) Field stand Fine focusing knob Mirror Stand Field diaphragm... - Page 5 PZ300 SERIES Lock screw for photo/TV adapter Trinocular head Optical path selecting pole Lock screw for Centering Bertrand lens Switch turntable of Bertrand lens Analyzer Lock screw for midst head Compensator Lock screw for stage The adjusting ring of Aperture diaphragm...
-
Page 6: Assembling
PZ300 SERIES 2. Assembling 2-1 Assembling scheme : Numbers denote the assembling order. ★Before assembling, make sure there is no dust or dirt. Assemble carefully and do not scrap any part or touch the glass surface. Eyepiece Head Midst head... -
Page 7: Assembling Step
PZ300 SERIES 2-2 Assembling steps: 2-2-1 Assembling the halogen bulb Hold the bulb ① with clean glove or gauze and insert the pins ② to the jack ③. Make sure the bulb is vertical. ★Don’t touch the bulb with finger. If there is a fingerprint, Carefully wipe off with tissue moistened with a little of 3:7 mixture of alcohol and ether or dimethylbenzene. - Page 8 PZ300 SERIES 2-2-5 Assembling the Objective Rotate the coarse focusing knob to lower the stage. Install the objective into the microscope nosepiece from the lowest magnification to the highest in a clockwise direction from the rear. (See fig.5) ★The 10X objective should be on the hole which center could not be adjusted.
-
Page 9: Operation
PZ300 SERIES 2-2-9 Connecting the electric cord (1) Make sure the switch① is on“O”(OFF).(See fig.9) (2) Insert the power cord to the socket ② of the stand. (3) Connect the power cord to the power supply outlet. ★Don’t use big force when the cord is bent or twisted. -
Page 10: Adjusting Focusing Tension
PZ300 SERIES 3-1-3 Adjusting focusing tension If the handle is too tight when adjusting, or the specimen Tighten leaves the focus plane after focusing, or the stage declines Loose itself, you can solve the problem by adjusting the tension adjustment ring①. (See fig.12) Fig.12... -
Page 11: Adjusting Objective Center
PZ300 SERIES 3-1-7 Adjusting objective center All the objective center can be adjusted except the 10X objective. Plug the two 1.5mm hex spanners into the hex bolt holes① on the corresponding objective nosepiece (see fig. 16 ). Adjusting the objective center to the same center of the rotatable stage. -
Page 12: Adjusting Field Diaphragm
PZ300 SERIES (8) In use, you can enlarge the field diaphragm a bit and Image of aperture diaphragm(inner) make the image a little larger than the field of view. 3-1-9 Adjusting field diaphragm By limiting diameter of the beam entering the condenser, the field diaphragm can prevent other light and strengthen the image reflection. -
Page 13: H-V Polarizing Observation
PZ300 SERIES Observation H-V(horizontal & vertical) polarizing observation is based on the mono-polarizing observation. Mount the analyzer without Bertrand. The polarizer and the analyzer are vibrated vertically. It is mainly used in observing the extinction and interference color of crystal. -
Page 14: Using Compensator
PZ300 SERIES 3-2-5 Using compensator The compensator ① is inserted in the slot of the midst head in 45°declined. The side with alphabetic character is up side. The λ , λ /4 and dustproof board should be inserted thoroughly, and the quartz chock could also be inserted if necessary. -
Page 15: Using Trinocular Viewing Head And The Tv/Photo Mount Adapter
PZ300 SERIES Using trinocular viewing head and the TV/Photo mount adapter 3-4-1 Choosing the optical path The light path selecting pole①controls the rate of energy of light between the binocular and trinocular. When①is pushed to the innermost, all light enters the binocular;... -
Page 16: Specification
PZ300 SERIES 4. Specification PZ300 Series Laboratory Polarizing Microscope Specification Color corrected infinity optical system(CCIS) Optical Infinity plan destressing objective 4X, 10X, 20X, 40XS, 100XS Objective PL10X22mm high eye-point plan eyepiece Eyepiece PL10X22mm high eye-point plan eyepiece with reticle Gemel type of binocular head, 30° inclined, Head Gemel type of trinocular head, 30°... -
Page 17: Troubleshooting
PZ300 SERIES 5. Trouble Shooting Problem Cause Remedy Optics The bulb is lit but it Field diaphragm is not large enough Largen the field diaphragm is dark in viewing Raise the condenser Condenser is too low field when doing Mono-polarizing... - Page 18 PZ300 SERIES Problem Cause Remedy (6)The eyes feel tired Interpupillary distance is wrong Adjust the interpupillary distance easily. The right field Diopter adjustment is wrong. Adjust the diopter of view doesn’t superpose with the The eyepieces for the right are different from Use the same eyepieces left.
Need help?
Do you have a question about the PZ300 Series and is the answer not in the manual?
Questions and answers