Table of Contents
Advertisement
Available languages
Available languages
Quick Links
Advertisement
Table of Contents

Related Manuals for urmet domus 2VOICE VOG 5W


Summary of Contents for urmet domus 2VOICE VOG 5W
- Page 1 Mod. 1760 DS1760-015B LBT21110 VIDEOCITOFONO 2VOICE VIVAVOCE WiFi VIDEO DOOR PHONE 2VOICE HANDS-FREE WiFi Interactive Links AAAAAAAAA Sch./Ref. 1760/15 (nero / black) Sch./Ref. 1760/16 (bianco / white) LIBRETTO D’USO USER BOOKLET...
-
Page 2: Table Of Contents
Interactive Links Nel documento sono presenti LINK INTERATTIVI per rendere la consultazione più rapida ed efficiente. ITALIANO INDICE 1. DESCRIZIONE GENERALE ........................3 2. DESCRIZIONE DEI COMPONENTI E CARATTERISTICHE ..............3 3. FUNZIONE PULSANTI ..........................4 3.1 SEGNALAZIONI STATO LED ...................... -
Page 3: Descrizione Generale
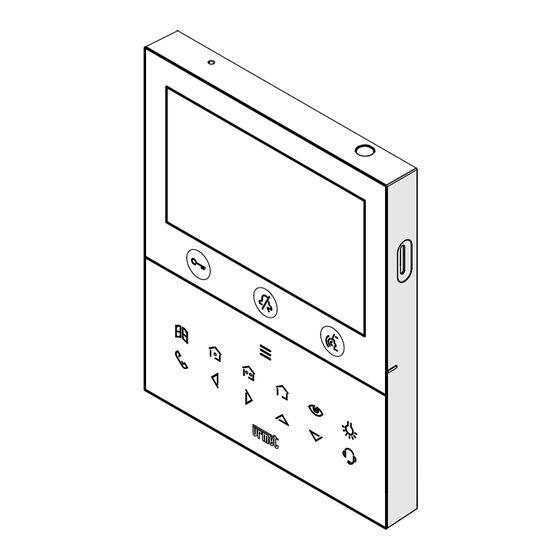
DESCRIZIONE GENERALE I videocitofoni Sch. 1760/15 e Sch. 1760/16 sono dedicati all’utilizzo in impianti videocitofonici del sistema 2Voice. Le caratteristiche principali sono: • schermo a colori TFT-LCD da 5’’ (Wide Angle); • pulsanti soft-touch retroilluminati (*); • possibilità di attivazioni delle funzioni del videocitofono tramite comandi gestuali sul sensore IR o tramite comandi vocali (di default disabilitate);... -
Page 4: Funzione Pulsanti
: tasto menu pulsanti Yokis : tasto autoinserzione / palleggiamento video : tasto funzione speciale : tasto chiamata intercomunicante : tasto freccia scorrimento verso sinistra : tasto freccia scorrimento verso destra : tasto freccia scorrimento verso l’alto : tasto freccia scorrimento verso il basso : tasto chiamata al centralino Tasto per l’attivazione delle funzioni secondarie / accensione del display (con led verde di... - Page 5 A RIPOSO IN ATTESA IN FONIA INVIO CHIAMATE FUNZIONI HOMEPAGE Stato RISPOSTA SECONDARIE (videocitofono (ricezione della (in comunicazione (riposo e singola (riposo e singola (riposo e doppia in stand by) chiamata) con altro pressione sul pressione sul pressione sul dispositivo) tasto tasto tasto...
- Page 6 A RIPOSO IN ATTESA IN FONIA INVIO CHIAMATE FUNZIONI HOMEPAGE Stato RISPOSTA SECONDARIE (videocitofono (ricezione della (in comunicazione (riposo e singola (riposo e singola (riposo e doppia in stand by) chiamata) con altro pressione sul pressione sul pressione sul dispositivo) tasto tasto tasto...
-
Page 7: Segnalazioni Stato Led
3.1. SEGNALAZIONI STATO LED DEI PULSANTI A RIPOSO IN ATTESA IN FONIA INVIO FUNZIONI HOMEPAGE Stato RISPOSTA CHIAMATE SECONDARIE (videocitofono in stand by) (ricezione (riposo e (riposo e (riposo della comunicazione singola singola e doppia chiamata) con altro pressione sul pressione sul pressione sul dispositivo) -
Page 8: Prestazioni
A RIPOSO IN ATTESA IN FONIA INVIO FUNZIONI HOMEPAGE Stato RISPOSTA CHIAMATE SECONDARIE (videocitofono in stand by) (ricezione (riposo e (riposo e (riposo della comunicazione singola singola e doppia chiamata) con altro pressione sul pressione sul pressione sul dispositivo) tasto tasto tasto Tasto... -
Page 9: Ricezione E Risposta A Una Chiamata Intercomunicante
Le screenshoot posso essere acquisite sia nello stato di “Ricezione della chiamata” sia nello stato di “Fonia”. Premendo il tasto si entra in comunicazione con il chiamante (il led del tasto inizia a lampeggiare). Premendo nuovamente il tasto la comunicazione viene chiusa e il display si spegne. 4.2. -
Page 10: Ricezione E Risposta A Una Chiamata Proveniente Da Centralino
4.3. RICEZIONE E RISPOSTA A UNA CHIAMATA PROVENIENTE DA CENTRALINO Quando il videocitofono riceve una chiamata da centralino squilla e visualizza la seguente schermata sul display: Premendo il tasto si entra in comunicazione con il centralino e il led del tasto inizia a lampeggiare. Il display visualizza la seguente schermata: Premendo nuovamente il tasto la comunicazione viene chiusa. -
Page 11: Chiamata Al Centralino O Chiamata Intercomunicante
4.5. CHIAMATA AL CENTRALINO O CHIAMATA INTERCOMUNICANTE CHIAMATA AL CENTRALINO Questa funzione permette di entrare in comunicazione con il centralino di portineria. Per effettuare una chiamata procedere nel seguente modo: con il videocitofono nella condizione di “RIPOSO” premere il tasto , i tasti si accenderanno con luce fissa, premere il tasto per avviare la chiamata. - Page 12 Il display visualizzerà la seguente schermata: Per i soli videocitofoni configurati in modalità Condominio e Palazzina, l’accesso alla rubrica videocitofonica è consentito solamente ad un solo dispositivo alla volta, per un tempo massimo di 5 minuti. Nel caso un utente provi ad accedere alla rubrica quando è già in uso su un altro dispositivo, il videocitofono emetterà un tono di dissuasione (4 beep) a indicare che non è possibile visualizzare momentaneamente la rubrica. Premere i tasti per selezionare il contatto in rubrica da chiamare, successivamente premere il tasto per avviare la chiamata.
-
Page 13: Autoinserzione
Premendo i seguenti tasti è possibile attivare la relativa funzione (per maggiori dettagli Funzione pulsanti). vedere capitolo Premendo nuovamente il tasto la comunicazione viene chiusa. 4.6. AUTOINSERZIONE La funzione di autoinserzione permette di visualizzare sul display del videocitofono l’immagine ripresa dalle postazioni di chiamata nell’impianto. -
Page 14: Chiamata Al Piano
4.8. CHIAMATA AL PIANO In caso di ricezione della chiamata al piano, il videocitofono emette lo squillo di chiamata con la melodia scelta dall’utente. La funzione è disponibile solo se è stato collegato un tasto ai morsetti denominati “CP”. Se il videocitofono è configurato nella modalità Alimentazione locale, alla ricezione della chiamata il display visualizza la seguente schermata: 4.9. ALLARME PANICO La segnalazione di allarme panico viene inviata dal videocitofono al centralino di portineria presente nell’impianto e a tutti gli smartphone in cui è... -
Page 15: Reset Dell'allarme Panico
4.9.1 RESET DELL’ALLARME PANICO Dopo aver inviato la segnalazione di allarme panico è possibile resettare l’invio della segnalazione dal videocitofono. Accedere alla Homepage del videocitofono premendo 2 volte il tasto quando il videocitofono è a riposo. Il display visualizza la seguente schermata: In basso a sinistra viene visualizzata la seguente icona che permette di resettare l’invio dell’allarme panico. -
Page 16: Funzionamento Con Protesi Acustica
4.11. FUNZIONAMENTO CON PROTESI ACUSTICA Il videocitofono è dotato di un dispositivo che consente alle persone audiolese, dotate di apposito auricolare, di poter sentire chi sta parlando dalla postazione di chiamata o da altri videocitofoni in caso di chiamate da centralino. -
Page 17: Menu Pulsanti Yokis
4.13. MENU PULSANTI YOKIS Il videocitofono dispone di 8 pulsanti equivalenti a quelli di un telecomando Yokis. Importando la configurazione di un telecomando è possibile riprodurre l’attivazione di un pulsante attraverso il videocitofono esattamente come se fosse stato premuto il pulsante dal telecomando (per importare la configurazione di Libretto di configurazione parametri al capitolo “Comandi Yokis”). un telecomando Yokis vedere il Per accedere al menu Yokis premere il tasto quando il videocitofono è... -
Page 18: Configurazione Funzione Mute
Nella Homepage premere i tasti per selezionare una funzione o un parametro del videocitofono che si desidera impostare. Effettuata la selezione premere il tasto per confermare la selezione. Di seguito vengono illustrate nel dettaglio le configurazioni presenti sul dispositivo. 5.1 CONFIGURAZIONE FUNZIONE MUTE Il seguente parametro permette di configurare la tipologia di MUTE quando il tasto viene premuto per “Attivazione funzione MUTE”). -
Page 19: Attivazione Segreteria Videocitofonica (Solo Videocitofono Master)
5.3 ATTIVAZIONE SEGRETERIA VIDEOCITOFONICA (SOLO VIDEOCITOFONO MASTER) La funzione consente la registrazione automatica di una videoclip a seguito di una chiamata. La durata della videoclip è di 10 secondi. Nella Homepage selezionare l’icona e premere il tasto per abilitare la funzione di segreteria videocitofonica. - Page 20 Premere i tasti per selezionare la videoclip o la screenshot, successivamente premere il tasto per la visualizzazione. Ogni videoclip e screenshot salvate riportano la date e l’ora in cui sono state effettuate. Il pallino rosso posizionato sulla destra indica che la videoclip o la screenshot non è ancora stata visualizzata. Premendo il tasto è...
-
Page 21: Funzioni Speciali
5.5 FUNZIONI SPECIALI Il videocitofono è abilitato alla gestione di attuatori elettrici tramite le decodifiche speciali Sch. 1083/80. Nella Homepage selezionare la seguente icona , successivamente premere il tasto per visualizzare sul display la schermata con la lista delle funzioni speciali programmate (per maggiori informazioni su come Libretto di configurazione parametri aggiungere un’attivazione di una funzione speciale vedere il capitolo “Attivazioni”). -
Page 22: Pulizia Schermo
5.7 PULIZIA SCHERMO La funzione “Pulizia schermo” rende temporaneamente insensibili i tasti del videocitofono a qualsiasi pressione. Questa prestazione è utile per evitare di attivare involontariamente le funzioni del videocitofono quando si vuole pulire lo schermo. Nella Homepage selezionare la seguente icona , successivamente premere il tasto per attivare la funzione. -
Page 23: English
Interactive Links The document contains INTERACTIVE LINKS for faster and more efficient consultation. ENGLISH INDEX 1. GENERAL DESCRIPTION ........................24 2. DESCRIPTION OF COMPONENTS AND FEATURES ................24 3. BUTTON FUNCTIONS ..........................25 3.1 BUTTON LED STATUS SIGNALS ....................28 4. FEATURES ............................. 29 4.1 RECEIVING AND ANSWERING A CALL FROM A CALLING STATION ........ - Page 24 GENERAL DESCRIPTION The video door phones Ref. 1760/15 and Ref. 1760/16 are dedicated to use in 2Voice video door phone systems. The main features are: • colour 5’’ TFT-LCD screen (Wide Angle); • backlit soft-touch buttons (*); • possibility of activating video door phone functions via gesture commands on the IR detector or via voice commands (disabled by default);...
- Page 25 : auto-on / video switching key : special function key : intercom call key : left scrolling arrow key : right scrolling arrow key : upwards scrolling arrow key : downwards scrolling arrow key : switchboard call key Key for activation of secondary functions / display turning on (with green backlighting LED) Raised notches for vision-impaired Pedestrian door opener button...
- Page 26 State STAND-BY WAITING FOR IN VOICE MODE SENDING CALLS SECONDARY HOMEPAGE AN ANSWER FUNCTIONS (video door (receiving call) (communicating with (stand-by and key (stand-by and (stand-by and key phone in another device) pressed twice) pressed once) pressed stand-by mode) once) Button (Go to (Go to...
- Page 27 State STAND-BY WAITING FOR IN VOICE MODE SENDING CALLS SECONDARY HOMEPAGE AN ANSWER FUNCTIONS (video door (receiving call) (communicating with (stand-by and key (stand-by and key (stand-by and phone in another device) pressed twice) pressed once) pressed stand-by mode) once) Button Within the Within the OSD...
- Page 28 3.1. BUTTON LED STATUS SIGNALS STAND-BY WAITING IN VOICE MODE SENDING SECONDARY HOMEPAGE State FOR AN CALLS FUNCTIONS ANSWER (video door phone in stand-by (receiving call) (communicating (stand-by (stand-by and (stand-by mode) with another and key and key pressed device) pressed twice) pressed once) once)
- Page 29 State STAND-BY WAITING IN VOICE MODE SENDING SECONDARY HOMEPAGE FOR AN CALLS FUNCTIONS ANSWER (video door phone in stand-by (receiving call) (communicating (stand-by (stand-by and (stand-by mode) with another pressed and key and key device) once) pressed once) pressed twice) Button White on fixed White on fixed White on fixed...
- Page 30 Screenshots can be captured either in the state of “Receiving the call” and in the “Voice mode”. Press the key to establish a conversation with the caller (the LED of the key will start flashing). Press the key again to terminate the call and the display switches off. 4.2. RECEIVING AND ANSWERING AN INTERCOM CALL When the video door phone receives an intercom call, it rings and if it is configured in Local Power mode, the following screens also appear on the display: Press the key to answer the call and the key LED starts flashing.
- Page 31 4.3. RECEIVING AND ANSWERING A SWITCHBOARD CALL When the video door phone receives a call from the switchboard, it rings and the following screen appears on the display: Press the key to answer the call from the switchboard and the key LED starts flashing. The display shows the following screen: Press the key again to terminate the call.
- Page 32 4.5. SWITCHBOARD CALL OR INTERCOM CALL SWITCHBOARD CALL This function allows to establish a conversation with the gatekeeper lodge switchboard. Proceed as follows to make a call: with the video door phone in “STAND-BY” mode press the key , the keys will turn on with steady light, press the key to start the call.
- Page 33 Only for video door configured powered in Low rise block and High rise block modes, access to the video door phone book is permitted to one device at a time, for a maximum of 5 minutes. If a user tries to access the book when it is already used on another device, the video door phone will emit a dissuasion tone (4 beeps) indicating that the address book cannot be displayed at the moment. Press keys to select the contact in the book to be called, then press the key to start the call.
- Page 34 By pressing the following keys it is possible to activate the respective function (for Button function). further details see chapter Press the key again to terminate the call. 4.6. AUTO-ON FUNCTION The auto-on function makes it possible to display on the video door phone the image taken from the call stations in the system.
- Page 35 4.8. FLOOR CALL If a floor call is received, the video door phone starts ringing with the ringtone chosen by the user. The function is only available if a key has been connected to the “CP” terminals If the video door phone is configured in Local Power mode, the display will show the following screen when the call is received: 4.9. PANIC ALARM The panic alarm signal is sent from the video door phone to the switchboard in the system and to all smartphones in which the call forwarding function has been activated via the CallMe app.
- Page 36 4.9.1 RESET PANIC ALARM After sending the panic signalling alarm, it is possible to reset the sending of the signalling from the video door phone. Access the Homepage of the video door phone by pressing the key twice when the video door phone is in stand-by mode.
- Page 37 4.11. OPERATION WITH HEARING AIDS The video door phone is equipped with a device to allows people with hearing impairments, equipped with a special headset, to hear who is speaking from the call station or other video door phones in case of calls from the switchboard.
- Page 38 4.13. YOKIS BUTTON MENU The video door phone has 8 buttons equivalent to those of a Yokis remote control. By importing the configuration of a remote control, it is possible to reproduce the activation of a button through the video door phone exactly as if the button had been pressed from the remote control (to import the configuration Parameter configuration booklet in chapter “Yokis Commands”). of a Yokis remote control, see the To access the Yokis menu press the key when the video door phone is in STANDBY, then press the , key to display the following screen: For video door phones in High rise block or Low rise block mode, access to the Yokis activation...
- Page 39 On the Homepage, press keys to select a function or parameter of the video door phone that you wish to set. When selection has been made press the key to confirm the selection. The configurations on the device are explained in detail below. 5.1 MUTE FUNCTION CONFIGURATION The following parameter is used to configure the type of MUTE when the key is pressed for a long time function”).
- Page 40 5.3 ACTIVATION OF THE VIDEO DOOR PHONE VOICEMAIL (MASTER VIDEO DOOR PHONE ONLY) This function enables the automatic recording of a video clip following a call. The duration of the video clip is 10 seconds. On the homepage, select the icon and press the key to enable the video door phone voicemail function.
- Page 41 Press the keys to select the video clip or screenshot, then press the key to viewing. Each saved video clip and screenshot shows the date and time it was taken. The red dot to the right indicates that the video clip or screenshot has not yet been viewed. By pressing the key, the following icon can be selected to delete the single selected video clip...
- Page 42 5.5 SPECIAL FUNCTIONS The video door phone is enabled to manage electric actuators via special decoders Ref. 1083/80. On the Homepage select the following icon, then press the key to display the screen with the list of programmed special functions (for further information on how to add a special function activation see the Parameter configuration booklet in the “Activations”...
- Page 43 5.7 CLEAN SCREEN The “Clean Screen” function temporarily makes the video door phone keys insensitive to any action. This feature proves useful to avoid unintentionally activating the functions of the video door phone when cleaning the screen. On the Homepage, select the following icon and then press the key to activate the function.
- Page 44 DS1760-015B LBT21110 URMET S.p.A. Area tecnica 10154 TORINO (ITALY) servizio clienti +39 011.23.39.810 VIA BOLOGNA 188/C http://www.urmet.com Telef. +39 011.24.00.000 (RIC. AUT.) e-mail: info@urmet.com +39 011.24.00.300 - 323...
Need help?
Do you have a question about the 2VOICE VOG 5W and is the answer not in the manual?
Questions and answers