Advertisement
Quick Links
INSTALLATION INSTRUCTIONS
HydroGuard
Complete Retrofit
WARNING
!
Read this Manual BEFORE using this equipment.
Failure to read and follow all safety and use information
can result in death, serious personal injury, property
damage, or damage to the equipment.
Keep this Manual for future reference.
WARNING
!
Need for Periodic Inspection/Maintenance: This product must be
tested periodically in compliance with local codes, but at least once per
year or more as service conditions warrant. All products must be retest-
ed once maintenance has been performed. Corrosive water conditions,
inlet temperatures over 200°F (93°C), and/or unauthorized adjustments
or repair could render the product ineffective for the service intended.
Regular checking and cleaning of the product's internal components
helps assure maximum life and proper product function.
420 Retrofit Instructions
The following instructions explain how to retrofit your existing 420
HydroGuard to the new, enhanced version which utilizes a wax element
and cartridge type design.
The combination of these design concepts results in a valve with enhanced
performance. See the exploded view of this new assembly below:
Figure 1
420-451 KIT
Powers product specifications in U.S. customary units and metric are approximate and are provided for reference only. For precise measurements,
please contact Powers Technical Service. Powers reserves the right to change or modify product design, construction, specifications, or materials with-
out prior notice and without incurring any obligation to make such changes and modifications on Powers products previously or subsequently sold.
T/P Series e420
®
BONNET ASSEMBLY
O-RING
STEM
Before you begin your upgrade, take the time to ensure you have all the
necessary pieces. Your retrofit kit, for each valve, consists of the following
(refer to figure 1 when taking inventory):
1. Cartridge Assembly (w/2 O-rings).
2. Wax Element.
3. Bonnet Assembly.
4. Spline Temperature Limit Stop (2 pieces).
5. Bonnet O-Ring.
6. Lubricant.
7. Four (4) Bonnet Screws.
After you verify that you have everything needed to complete the retrofit,
proceed with the next section.
Retrofit
Follow the instructions below to perform your retrofit. Save all components
until you have successfully completed your retrofit.
Disassembly
1. Turn off hot & cold water supply-stops (required for this retrofit).
2. Remove the handle and trim plate.
3. Remove 4 bonnet screws and bonnet assembly.
4. Remove all internal components from valve body.
5. Remove hot water seat using 7/8" hex socket.
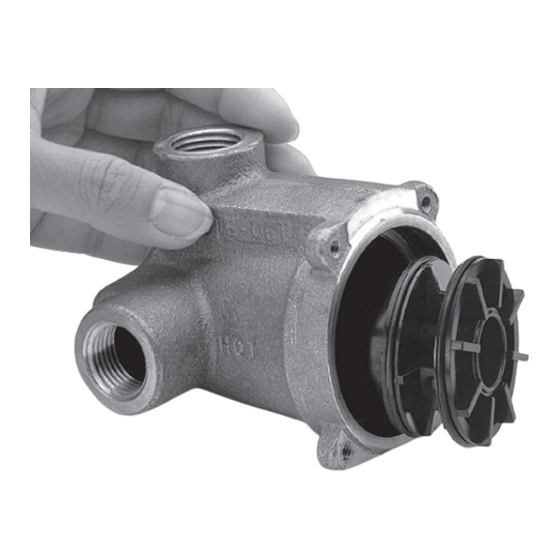
6. At this point you should have an empty valve body.
You are now ready to put the new components into your existing valve.
IS-P-420R
Figure 2
Advertisement

Related Manuals for Watts POWERS HydroGuard e420 T Series


Summary of Contents for Watts POWERS HydroGuard e420 T Series
- Page 1 IS-P-420R INSTALLATION INSTRUCTIONS HydroGuard T/P Series e420 ® Complete Retrofit WARNING Read this Manual BEFORE using this equipment. Failure to read and follow all safety and use information can result in death, serious personal injury, property damage, or damage to the equipment. Keep this Manual for future reference.
- Page 2 Reassembly CAUTION 1. Ensure the inside of the valve body is free of deposits and debris. Clean Any repair or modification of the valve may affect the high temperature as necessary. setting. The maximum temperature setting must be checked by the installer 2.
Need help?
Do you have a question about the POWERS HydroGuard e420 T Series and is the answer not in the manual?
Questions and answers