Table of Contents
Advertisement
Quick Links
Advertisement
Table of Contents

Related Manuals for NCR 1924-K006


Summary of Contents for NCR 1924-K006
- Page 1 Kit Instructions Quick Release Bracket 1924-K006 Issue A...
- Page 2 NCR, therefore, reserves the right to change specifications without prior notice. All features, functions, and operations described herein may not be marketed by NCR in all parts of the world. In some instances, photographs are of equipment prototypes. Therefore, before using this document, consult with your NCR representative or NCR office for information that is applicable and current.
-
Page 3: Table Of Contents
Table of Contents Quick Release Bracket Introduction Kit Contents Tools Needed Installation Procedures Install the Kitchen Controller VESA Bracket Radial Arm Installation Wall Mount Installation Install the Power Supply Brackets Install the Monitor VESA Bracket onto the Display Mount the Display Assembly onto the Kitchen Controller Bracket Mount the Kitchen Controller and the Power Supplies Connect the Cables... - Page 4 Revision Record Issue Date Remarks Dec 2017 First Issue...
-
Page 5: Quick Release Bracket
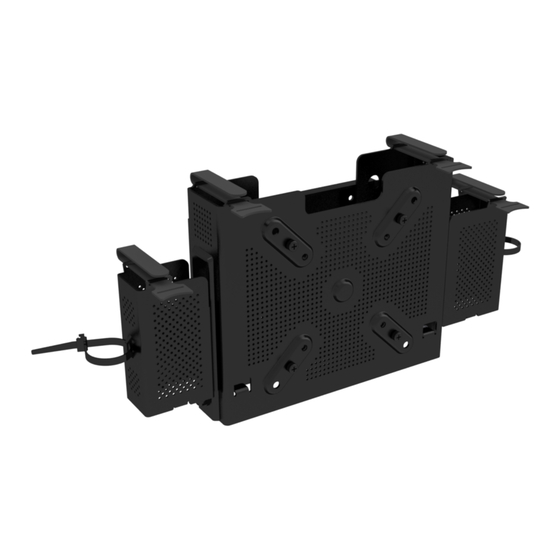
Quick Release Bracket Introduction This kit provides an easy solution for mounting the NCR Kitchen Controller to the back of the display while minimizing clutter and optimizing cable management. The KT2200 Kitchen Touch Display can be mounted to a properly specified VESA mounting (75-mm... -
Page 6: Kit Contents
Quick Release Bracket Kit Contents Item Part Number Description 497-0519070 Bracket, Kitchen Controller VESA 497-0519071 Bracket, Kitchen Controller International Power Supply 497-0519072 Bracket, Kitchen Controller Monitor Power Supply 497-0519617 Bracket, Monitor VESA Cable Tie, Black Retaining Strap, Black M4 x 10 Phillips Pan Head, SEMS Washer, Black... -
Page 7: Tools Needed
Quick Release Bracket Tools Needed • #2 Phillips screwdriver • Pencil or Marker • (4) 3/16-inch Toggle bolts or similar, depending on mounting substrate — supplied by customers... -
Page 8: Installation Procedures
Quick Release Bracket Installation Procedures Radial Arm Installation Installing the Quick Release Bracket to a radial arm involves the following procedures: 1. Install the Kitchen Controller VESA Bracket. 2. Install the Power Supply Brackets. 3. Install the Monitor VESA Bracket onto the Display. 4. -
Page 9: Install The Kitchen Controller Vesa Bracket
Quick Release Bracket Install the Kitchen Controller VESA Bracket Radial Arm Installation The Kitchen Controller VESA Bracket (KC4 bracket) is mounted directly onto the mounting plate of the radial arm. 1. Align the four holes on the KC4 bracket with the four holes on the radial arm mounting plate. - Page 10 Quick Release Bracket 2. Install the screws to secure the KC4 bracket to the radial arm mounting plate. Note: Do not fully tighten any screw on the first turn. Use a stepping method when tightening the screws. Tighten each screw a little at a time to evenly secure the KC4 bracket to the radial arm mounting plate.
-
Page 11: Wall Mount Installation
Quick Release Bracket Wall Mount Installation The Kitchen Controller VESA Bracket (KC4 bracket) is mounted directly onto the wall by using toggle bolts or similar. 1. Mark the screw holes. a. Using the KC4 bracket as a template, hold the bracket against the wall and mark the four holes. -
Page 12: Install The Power Supply Brackets
Quick Release Bracket Install the Power Supply Brackets The two power supply brackets are installed at each side of the KC4 bracket. • To install the power supply bracket, insert its hook into the hole at the side of the KC4 bracket, and then tighten the thumb screw at the bottom. -
Page 13: Install The Monitor Vesa Bracket Onto The Display
Quick Release Bracket Install the Monitor VESA Bracket onto the Display The KT2200 Kitchen Touch Display is mounted to the KC4 Bracket by using the Monitor VESA Bracket. 1. Place the display face down on a flat and smooth surface. 2. -
Page 14: Mount The Display Assembly Onto The Kitchen Controller Bracket
1-10 Quick Release Bracket Mount the Display Assembly onto the Kitchen Controller Bracket The quick release feature of the Monitor VESA Bracket makes it easier to mount the display assembly to the KC4 Bracket. Note: In the following images, the display is not shown for clarity. 1. -
Page 15: Mount The Kitchen Controller And The Power Supplies
Quick Release Bracket 1-11 Mount the Kitchen Controller and the Power Supplies The kitchen controller, its power supply, and the display power supply have designated brackets for mounting. Note: The KC4 power supply used in this procedure is an International power supply. 1. -
Page 16: Connect The Cables
1-12 Quick Release Bracket Connect the Cables Warning: Before connecting the cables, ensure that the kitchen controller and the display are turned off. KC4 Kitchen Controller Cables To connect the kitchen controller cables and other components, refer to KC4 Kitchen Controller Cables on page 13. -
Page 17: Appendix A: Kc4 Kitchen Controller Cables
KC4 Kitchen Controller Cables Appendix A: This appendix covers the connectivity options for the KC4 and the procedures in setting up the hardware components of the KPS system, namely: • Power Supply on page 15 • Kitchen Display on page 15 • Bump Bar on page 16 •... -
Page 18: Connectivity Diagram
A-14 KC4 Kitchen Controller Cables Connectivity Diagram The image below shows the available connectivity options for the KC4. -
Page 19: Power Supply
KC4 Kitchen Controller Cables A-15 Power Supply The KC4 has an external power supply. Source power is drawn from a regular AC wall outlet. The universal power supply features a locking input connector to prevent unintentional detachment from the KC4. For International installations, there is a separate power supply, which has a detachable AC power cord that can be interchanged for different regions. -
Page 20: Bump Bar
A-16 KC4 Kitchen Controller Cables Bump Bar With the KPS Bump Bar, the user can “bump” or delete an inputted order from the queue. The Bump Bar is powered through the serial port from the KPS controller. To connect the Bump Bar to the KC4, plug the cable to the Serial Port on the rear IO panel. - Page 21 NCR Kitchen Controller. The image below shows the available connectivity options for the KT2200 Kitchen Touch Display. To connect the KT2200 Kitchen Touch Display to the NCR Kitchen Controller, do the following: 1. Turn off the Kitchen Controller and the Display.
Need help?
Do you have a question about the 1924-K006 and is the answer not in the manual?
Questions and answers