Table of Contents

Related Manuals for Feider Machines FAST200T


Summary of Contents for Feider Machines FAST200T
- Page 1 ORIGINAL INSTRUCTIONS INSTRUCTION MANUAL Leaf&litter vacuum FAST200T FEIDER ZI – 32, rue Aristide Bergès, 31270 Cugnaux, France Made in P.R.C. 2019 IMPORTANT: Read safety rules and instructions carefully before operating equipment.
-
Page 2: Table Of Contents
ORIGINAL INSTRUCTIONS CONTENT 1. Safety Labels Found on Your Unit....................2 2. PURPOSE............................5 3. Safety with petrol - Powered Machines..................6 4. General safety..........................6 5. PARTS IDENTIFICATION........................7 6. Technical data..........................8 7. Delivery............................8 8. Assembly............................9 9. Preparation for use.........................13 10. Operate the machine........................14 11. - Page 3 WARNING Read this Safety & Operating Instructions manual before you use the Leaf&Litter Vacuum. Become familiar with the operation and service recommendations to ensure the best performance of your machine. WARNING This indicates a hazardous situation, which, if not avoided, could result in death or serious injury. CAUTION This indicates a hazardous situation, which, if not avoided, could result in minor or moderate injury.
-
Page 4: Safety Labels Found On Your Unit
1: Safety Labels Found on Your Unit NO SMOKING WHEN REFUELLING. -
Page 5: Purpose
Always wear goggle and gloves. Guaranteed sound power level L 2. PURPOSE This vacuum is designed for picking up trash, organic material and other similar debris, must not be used for any other purpose. It should only be used by trained operators who are familiar with the content of this manual. It is potentially hazardous to fit or use any parts other than your dealer parts. -
Page 6: Safety With Petrol - Powered Machines
NOTICE A. Maintain strict discipline at all times and service machine at specified periods. B. DO NOT operate the machine whilst under the influence of alcohol or drugs. Protecting Yourself WARNING This is a high-powered machine, with moving parts operating with high energy. You must operate the machine safely. Always take the following precautions when using this machine: A. -
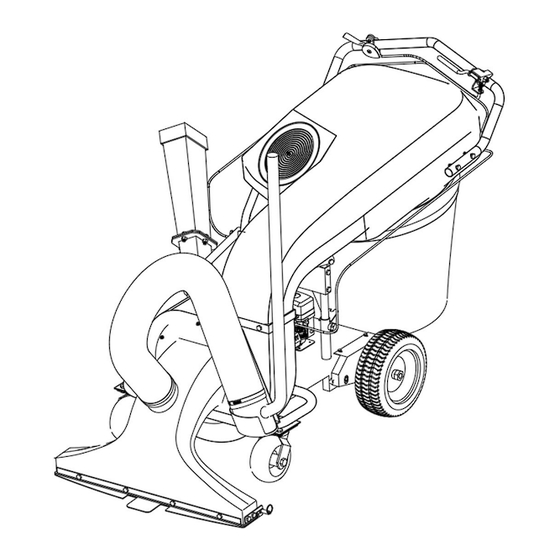
Page 7: Parts Identification
Vacuum. This includes all shields and guards. Modifications to your machine could cause personal injuries and property damage and will invalid your warranty. If the machine starts to make an unusual noise or vibrate, shut down the engine, disconnect the spark plug wire, keeping it away from the spark plug to prevent accidental starting, wait 5 minutes for engine to cool down, then inspect for damage. -
Page 8: Technical Data
6. Technical data Engine start Recoil Start Rated power 4.4kW(212cc) Speed 3600/min Engine: Fuel Capacity 3.6L Engine: Oil Capacity 0.6L Power Petrol/petrol 6-blade armor plate steel Chipping Capacity 50mm Overall Length 1700mm Overall Width 730mm Overall Height 1280mm Overall Weight 140KG Guaranteed sound power level L 111dB(A) -
Page 9: Assembly
8. Assembly At least two people are required for assembly. Install the assembly parts with the engine switched off. Installation steps 1 - 6 Setp 1: Loosen the two screws, nuts and washers left and right on the guide rail. Position the guide rail at the mounting holes located backwards on the suction channel. - Page 10 help and hold the handlebar. Fasten the guide bar to the suction channel with the previously loosened screws, nuts and washers. Step 2: Mount the collecting bag with the retaining bracket and the two clamp closures as follows: (1) Guide the grass catcher under the guide bracket forwards towards the engine. Position the metal ring from the collection bag over the opening of the suction channel.
- Page 11 Mount the suction nozzle on the housing Step 4: 1) Undo the 2 nuts and washers on the housing, to the left of the suction nozzle and insert the suction hose holder. 2) 12.4.2 Screw the bracket to the housing with the previously loosened nuts and washers. Mount holder for suction hose / hand extraction on housing.
- Page 12 Fix the suction hose on the suction nozzle. Step 6: Loosen the 4 screws, nuts and washers on the side feed hopper and remove the rubber seal. Place the rubber gasket on the pre-assembled intake for the funnel, to the right of the suction nozzle. Position the side feed hopper over the receptacle and secure the hopper with the previously loosened bolts, nuts and washers.
-
Page 13: Preparation For Use
9. Preparation for use WARNING You must not carry out the work described in this chapter until you have read and understood the safety instructions. It concerns your personal safety! CAUTION Engine oil must be topped up before first use! Faulty oil filling can lead to irreparable damage to the engine. In this case sellers and manufacturers distance themselves from any warranty service. -
Page 14: Operate The Machine
■ Do not point the suction nozzle or the suction hose at objects or people lying around before starting the machine. ■ The grass catcher must be completely closed before starting work. ■ Check if the motor switch is working. Start the engine and let it run for a few seconds. Turn the engine switch to OFF, the engine will stop immediately. - Page 15 Before use, ensure the maintenance plan has been carried out. Check that there is enough fuel in the fuel tank. Before starting the engine, all controls must be switched to neutral. Do not step in front of the machine when starting the engine. 1).
- Page 16 engine, the suction and chipping unit will continue to run for a few seconds. 4. Then push fuel tap (5) to the left to OFF / OFF to close. 5. Disconnect the spark plug connector so that accidental starting of the engine is not possible. = Protection against unauthorized use! WARNING After switching off the engine, the suction and...
- Page 17 The suction force is largely determined by the height adjustment of the suction nozzle, that is, the heavier the suction material, which is to be absorbed, the lower the suction nozzle should be. Very low on moist foliage, higher on dry foliage (about 3 cm).If A lower setting does not improve the suction result and may cause damage to the suction nozzle.
- Page 18 Suction nozzles flap 3). Guide the suction hose to the handlebar. 4). Hold the suction hose slightly down and move the end of the suction tube back and forth to pick up light debris. Shredding Branches and smaller branches up to max. 50 mm diameter can be fed to the cleaver via the side feed hopper. WARNING, Do not chop hardwood or lumber (with nails or screws).
-
Page 19: Maintenance
11. MAINTENANCE WARNING Improper maintenance or non-observance or non-rectification of a problem can become a source of danger during operation. Only operate regularly and properly maintained machines. Proper maintenance and lubrication help keep the machine in perfect working order. All persons performing maintenance on the machine must be technically qualified and trained accordingly. You must know all the dangers and risks associated with the machine. - Page 20 the manufacturer must be used. Never operate the machine without a collecting bag. Lubricate moving parts Lubricate every 30 hours with a few drops of light oil ■the height adjustment of the suction nozzle All bearing points on the machine are equipped with self-lubricating ball bearings, eliminating bearing lubrication. Mounting screws Regularly check all screw connections for tightness, retighten if necessary.
- Page 21 WARNING Hot surfaces. There are hot surface parts on the engine, such as the exhaust or engine cooling fins. Wait for the engine to cool down before performing any work on the engine. Check spark plug, clean and replace 1. Allow the engine to cool. 2.
-
Page 22: Transport / Storage
Maintenance Schedule Maintenance Before After After the After the 25hrs 30-50hrs 100hrs Annually work every use each use first 3hrs first 10hrs necessary Check the ■√ machine Check motor ■√ switch Protective devices ■√ check Check fastening ■√ ■√ screws, retighten Refuel and check oil... - Page 23 ■ Only use suitable and tested tools for loading and securing the load on or in vehicles. ■ Secure the machine on the transport vehicle to prevent it from rolling, slipping or tipping over and, in addition, lash it down with tension straps, chains or ropes at suitable points. ■...
-
Page 24: Troubleshooting Table
13. Troubleshooting Table Before any troubleshooting ■ Switch off the machine ■ Wait for the tools to stop ■ Disconnect the spark plug connector SYMPTOM POSSIBLE CAUSE => Is the ignition switch in the “ON” position? The engine won’t start. =>... -
Page 25: Ce Declaration
Tel : +33 (0)5.34.502.502 : +33 (0)5.34.502.503 States that the designated below machine: Model: Leaf&litter vacuum FAST200T Serial number: 20190829458-20190829477 is in confirmity with the essential requirements and other relavant provisions of the applicable European Directives,based on the application of European harmonized standerds. - Page 26 ORIGINAL INSTRUCTIONS...
Need help?
Do you have a question about the FAST200T and is the answer not in the manual?
Questions and answers