Table of Contents
Advertisement
Available languages
Available languages
Quick Links
XP 90 K
XBC 901 K
Piano di cottura
Istruzioni per l'uso e l'installazione
Hob
Instructions for use and installation
Plan de cuisson
Instruction pour l'utilisation et l'installation
Kochplatte
Gebrauchs- und Installationsanleitungen
kookplaat
Instructies voor het gebruik en installeren
Planos de cocción
Instrucciones para el uso y la instalación
Planos de cozedura
Instruções para o uso e a instalação
1
7
13
19
25
31
37
Advertisement
Table of Contents

Related Manuals for Ariston XP 90 K


Summary of Contents for Ariston XP 90 K
- Page 1 XP 90 K XBC 901 K Piano di cottura Istruzioni per l'uso e l'installazione Instructions for use and installation Plan de cuisson Instruction pour l'utilisation et l'installation Kochplatte Gebrauchs- und Installationsanleitungen kookplaat Instructies voor het gebruik en installeren Planos de cocción Instrucciones para el uso y la instalación...
- Page 2 La ringraziamo per aver scelto un prodotto Ariston, sicuro e davvero facile da usare. Per conoscerlo, utilizzarlo al meglio e a lungo, le consigliamo di leggere questo manuale. Grazie. AVVERTENZE • non lasciare esposto l’apparecchio ad agenti atmosferi- 1 Questo apparecchio è stato concepito per un uso di ci (pioggia, sole, ecc.)
-
Page 3: Visto Da Vicino
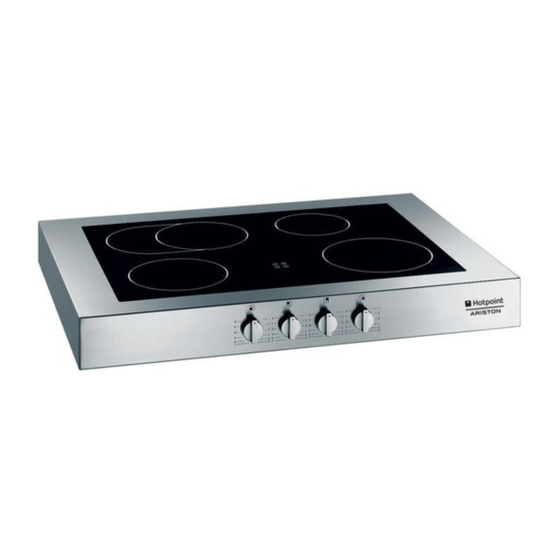
VISTO DA VICINO A Elemento radiante 1500 W / 2500 W B Elemento radiante 1200 W C Elemento radiante / alogeno 1800 W D Elemento radiante / alogeno 2200 W E Spie di calore residuo M Manopole di comando degli elementi riscaldanti COME UTILIZZARLO Descrizione degli elementi riscaldanti Tabella 1... - Page 4 COME UTILIZZARLO • Accertatevi che la base delle pentole sia sempre asciut- Le manopole di comando ta e pulita, per garantire un buon contatto ed una lunga Ciascuna zona di cottura è dotata di una manopola di co- durata delle piastre e delle pentole stesse. mando "M"...
- Page 5 COME TENERLO IN FORMA Pulire il piano di cottura quando è tiepido; utilizzare un pro- Mantenete sempre il piano pulito. Prima di pulirlo assicura- dotto di pulizia adatto e carta da cucina, strofinare con un tevi che il piano sia spento e che sia freddo. panno umido ed asciugare.
-
Page 6: Istruzioni Per L'installatore
ISTRUZIONI PER L'INSTALLATORE Le istruzioni che seguono sono rivolte all’installatore qualificato affinché compia le operazioni di installazione, regolazione e manutenzione tecnica nel modo più corretto e secondo le norme in vigore. Importante: qualsiasi intervento di regolazione, manutenzione, ecc. deve essere eseguito con il piano elettricamente disinserito. - Page 7 Allacciamento del cavo di alimentazione alla rete Collegamento elettrico Montare sul cavo una spina normalizzata per il carico indi- OBBLIGATORIO IL COLLEGAMENTO A TERRA cato sulla targhetta caratteristiche, nel caso di collegamen- DELL’APPARECCHIATURA. to diretto alla rete è necessario interporre tra l’apparecchio Il piano è...
- Page 8 Congratulations on choosing an Ariston appliance, which you will find is dependable and easy to use. We recommend that you read this manual for best performance and to extend the life of your appliance. Thank you. RECOMMENDATIONS 13 Before doing any cleaning or maintenance work on the...
-
Page 9: Close-Up View
CLOSE-UP VIEW A Electrical heating element 1500 W / 2500 W B Electrical heating element 1200 W C Combined halogen and electrical heating element 1800 W D Combined halogen and electrical heating element 2200 W E Residual heat indicator lights M Heating elements control knobs HOW TO USE YOUR APPLIANCE Table 1... - Page 10 The control knobs • Make sure that the bottom of the cookware is always clean Each cooking area is equipped with a control knob "M" to and dry to provide good contact between the cooking regulate the temperature at any time from a minimum of 1 to surface and the cookware.
-
Page 11: How To Keep Your Cooktop In Shape
HOW TO KEEP YOUR COOKTOP IN SHAPE Always keep the surface of the cooktop clean. However, Clean the cooktop when it is warm, using a suitable cleaning before cleaning, make sure that the cooktop has been turned product and paper towels, then rub with a damp cloth, and off and is no longer hot. -
Page 12: Instructions For The Installer
INSTRUCTIONS FOR THE INSTALLER The following instructions are provided for qualified installers so that they may accomplish installation, adjustment and technical maintenance operations correctly and in compliance with current regulations and standards. Important: the hob should be disconnected from the 180cm²... - Page 13 Electrical connection Connecting the supply cable to the mains THE APPLIANCE MUST BE EARTHED Fasten the appropriate standard plug for the load indicated The cooktop is designed to work with alternating current at the rating plate to the cable. If the appliance must be directly the supply voltage and frequency indicated on the rating plate connected to the mains, a multipolar switch must be installed (situated under the hob or at the end of the instruction...
- Page 14 Merci d'avoir choisi un produit Ariston, fiable et facile à utiliser. Pour mieux le connaître et l'utiliser le plus longtemps possible, nous vous conseillons de lire attentivement ce livret. AVERTISSEMENTS • ne pas laisser utiliser l’appareil, sans surveillance, par 1 Cet appareil a été conçu pour une utilisation non des enfants ou des personnes incapables de le faire.
-
Page 15: Comment L'utiliser
VU DE PRÈS A Élément radiant 1500 W / 2500 W B Élément radiant 1200 W C Élément radiant / halogène 1800 W D Élément radiant / halogène 2200 W E Voyant chaleur résiduelle M Manettes de commande COMMENT L'UTILISER Description des éléments chauffants Tableau 1 Les éléments radiants sont formés par des résistances... - Page 16 • Veillez à ce que la base des casseroles soit toujours bien Les manettes de commande sèche et propre, pour garantir un bon contact et une Chaque zone de chauffe est dotée d’une manette "M" pour longue durée de vie des foyers mais aussi des casseroles. le réglage constant de la température, allant de 1, pos.
- Page 17 COMMENT LE GARDER EN FORME Gardez toujours propre votre plan de cuisson. Avant de Nettoyez le plan de cuisson lorsqu’elle est tiède; utilisez un procéder à son entretien, vérifiez si les zones de chauffes produit d’entretien approprié et du papier cuisine, passez sont bien éteintes et absolument froides.
-
Page 18: Instructions Pour L'installation
INSTRUCTIONS POUR L'INSTALLATION Les instructions qui suivent s’adressent à l’installateur qualifié afin qu’il exécute les opérations d’installation, réglage et entretien technique conformément aux normes en vigueur. Important: avant d’effectuer toute opération de réglage, entretien, etc., assurez-vous que le plan de cuisson soit déconnecté... - Page 19 Branchement électrique Branchement du câble d’alimentation à la ligne L’APPAREIL DOIT NECESSAIREMENT ÊTRE RELIÉ A LA électrique TERRE. Montez sur le câble une fiche normalisée pour la charge Le plan est prédisposé pour fonctionner en courant alternatif figurant sur la plaquette des caractéristiques; en cas de à...
- Page 20 Herzlichen Glückwunsch! Sie haben ein Haushaltsgerät gekauft, das unter Anwendung zeitgemäßer Technologien und hochwertiger Materialien hergestellt wurde. Während des Gebrauchs werden Sie die Funktionalität und die Sicherheit, konstante Merkmale unserer Produktion zu schätzen wissen. HINWEISE • 1 Dieses Gerät wurde für den Gebrauch nicht professioneller lassen Sie das Gerät nicht von unbeaufsichtigten Kindern Art in Haushalten konzipiert.
- Page 21 DRAUFSICHT A Strahlerelement 1500 W / 2500 W B Strahlerelement 1200 W C Kombi/Halogenstrahler 1800 W D Kombi/Halogenstrahler 2200 W E Restwärme-Kontrolleuchten M Schaltknöpfe BEDIENUNGSANWEISUNGEN Tabelle 1 Beschreibung der Heizelemente Bei den Strahlerelementen handelt es sich um kreisförmige Position Heizstrahler Heizwiderstände, die nach Einschalten in wenigen Sekunden glühend werden.
- Page 22 Schaltknöpfe • Der Geschirrboden muß sauber und trocken sein, um eine Jede Kochzone ist mit einem entsprechenden Schaltknopf perfekte Auflage auf der Kochzone und eine längere "M" ausgestattet, der eine stufenlose Einstellung der Lebensdauer Ihres Ceranfeldes und Ihrer Töpfe zu Temperatur von min.
-
Page 23: Reinigung Und Wartung
REINIGUNG UND WARTUNG Halten Sie das Ceranfeld stets perfekt sauber. Vergewissern Reinigen Sie das Ceranfeld, wenn es noch lauwarm ist; Sie sich vor der Reinigung, das sämtliche Kochzonen verwenden Sie ein geeignetes Reinigungsmittel und ausgeschaltet und erkaltet sind. Küchenpapier, reiben Sie es mit einem feuchten Tuch sauber und trocknen Sie mit Küchenpapier nach. -
Page 24: Anweisungen Für Den Installateur
ANWEISUNGEN FÜR DEN INSTALLATEUR Die nachstehenden Anweisungen wenden sich an den qualifizierten Installateur, so daß er die Installations-, Einstell- und technischen Wartungsarbeiten auf korrekte Weise in Übereinstimmung mit den geltenden Normen durchführen kann. 180cm² Wichtig: jeglicher Einstell- und Wartungseingriff usw. darf erst durchgeführt werden, nachdem die Stromversorgung der Kochplatte unterbrochen wurde. - Page 25 Elektroanschluß Anschluß des Versorgungskabels an das Stromnetz ES IST UNERLÄSSLICH, DAS GERÄT ZU ERDEN Das Kabel ist mit einem der auf dem Typenschild Dieses Gerät ist für den Betrieb mit Wechselstrom bei der angegebenen Last entsprechenden Stecker zu versehen. auf dem Typenschild (unter dem Kochfeld und auf der letzten Wird das Gerät direkt an das Stromnetz angeschlossen, ist Seite des Handbuches) angegebenen Zufuhrspannung und zwischen Stromnetz und Gerät ein allpoliger, der Last und...
-
Page 26: Algemene Aanwijzingen
Wij danken u dat u een Ariston product heeft gekozen, veilig en gemakkelijk in het gebruik. Om het fornuis te leren kennen moet het langdurig en zo goed mogelijk gebruikt worden. Wij raden u aan deze gebruiksaanwijzing te lezen. Danku. -
Page 27: Van Dichtbij Gezien
VAN DICHTBIJ GEZIEN A Stralingsplaat 1500 W / 2500 W B Stralingsplaat 1200 W C Gemengde halogeenplaat 1800 W D Gemengde halogeenplaat 2200 W E Controlelampje resterende warmte M De bedienings-knoppen INSTRUCTIES VOOR HET GEBRUIK Tabel 1 Beschrijving van de verwarmings-elementen De stralingsplaten bestaan uit cirkelvormige weerstanden. - Page 28 De bedienings-knoppen • Let erop dat de bodem van de pan altijd schoon en droog Ledere kookzone heeft zijn eigen knop "M" die de is voor een goed contact en een lange levensduur van temperatuur regelt van een minimum van 1 tot een maximum kookvlak en pannen.
-
Page 29: Het Onderhoud
HET ONDERHOUD Reinig het kookvlak als het lauw is; gebruik het juiste middel Houdt het kookvlak altijd schoon. Voordat u gaat reinigen en keukenpapier, wrijf met een vochtige doek en droog af. moet u zich ervan verzekeren dat het kookvlak is Aluminium folie, plastic voorwerpen of synthetisch materiaal uitgeschakeld en dat het koud is. - Page 30 INSTRUKTIES VOOR HET INSTALLEREN De onderstaande instructies zijn bestemd voor de erkende installateur om hem in staat te stellen de handelingen met betrekking tot de installatie op de meest correcte wijze en in overeenstemming met de van toepassing zijnde normen uit te voeren.
- Page 31 Aansluiting voedingskabel aan het net Elektrische aansluiting Monteer op de kabel een stekker die is aangepast aan het HET APPARAAT MOET OP EEN RANDGEAARD vermogen dat is aangegeven op het typeplaatje. Bij STOPCONTACT WORDEN AANGESLOTEN. rechtstreekse aansluiting aan het net moet tussen het Het apparat is bestemd om te worden gebruikt met apparaat en het net een veelpolige schakelaar worden wisselstroom met een spanning en frequentie zoals vermeld...
- Page 32 Le agradecemos por haber elegido un producto Ariston, seguro y verdaderamente fácil de usar. Para conocerlo, utilizarlo lo mejor posible y por mucho tiempo, le aconsejamos leer este manual. Gracias. ADVERTENCIAS • no tirar del cable de alimentación ni del aparato, cuando 1 Este aparato ha sido creado para una utilización de tipo...
-
Page 33: Visto De Cerca
VISTO DE CERCA A Elemento radiante 1500 W / 2500 W B Elemento radiante 1200 W C Elemento radiante / halógeno 1800 W D Elemento radiante / halógeno 2200 W E Luz indicadora de calor residua M Perillas de mando COMO UTILIZARLO Tabla 1 Descripción de los elementos calentadores... - Page 34 Las perillas de mando • Asegurarse que la base de las ollas esté siempre seca y Cada zona de cocción posee una perilla de mando "M" que limpia, para garantizar un buen contacto y una gran permite una regulación continua de la temperatura desde duración de las placas y también de las ollas.
- Page 35 COMO MANTENERLO EN BUENAS CONDICIONES Mantenga siempre la encimera limpia. Antes de limpiarla Limpiar la encimera cuando está tibia; utilizar un producto asegúrese que esté apagada y fría. de limpieza adecuado y papel de cocina, refregar con un paño húmedo y secar. Hojas de aluminio, objetos de plástico Plano en acero inoxidable o material sintético, que accidentalmente se hayan fundido, •...
-
Page 36: Instalación Del Aparato
INSTALACIÓN DEL APARATO Las instrucciones citadas a continuación están dirigidas al instalador calificado para que realice las operaciones de instalación, regulación y manutención técnica de la manera más correcta y según las normas vigentes. Importante: todas las operaciones de regulación, 180cm²... - Page 37 Conexión eléctrica • Fijar el cable de alimentación en el correspondiente ES OBLIGATORIA LA DESCARGA A TIERRA DEL EQUIPO. sujetacable y cerrar bien la tapa. Los planos están predispuestos para funcionar con corriente alterna a la tensión y frecuencia de suministro indicadas en Conexión del cable de alimentación a la red la placa indicadora (colocada debajo del plano o al final del Montar sobre el cable un enchufe normalizado para la...
- Page 38 Agradecemos a sua escolha de um produto Ariston, seguro e realmente fácil de utilizar. Para conhecê-lo e utilizá-lo da melhor maneira e mais tempo, aconselhamos que leia este manual. Obrigado. ADVERTÊNCIAS 1 Este aparelho foi concebido para ser utilizado por •...
-
Page 39: Visto De Perto
VISTO DE PERTO A Elemento irradiante 1500 W / 2500 W B Elemento irradiante 1200 W C Elemento irradiante alógeno 1800 W D Elemento irradiante alógeno 2200 W E Luz de aviso do calor resíduo M Manípulos comando elementos esquentadores COMO UTILIZAR Descrição dos elementos esquentadores Tabela 1... - Page 40 • Os manípulos de comando Certificai-vos que a base das panelas seja sempre enxuta Cada uma das zonas de cozedura está dotada de um e limpa, para garantir um bom contacto e uma longa manípulo de comando “M” que permite uma regulação duração das placas e das próprias panelas.
- Page 41 COMO MANTÊ-LO EM FORMA Manter sempre o plano limpo. Antes de o limpar certificai- Limpar o plano de cozedura quando está tépido; utilizar um vos que o plano esteja desligado e que esteja frio. produto de limpeza adequado e papel de cozinha, e esfregar com um pano húmido e enxugar.
-
Page 42: Instruções Para A Instalação
INSTRUÇÕES PARA A INSTALAÇÃO As instruções a seguir são dirigidas ao instalador qualificado para que execute as operações de instalação, regulação e manutenção técnica no modo mais correcto e segundo as normas em vigor. Importante: Qualquer intervenção de regulação, 180cm² manutenção etc. - Page 43 Ligação eléctrica Ligação do cabo de alimentação à rede A LIGAÇÃO A TERRA DO APARELHO É OBRIGATÓRIA. Montar no cabo uma ficha normalizada para a carga indicada O aparelho è predisposto para o funcionamento com corrente na placa das características, no caso de ligação directa à alternada à...
- Page 44 viale Aristide Merloni, 47 - 60044 Fabriano tel. 0732/6611 - telex 560196 - fax 0732/662954 www.Merloni.com...
Need help?
Do you have a question about the XP 90 K and is the answer not in the manual?
Questions and answers