
Related Manuals for CareCo ORACLE


Summary of Contents for CareCo ORACLE
- Page 1 Scan me on your phone camera to watch our assembly video. USER MANUAL WA02010039 PRODUCT CODE:...
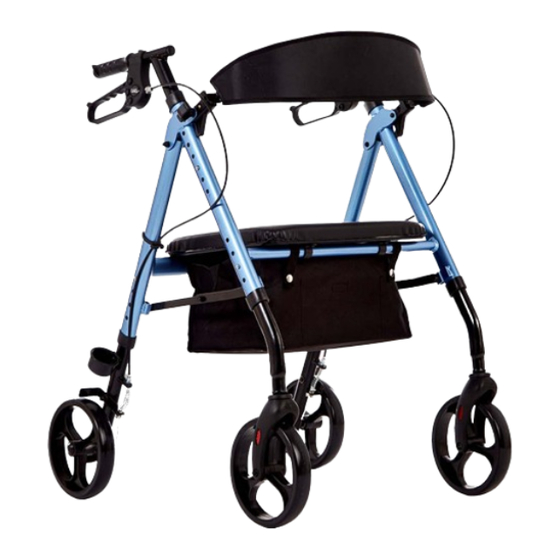
- Page 2 IINTRODUCING YOUR ORACLE ROLLATOR Whether you’re navigating busy shopping centres or simply moving around the home, you can feel at ease knowing you’re supported by the Oracle Rollator. It’s lightweight aluminium frame, spacious storage bag and height adjustable seat make this rollator the go-to reliable aid for any occasion.
- Page 3 We recommend that you keep this user manual in a safe place for future reference. If you have any questions about use, maintenance, or safety, please contact CareCo. KEY DEFINITIONS This user manual contains warnings and suggestions marked with the following symbols: WARNING! Highlights a potentially hazardous condition/situation for the user and/or product.
-
Page 4: Table Of Contents
WA02010039 PRODUCT CODE CONTENTS GETTING STARTED CARTON CONTENTS PRODUCT COMPONENTS SETTING UP YOUR ORACLE ROLLATOR HOW TO USE YOUR ROLLATOR USER INSTRUCTIONS APPLYING THE BRAKES FOLDING & UNFOLDING COMFORT ADJUSTMENTS HANDLE HEIGHT ADJUSTMENT SEAT HEIGHT ADJUSTMENT ACCESSORIES BACKREST STRAP WALKING STICK/CANE HOLDER STORAGE BAG TRANSPORTATION &... - Page 5 WARNINGS & TECHNICAL INFORMATION SPECIFICATIONS PRODUCT REISSUING RECYCLING & DISPOSAL INTENDED USE PRODUCT IDENTIFICATION GENERAL WARNINGS EXPECTED LIFETIME WARRANTY NOTES...
-
Page 6: Getting Started
WA02010039 PRODUCT CODE GETTING STARTED CARTON CONTENTS Contact CareCo immediately if ITEM NUMBER DESCRIPTION QUANTITY any of the listed contents are Oracle Rollator missing. Front Wheel Assembly We strongly recommend that LHS Handle & Rear Wheel Assembly you keep the box and internal RHS Handle &... -
Page 7: Setting Up Your Oracle Rollator
SETTING UP YOUR ORACLE ROLLATOR 1. Remove all rollator components from the 2. Insert the Front Wheel Assemblies into the outer packaging and place them onto a front frame base. level surface. An audible “click” will confirm secure. 3. Insert the Rear Wheel Assemblies into the 4. - Page 8 WA02010039 PRODUCT CODE 5. Locate both brake cables into the “S” clips 6. Insert the backrest clip into the frame attached to the frame. bracket. An audible “click” will confirm secure. WARNING! Ensure the rollator’s wheels and handles are level and secure before use. SUGGESTION If for any reason the rollator needs to be disassembled, use the set-up instructions as a guide to disassemble the rollator.
-
Page 9: How To Use Your Rollator
HOW TO USE YOUR ROLLATOR USER INSTRUCTIONS WALKING POSITION Walk with the rollator close to your body, face forwards and ensure your back is straight. USER CONTROL Hold the handles with a comfortable grip and allow your arms to sit naturally by your side. NEGOTIATING THRESHOLDS &... -
Page 10: Applying The Brakes
WA02010039 PRODUCT CODE APPLYING THE BRAKES STOPPING Gradually squeeze both brake levers to stop the rollator. Release the brake levers to start moving again. TURNING Squeeze the left and right brake levers individually to rotate the rollator. Release the brake lever to stop rotating. LOCKING Push both brake levers downwards to apply the brake lock. -
Page 11: Folding & Unfolding
FOLDING & UNFOLDING FOLDING UNFOLDING Push both brake levers downwards to apply Push downwards on the seat to open the the brake lock. rollator. Lift the seat upwards to reveal the folding Pull both brake levers upwards to unlock the handle. -
Page 12: Comfort Adjustments
WA02010039 PRODUCT CODE COMFORT ADJUSTMENTS HANDLE HEIGHT ADJUSTMENT To set the correct handle height, stand upright behind the rollator with arms by side. Adjust the height of the handgrips so they are level with the users’ wrists. Press and hold the height adjustment button whilst pulling the handle upwards. -
Page 13: Accessories
ACCESSORIES BACKREST STRAP FOLDING Raise the backrest to fold. UNFOLDING Lower the backrest to unfold. Ensure the backrest is secure before using the rollator as a seat. WALKING STICK/CANE HOLDER Place the walking stick/cane into the lower cup section. Secure the walking stick/ cane to the rollator frame using the clip included. -
Page 14: Storage Bag
WA02010039 PRODUCT CODE STORAGE BAG ATTACHING Lift the seat upwards to reveal the support bag contents. Loop the four bag straps over the frame bar and secure using the snap on fasteners. REMOVING Lift the seat upwards to reveal the bag contents. -
Page 15: Transportation & Storage
TRANSPORTATION & STORAGE TRANSPORTATION Ensure the brakes have been applied and any adjustable parts have been properly secured to avoid transit damage. Fold the rollator then position it appropriately within the desired vehicle to prevent excess movement. STORAGE Store the product in a cool and dry environment. Do not store in extreme temperatures. WARNING! Storing the product in extreme temperatures can cause premature rusting &... -
Page 16: Looking After Your Rollator
REPAIRS Certain rollator components can be repaired by the user with guidance provided by CareCo. Other components can only be repaired/replaced by a service technician. If for any reason the rollator requires repair due to a defect, contact CareCo immediately. - Page 17 OTHER ADJUSTMENTS BRAKE CABLE ADJUSTMENT Difficulty Level Moderate High Tools Required 8mm Spanner x1 10mm Spanner x1 The user can adjust the brake cable using simple household tools. Loosen the lock nut (A) by rotating it anticlockwise. Adjust the brake cable tension by rotating the brake adjuster (B). Tighten the lock nut (A) by rotating it clockwise.
- Page 18 WA02010039 PRODUCT CODE WARNINGS & TECHNICAL INFORMATION SPECIFICATIONS OVERALL LENGTH (MM) 681-760 OVERALL WIDTH (MM) OVERALL HEIGHT (MM) 800-990 MAXIMUM/MINIMUM HANDLE HEIGHT (MM) 800-990 FOLDED LENGTH (MM) FOLDED WIDTH (MM) FOLDED HEIGHT (MM) FRONT WHEEL DIAMETER (IN) REAR WHEEL DIAMETER (IN) CARRY WEIGHT (KG) WEIGHT CAPACITY (KG) BAG WEIGHT CAPACITY (KG)
- Page 19 Ensure the product is safe and functions as intended before re-issuing. RECYCLING & DISPOSAL Disposal or recycling of the rollator should be completed through an approved distributor or disposal facility. (Local disposal & recycling regulations may apply) Alternatively, contact CareCo for advice on disposal. MATERIAL UPHOLSTERY ALUMINIUM...
- Page 20 WA02010039 PRODUCT CODE PRODUCT IDENTIFICATION The product identification label is located on the cross-frame underneath the seat. 056059 114354 DEFINITIONS Model number Refer to instruction manual Batch code Caution Date of manufacturer Indicates electrical / electronic equipment must be disposed of in accordance with the WEEE regulation.
- Page 21 GENERAL WARNINGS Read the following carefully to avoid damage and/or injury caused by improper operation. • Only use the rollator for its intended use, incorrect use can lead to hazardous situations. • Only use the rollator on even and solid surfaces. •...
- Page 22 WA02010039 PRODUCT CODE EXPECTED LIFETIME The Expected Lifetime is the estimated period of time for which the rollator is expected to function according to its intended use. Various items such as weight capacity, user behaviour, external conditions and intensity of use can affect the expected lifetime.
- Page 23 Parts that have been purchased by the end user after the original warranty period has expired have a warranty period of 12 months. CareCo is not responsible if the rollator requires repair or replacement as a direct result of: •...
- Page 24 WA02010039 PRODUCT CODE NOTES...
- Page 25 NOTES...
- Page 26 056059 114323 ROLLATOR...
Need help?
Do you have a question about the ORACLE and is the answer not in the manual?
Questions and answers