Advertisement
Available languages
Available languages
Quick Links
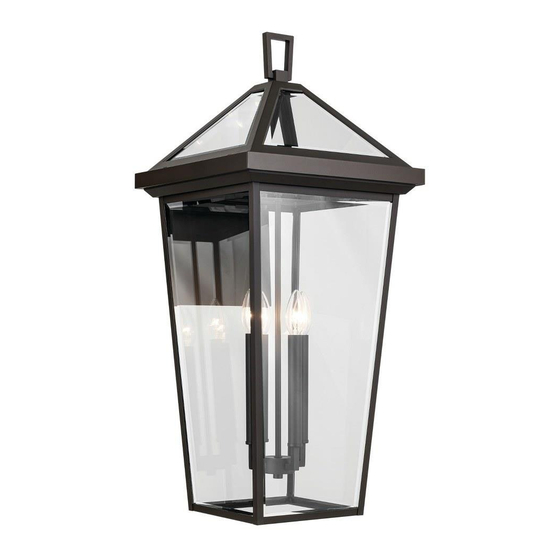
FIXTURE DIAGRAM
NOTE: Model #59128 shown (4-light configuration)
I
H
E
G
PARTS LIST
[A] Mounting Strap
[B] Outlet Box (not supplied)
[C] Strap Mounting Screw (2)
[D] Mounting Screw (4)
CAUTIONS
CAUTION – RISK OF SHOCK:
Disconnect Power at the main circuit breaker panel or main fusebox before starting and during
the installation.
WARNING:
1. This fixture is intended for installation in accordance with the National Electrical Code (NEC)
and all local code specifications. If you are not familiar with code requirements, installation by a
certified electrician is recommended. Failure to adhere to these codes and instructions may result
in serious injury and/or property damage and will void the warranty.
INSTRUCTIONS FOR MOUNTING FIXTURE OUTDOORS
AND/OR IN WET LOCATIONS:
1) Mounting surface should be clean, dry, flat and 1/4" larger than the canopy on all sides. Any gaps
between the mounting surface and canopy exceeding 3/16" should be corrected as required.
2) With silicone caulking compound, caulk completely around where back of canopy meets the wall
surface to prevent water from seeping into outlet box.
CLEANING:
• Always be certain that electric current is turned off before cleaning.
• Only a soft damp cloth should be used. Harsh cleaning products may damage the finish.
REV 1-MAY-2023
J
C
D
F
[E] Socket
[F] Canopy
[G] Lower Frame
[H] Upper Frame
© 2023 Kichler Lighting LLC. All rights reserved.
For warranty information please visit: kichler.com/warranty
K
B
A
x
x
x
x
Fig. 1
[I] Countersunk Screw (4)
[J] Wall Anchor Screw (4)
[K] Wall Anchor (4)
We're here to help
INSTALLATION INSTRUCTIONS
1.
Remove the four (4) countersunk screws[I] from the top of upper
frame[H] (two on each side of fixture). Retain countersunk screws.
Carefully remove upper frame[H] from lower frame[G].
NOTE: Lower frame[G] should be removed for inspection of supply
connections and relamping during the life of the product. To remove
lower frame after fixture installation is complete, hold lower frame in place
while removing the four (4) countersunk screws[I] from the top of upper
frame[H], then carefully remove lower frame from upper frame.
2.
Attach mounting strap[A] to outlet box[B] using the strap mounting
screws[C]. Mounting strap can be adjusted to suit position of fixture.
NOTE: Mounting strap should be installed with the bent tabs at the outer
edge of the mounting strap pointing away from the wall, at the 9 and 3
o'clock position as shown.
3.
Using the mounting strap as a template, mark the center of the four (4)
outer slots as shown (Fig. 1):
4.
Carefully remove strap mounting screws[C] and mounting strap[A] from
outlet box.
5.
Drill 1/8" (3.2mm) holes in the mounting surface at the positions that were
marked in Step 3. Insert a wall anchor[K] into each hole, and lightly tap
wall anchor into mounting surface until flush.
6.
Reattach mounting strap[A] to outlet box[B] using the strap mounting
screws[C].
7.
Secure mounting strap to wall anchors with four (4) wall anchor
screws[J].
8.
Grounding instructions: (See Illus. a or b).
a.
On fixtures where mounting strap is provided with a hole and two
raised dimples, wrap ground wire from outlet box around green
ground screw, and thread into hole.
b.
On fixtures where a cupped washer is provided, attach ground wire
from outlet box under cupped washer and green ground screw, and
thread into mounting strap.
If fixture is provided with ground wire, connect fixture ground wire to
outlet box ground wire with wire connector after following the above
steps. Never connect ground wire to black or white power supply wires.
a
WIRE CONNECTOR
OUTLET BOX
GROUND
FIXTURE
GROUND
OUTLET BOX
DIMPLES
GROUND
GREEN GROUND
SCREW
9.
Make wire connections. Reference chart below for correct connections
and wire accordingly.
Connect Black or Red
Supply Wire to:
Black
*Parallel cord (round &
smooth)
Clear, Brown, Gold or Black
without Tracer
Insulated wire (other
than green) with copper
conductor
*Note: When parallel wire (SPT
1 & SPT 2) are used. The neutral
wire is square shaped or ridged
and the other wire will be round
in shape or smooth (See illus.)
10. NOTE: Fixture should be installed with sockets[E] facing UP as
shown.
Push canopy[F] to wall, carefully aligning the mounting screw holes in left
and right side of mounting strap with the mounting screw holes in left and
right side of canopy.
NOTE: Make sure all wires are inside canopy and do not get pinched
between mounting strap and canopy or wall and canopy of fixture.
11.
Screw four (4) mounting screws[D] into holes in canopy and mounting
strap to attach fixture to wall. Two on the left side and two on the right
side of canopy. Tighten to secure.
12.
Insert recommended bulb(s) (not included).
13.
Carefully raise lower frame[G] up over bulbs, to upper frame[H]. Align the
four (4) holes in the top of the lower frame with the four (4) holes in the
upper frame.
14.
While holding lower frame in place, screw countersunk screws[I] into
aligned holes and tighten to secure lower frame to upper frame.
866-558-5706
Hrs: M-F 9am to 5pm EST
b
FIXTURE
GROUND
CUPPED
GREEN GROUND
SCREW
WASHER
Connect White Supply
Wire to:
White
*Parallel cord (square &
ridged)
Clear, Brown, Gold or Black
with Tracer
Insulated wire (other
than green) with silver
conductor
Neutral Wire
IS-59127-US
Advertisement

Related Manuals for Kichler Lighting Regence 59128


Summary of Contents for Kichler Lighting Regence 59128
- Page 1 While holding lower frame in place, screw countersunk screws[I] into aligned holes and tighten to secure lower frame to upper frame. © 2023 Kichler Lighting LLC. All rights reserved. For warranty information please visit: kichler.com/warranty REV 1-MAY-2023 IS-59127-US...
- Page 2 • Soyez toujours certain que l’alimentation électrique du luminaire est fermée avant le nettoyage. • N’utilisez qu’un chiffon doux humide. Les produits de nettoyage acides/abrasifs peuvent endommager le fini. © 2023 Kichler Lighting LLC. Tous droits réservés. Pour de plus amples informations sur la garantie, veuillez visiter : kichler.com/warranty REV 1-MAY-2023...
- Page 3 Mientras sostiene el armazón inferior en su sitio, atornille los tornillos avellanados[I] en los orificios alineados y apriételos para fijar el armazón inferior al superior. © 2023 Kichler Lighting LLC. Todos los derechos reservados. Para informacion de la garantia por favor visite: kichler.com/warranty REV 1-MAY-2023...
Need help?
Do you have a question about the Regence 59128 and is the answer not in the manual?
Questions and answers