Table of Contents
Advertisement
Available languages
Available languages
Quick Links
Advertisement
Chapters
Table of Contents

Related Manuals for Optimus IF-7P4/0E


Summary of Contents for Optimus IF-7P4/0E
- Page 3 WARNING: This is Class A equipment. In a domestic environment it may cause radio inter- ference. In this case the user should take appropriate measures. ATTENTION: THIS MANUAL REFERS SPECIFICALLY TO IF-7P4/0E SERIES 2 EQUIPMENT. BE SURE TO FOLLOW THE INSTRUCTIONS DETAILED IN THE MANUAL TO ENSURE PROPER SETUP AND COMMISSIONING.
-
Page 4: Table Of Contents
5.2.1. CAN bus connection between the main audio matrix (COMPACT or IF-7P4ETH/0) and IF- 7P4/0E expansion units ........................18 5.2.2. CAN bus configuration of the IF-7P4/0E expansion unit ............18 5.2.3. Connection between IF7P4/0E and CAN-AV speed adapter ..........19 5.3. -
Page 5: Introduction
The MP-WD1 series amplifiers are powered at 100-240V AC 50/60Hz through the IF-7P4/0E chassis. The MP-WDC series amplifiers can be powered either at 100- 240V AC 50/60Hz through the IF-7P4/0E chassis, or at 24V DC through an individual power strip for each amplifier module. R + D Department... - Page 6 Optionally, the IF-7P4/0E can have 10 input contacts and 4 output contacts by incorporating the IF-PCT module. Communicates with the main IF-7P4ETH/0 unit or COMPACT unit via CAN bus. Each main unit can control up to 10 IF-7P4/0E units. Main characteristics: •...
-
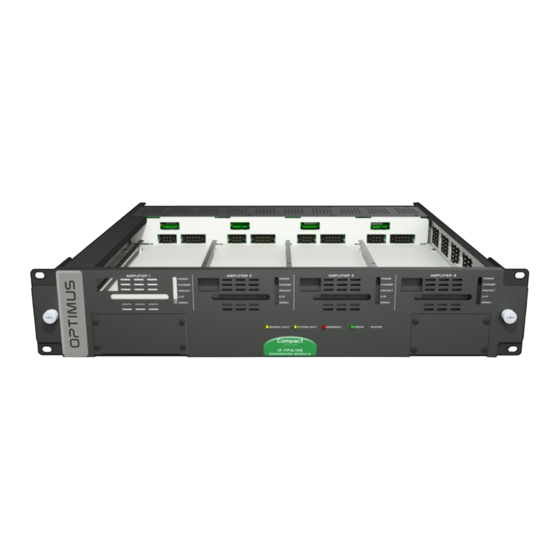
Page 7: Front View
Illuminates when Protection is activated, due to an powered. overload or short-circuit in the speaker line, or excessive 14. Buzzer. Acoustic indicator. Indicates receipt of a system heating of the power amplifier. alarm. R + D Department IF-7P4/0E version 5.2.002 ENG... -
Page 8: Back View
20. 24V DC power supply input of amplifier 2 (see section 5.7). channels between the main matrix (IF-7P4ETH/0 or Only in MP-WDC series amplifiers. COMPACT) and the secondary units IF-7P4/0E. (see section 21. 24V DC power supply fuse of amplifier 1 (see section 6). 5.3.). -
Page 9: Insertion And Removal Of Amplifier Modules
4. INSERTION AND REMOVAL OF AMPLIFIER MODULES 4.1. Inserting the amplifier module 1. Remove the faceplate. Figure 3 2. Remove the front panel from the corresponding slot. Figure 4 Slot 4 Slot 3 Slot 2 Slot 1 R + D Department IF-7P4/0E version 5.2.002 ENG... - Page 10 Figure 5 4. Push the amplifier module between the two guides to the bottom of the slot, connecting it to the IF-7P4/0E. Figure 6 R + D Department IF-7P4/0E version 5.2.002 ENG...
- Page 11 Expansion unit IF-7P4/0E for 4 modular amplifiers 5. Rest the front of the amplifier module on the IF-7P4/0E chassis. If the module is properly inserted, it should fit with the inside of the input step. Figure 7 6. Slide the moving mechanism of the amplifier faceplate to the left until it locks into the hotswap screw. Fix the amplifier module by means of the hotswap screw.
-
Page 12: Removal Of The Amplifier Module
7. Finally, place and reattach the faceplate. Figure 9 4.2. Removal of the amplifier module 1. After removing the faceplate from the IF-7P4/0E, loosen the front retaining screw on the amplifier module you wish to remove as much as possible. - Page 13 3. Holding the amplifier module from the front handle, tilt the amplifier up slightly and pull it out of the IF-7P4E/0E. Figure 13 ATTENTION: Before replacing the faceplate, the front screw must be screwed all the way into the guide. R + D Department IF-7P4/0E version 5.2.002 ENG...
-
Page 14: Connections
The IF-7P4/0E allows monitoring the status of the loudspeaker lines and determining their status (open line, short circuit, low impedance, high impedance or line in good condition). If a line fault is detected, it automatically disconnects from the corresponding amplifier, while notifying the system of this occurrence. -
Page 15: Example Of Connection Of Loudspeaker Lines To 3 Zone Amplifiers And A Backup Amplifier
AMPLIFIER AMPLIFIER AMPLIFIER IF-7P4/0E ATTENTION: • The backup amplifier must be of a power rating equal to or greater than the power rating of the largest of the amplifiers to be replaced. R + D Department IF-7P4/0E version 5.2.002 ENG... -
Page 16: Example Of Connection Of Loudspeaker Lines With Zones A/B
The rated power of the amplifier is split between both line outputs. This allows the connection of redundant loudspeaker lines for the same zone. Figure 17 ZONE 4 ZONE 3 ZONE 2 ZONE 1 AMPLIFIER AMPLIFIER AMPLIFIER AMPLIFIER R + D Department IF-7P4/0E version 5.2.002 ENG... -
Page 17: Can Bus
IF-7P4/0E for 4 modular amplifiers 5.2. CAN bus The CAN bus is used to communicate the IF-7P4/0E unit with the main audio matrix. The communication speed between them is 500 kbit/s. The CAN peripherals (MD-30C, ME-200C, NS-CAN...) use a transmission... -
Page 18: Can Bus Connection Between The Main Audio Matrix (Compact Or If-7P4Eth/0) And If-7P4/0E Expansion Units
• CAN address Each IF-7P4/0E connected to the CAN bus must have a different CAN address. DIP switches 3, 4, 5 and 6 (b0, b1, b2 and b3) allow to assign this communication address. Each main audio matrix (IF-7P4ETH/0 or COMPACT) can be expanded with a maximum of 10 IF-7P4/0E units, so in this case 10 different CAN addresses will be used. -
Page 19: Connection Between If7P4/0E And Can-Av Speed Adapter
Expansion unit IF-7P4/0E for 4 modular amplifiers 5.2.3. Connection between IF7P4/0E and CAN-AV speed adapter In installations with IF-7P4/0E units and CAN Figure 22 peripherals (MD-30C, ME-200C, NS-CAN...) a CAN-AV module (code A465AV) is required. IF-7P4/0E This module adapts the communication speed of the expansion matrix (500 kbit/s) with the speed of the peripherals (33.333 kbit/s). -
Page 20: Audio Connection Between Different Matrices
AUDIO LINK OUTPUT 2. Audio channels Audio channel 4 and (CAN Bus) 1, 2 and 3 emergency audio channel Figure 24 IF-7P4/0E IF-7P4/0E IF-7P4/0E (CAN Bus) (Audio Bus) R + D Department IF-7P4/0E version 5.2.002 ENG... -
Page 21: Fail Contacts
5.5. Connection of the optional additional input and output contact module IF-PCT The additional IF-PCT module must be placed in Figure 26 expansion slot 1 of the IF-7P4/0E. This module provides 10 input contacts and 10 output contacts. IF-PCT Module Figure 27 5.5.1. -
Page 22: Output Contacts 1A, 1B, 2A, 2B, 3A , 3B, 4A And 4B
WITHOUT 3K3 REFERENCED TO NUMBER WITH 3K3 RESISTOR RESISTOR GROUND OUTPUT OUT 1 CONTACT 1 OUTPUT OUT 2 CONTACT 2 OUTPUT OUT 4 CONTACT 3 OUTPUT OUT 4 CONTACT 4 *FACTORY SETTINGS R + D Department IF-7P4/0E version 5.2.002 ENG... -
Page 23: Connection To The Mains
The equipment has a 100-240V AC 50/60 Hz power supply input, through an IEC C20 input, which allows the connection of the equipment to the mains by means of the two-meter cable supplied (CEE 7/7 to IEC 60320 C19 cable). Figure 32 R + D Department IF-7P4/0E version 5.2.002 ENG... -
Page 24: Dc Secondary Power Supply (Only With Mp-Wdc Series Amplifiers)
5.7. 24V DC secondary power supply (only with MP-WDC series amplifiers) When using MP-WDC series amplifiers, the IF-7P4/0E has 4 independent 24VDC secondary power inputs, one for each amplifier module. This allows these devices to be used in security installations by connecting to a 24V DC battery system. In this case, it will also be necessary to power the control module at 24VDC. -
Page 25: Fuse Placement Of The Amplifier Module In Mp-Wdc Amplifiers
THE FRONT POWER LEDs ARE OFF. 2. Remove the protective cover from the fuse compartment. 3. Insert the fuse. 4. Replace the protective cover and restore the power supply to the equipment. Figure 35 R + D Department IF-7P4/0E version 5.2.002 ENG... -
Page 26: Commissioning The Unit
Configurator software installed on it. 1. Insert the modular amplifier(s). 2. Set the CAN address of the device using the CAN address DIP switches. See section 5.2.2. CAN bus configuration of the IF-7P4/0E expansion unit . 3. Make the connections between the devices. - Page 27 6. Connect the devices (IF-7P4ETH/0 and amplifier modules) to the system structure. To do this, right-click on these devices and select the Connect option from the pop-up menu. Figure 39 Figure 40 Connecting the Connection of IF-7P4/0E the amplifier module R + D Department IF-7P4/0E version 5.2.002 ENG...
-
Page 28: System Alarms
SYSTEM FAULT indicator light: Front yellow LED. Illuminates when the equipment detects an internal error. • Acoustic alarm indicator (buzzer): Intermittent buzzing sound. The IF-7P4/0E incorporates a buzzer that generates an acoustic signal each time an alarm is received. The acoustic indication is a buzzing sound that lasts 10 seconds and is periodically repeated every 20 seconds. -
Page 29: Technical Characteristics
8.4 kg (amplifier modules not included). Finishes RAL9005 Iron painted black. Measurements (mm) 482.6 (width) x 88.6 (height) x 430 (depth). Rack units OPTIONAL ACCESSORIES IF-PCT MODULE WITH 10 INPUT CONTACTS AND 4 OUTPUT CONTACTS. R + D Department IF-7P4/0E version 5.2.002 ENG... -
Page 30: Mp-Wd1 Series Modular Amplifiers
<0,6% <0,6% <0,6% Consumption Standby 3.5W Idle 6,5W 7,2W 7,2W 7,2W 134W 165W 276W 339W 520W AC Fuse NOT USED IN MP-WD1 SERIES AMPLIFIERS MOUNTED ON IF-7P4/0E Power supply (IF-7P4/0E) 100-240V AC R + D Department IF-7P4/0E version 5.2.002 ENG... -
Page 31: Mp-Wdc Series Modular Amplifiers
3,5W Consumption Idle 6,5W 6,5W 7,2W 7,2W 7,2W 134W 165W 276W 339W 520W DC Fuse 7.5A 100-240V AC, through the IF-7P4/0E chassis. Power supply 24V DC, with independent connection for each amplifier. R + D Department IF-7P4/0E version 5.2.002 ENG... -
Page 32: Software And Firmware Versions
R+D Department 10. Software and firmware versions. 5.0.001 September 2020 Software 5.0 R+D Department 5.2.002 November 2023 IF-7P4/0E SERIE 2. Software 5.2. A / B Lines. R+D Department Approved By Function Date Ferran Gironès i Puig R+D Director 11/2023 R + D Department... -
Page 33: Warranty
In the event that the guarantee rights do not apply, In order to claim the guarantee rights, it shall be an essential requirement to OPTIMUS S.A. shall duly inform the client. If, within a period of 6 weeks from this present the original purchase invoice or the guarantee certificate. - Page 37 En este caso el usuario debería tomar las medidas adecuadas. ATENCIÓN: EL PRESENTE MANUAL SE REFIERE ESPECÍFICAMENTE A LOS EQUIPOS IF-7P4/0E DE LA SERIE 2. ASEGÚRESE DE SEGUIR LAS INSTRUCCIONES DETALLADAS EN EL MANUAL PARA GARANTIZAR UNA CONFIGURACIÓN Y PUESTA EN MARCHA ADECUADAS.
- Page 38 5.2.1. Conexión del bus CAN entre la matriz de audio principal (COMPACT o IF-7P4ETH/0) y unidades de expansión IF-7P4/0E ..................... 18 5.2.2. Configuración del bus CAN de la unidad de expansión IF-7P4/0E .......... 18 5.2.3. Conexión entre IF7P4/0E y el adaptador de velocidad CAN-AV ..........19 5.3.
-
Page 39: Introducción
MP-460WDC 460W Los amplificadores de la serie MP-WD1 se alimentan a 100- 240V CA 50/60Hz a través del chasis del IF-7P4/0E. Los amplificadores de la serie MP-WDC pueden alimentarse tanto a 100-240V CA 50/60Hz a través del chasis del IF-7P4/0E, como a 24V CC mediante una regleta individual para cada módulo amplificador. - Page 40 Opcionalmente, el IF-7P4/0E puede disponer de 10 contactos de entrada y 4 contactos de salida incorporando el módulo IF-PCT. Se comunica con la unidad principal IF-7P4ETH/0 o COMPACT a través de un bus CAN. Cada unidad principal puede controlar hasta 10 unidades IF-7P4/0E.
-
Page 41: Vista Frontal
7. Indicador luminoso PROTECT del módulo amplificador. Se ilumina cuando actúa la Protección, debido a una sobrecarga o cortocircuito en la línea de altavoces, o a un calentamiento excesivo de la etapa de potencia R + D Department IF-7P4/0E versión 5.2.002 ESP... -
Page 42: Vista Posterior
- IF-7P4ETH/0 o COMPACT - y las 2. Interruptor ON/OFF del módulo de control. unidades de expansión IF-7P4/0E). Vea el apartado 5.2. 3. Fusible de red del módulo de control (1A). 14. Relé indicador de FAIL. indica fallo en el sistema (ver apartado 0). -
Page 43: Inserción Y Extracción De Los Módulos Amplificadores
4. INSERCIÓN Y EXTRACCIÓN DE LOS MÓDULOS AMPLIFICADORES 4.1. Inserción del módulo amplificador 1. Retire la placa frontal. Figura 3 2. Retire el panel frontal del slot correspondiente. Figura 4 Slot 4 Slot 3 Slot 2 Slot 1 R + D Department IF-7P4/0E versión 5.2.002 ESP... - Page 44 3. Afloje el tornillo frontal ubicado en la guía izquierda del slot, hasta el máximo que permita la tuerca. Figura 5 4. Empuje el módulo amplificador entre las dos guías hasta el fondo del slot, conectándolo al IF-7P4/0E. Figura 6 R + D Department IF-7P4/0E versión 5.2.002 ESP...
- Page 45 Unidad de expansión para 4 IF-7P4/0E módulos amplificadores 5. Apoye la parte frontal del módulo amplificador sobre el chasis del IF-7P4/0E. Si el módulo está bien insertado, debe encajar con la parte interior del escalón de entrada. Figura 7 6. Desplace el mecanismo móvil de la placa frontal del amplificador hacia la izquierda, hasta encajarlo en el tornillo hotswap. Fije el módulo amplificador por medio del tornillo hotswap.
-
Page 46: Extracción Del Módulo Amplificador
7. Finalmente, coloque y fije de nuevo la placa frontal. Figura 9 4.2. Extracción del módulo amplificador 1. Una vez retirada la placa frontal del IF-7P4/0E, afloje al máximo el tornillo frontal de sujeción del módulo amplificador que desea retirar. Figura 10 R + D Department IF-7P4/0E versión 5.2.002 ESP... - Page 47 él hasta extraerlo del IF-7P4/0E. Figura 13 Atención: Antes de colocar de nuevo la placa frontal, deberá atornillar hasta el fondo el tornillo frontal a la guía. R + D Department IF-7P4/0E versión 5.2.002 ESP...
-
Page 48: Conexiones
El IF-7P4/0E permite supervisar el estado de las líneas de altavoces y determinar su estado (línea abierta, cortocircuito, baja impedancia, alta impedancia o línea en correcto estado). Si se detecta un fallo en la línea, se desconecta automáticamente del amplificador correspondiente, a la vez que notifica al sistema esta incidencia. -
Page 49: Ejemplo De Conexión De Las Líneas De Altavoces A 3 Amplificadores De Zona Y Un Amplificador De Respaldo
DE ZONA 2 DE ZONA 1 IF-7P4/0E ATENCIÓN: • El amplificador de respaldo debe ser de una potencia igual o superior a la potencia del mayor de los amplificadores a los que debe reemplazar. R + D Department IF-7P4/0E versión 5.2.002 ESP... -
Page 50: Ejemplo De Conexión De Las Líneas De Altavoces Con Zonas A/B
Esto permite la conexión de líneas de altavoces redundantes para una misma zona. Figura 17 AMPLIFICADOR AMPLIFICADOR AMPLIFICADOR AMPLIFICADOR DE ZONA 4 DE ZONA 3 DE ZONA 2 DE ZONA 1 R + D Department IF-7P4/0E versión 5.2.002 ESP... -
Page 51: Bus Can
5.2. Bus CAN El bus CAN se utiliza para comunicar la unidad IF-7P4/0E con la matriz de audio principal. La velocidad de comunicación entre ellas es de 500 kbit/s. Los periféricos CAN (pupitres MD-30C, ME-200C, NS-CAN…) utilizan una EQUIPO VELOCIDAD de TRANSMISIÓN... -
Page 52: Conexión Del Bus Can Entre La Matriz De Audio Principal (Compact O If-7P4Eth/0) Y Unidades De Expansión If-7P4/0E
• Dirección CAN Cada IF-7P4/0E conectado al bus CAN debe tener una dirección CAN distinta. Los DIP switches 3, 4, 5 y 6 (b0, b1, b2 y b3) permiten asignar esta dirección de comunicación Cada matriz de audio principal (IF-7P4ETH/0 o COMPACT) puede ampliarse con un máximo de 10 unidades IF-7P4/0E, por lo que en tal caso se utilizarán 10 direcciones CAN distintas. -
Page 53: Conexión Entre If7P4/0E Y El Adaptador De Velocidad Can-Av
(500 kbit/s) con la velocidad de los periféricos (33,333 kbit/s). La figura 22 muestra el detalle de la conexión entre la unidad IF-7P4/0E y el adaptador de velocidad CAN-AV. CAN L Fuente de Para la conexión se recomienda la utilización de CAN H alimentación... -
Page 54: Conexión Del Audio Entre Distintas Matrices
AUDIO LINK OUTPUT 2. Canales de audio Canal 4 de audio y canal (Bus CAN) 1, 2 y 3 de audio de emergencia Figura 24 IF-7P4/0E IF-7P4/0E IF-7P4/0E (Bus CAN) (Bus de audio) R + D Department IF-7P4/0E versión 5.2.002 ESP... -
Page 55: Contactos De Fail
5.5. Conexión del módulo opcional de contactos de entrada y salida IF-PCT. El módulo adicional IF-PCT debe situarse en el Figura 26 Slot de ampliación número 1 del IF-7P4/0E. Este módulo proporciona 10 contactos de entrada y 10 contactos de salida. -
Page 56: Contactos De Salida Output Ct 1A, 1B, 2A, 2B, 3A , 3B, 4A Y 4B
CON RESISTENCIA 3K3 SIN RESISTENCIA 3K3 MASA CONTACTO OUT 1 DE SALIDA 1 CONTACTO OUT 2 DE SALIDA 2 CONTACTO OUT 4 DE SALIDA 3 CONTACTO OUT 4 DE SALIDA 4 *CONFIGURACIÓN DE FÁBRICA R + D Department IF-7P4/0E versión 5.2.002 ESP... -
Page 57: Conexión A La Red Eléctrica
El equipo dispone de una entrada alimentación 100-240V CA 50/60 Hz, mediante una entrada IEC C20, que permite la conexión del equipo a la red eléctrica mediante el cable de dos metros suministrado (cable CEE 7/7 a IEC 60320 C19). Figura 32 R + D Department IF-7P4/0E versión 5.2.002 ESP... -
Page 58: Alimentación Secundaria A 24V Cc (Sólo Con Amplificadores De La Serie Mp-Wdc)
5.7. Alimentación secundaria a 24V CC (sólo con amplificadores de la serie MP-WDC) Si se utilizan amplificadores de la serie MP-WDC, el IF-7P4/0E dispone de 4 entradas secundarias de alimentación de 24VCC independientes, una por cada módulo amplificador. Esto permite utilizar estos equipos en instalaciones de seguridad mediante la conexión a un sistema de baterías de 24VCC. -
Page 59: Colocación Del Fusible Del Módulo Amplificador En Amplificadores Mp-Wdc
SECUNDARIA. LOS LEDs DE POWER FRONTALES DEBEN ESTAR APAGADOS. 2. Retire la tapa de protección del compartimento del fusible. 3. Inserte el fusible. 4. Coloque nuevamente la tapa de protección y restablece la alimentación del equipo. Figura 35 R + D Department IF-7P4/0E versión 5.2.002 ESP... -
Page 60: Puesta En Marcha Del Equipo
La puesta en marcha del equipo requiere el envío de configuraciones a través de la conexión Ethernet a la matriz de audio COMPACT o IF-7P4ETH/0 de cuyo bus CAN depende la unidad IF-7P4/0E. Para ello, es necesario un PC equipado con tarjeta de red y conectado a la matriz de audio IP, bien a través de un switch, o directamente a través de un cable de red. - Page 61 Nombre de la zona Número de zona 6. Conecte los equipos (IF-7P4/0E y módulos amplificadores) en la estructura de la instalación. Para ello, haga clic con el botón secundario del ratón sobre estos equipos y seleccione la opción Conectar del menú emergente.
-
Page 62: Alarmas Del Sistema
Indicador luminoso SYSTEM FAULT: LED amarillo frontal. Se enciende cuando el equipo detecta un error interno. • Indicador acústico (zumbador) de alarma: Pitido intermitente. El IF-7P4/0E dispone de un zumbador que genera una indicación acústica cada vez que recibe una alarma. La indicación acústica, un pitido de 10 segundos de duración, se va repitiendo periódicamente cada 20 segundos. -
Page 63: Características Técnicas
Acabados Hierro pintado negro RAL9005. Medidas (mm) 482,6 (ancho) x 88,6 (alto) x 430 (fondo) Unidades de rack ACCESORIOS OPCIONALES IF-PCT MODULO DE 10 CONTACTOS DE ENTRADA Y 4 CONTACTOS DE SALIDA. R + D Department IF-7P4/0E versión 5.2.002 ESP... -
Page 64: Amplificadores Modulares De La Serie Mp-Wd1
<0,6% <0,6% Consumo Standby 3.5W Idle 6,5W 7,2W 7,2W 7,2W 134W 165W 276W 339W 520W Fusible AC NO UTILIZADO EN AMPLIFICADORES DE LA SERIE MP-WD1 MONTADOS EN IF-7P4/0E Alimentación (IF-7P4/0E) 100-240V CA R + D Department IF-7P4/0E versión 5.2.002 ESP... -
Page 65: Amplificadores Modulares De La Serie Mp-Wdc
Consumo Idle 6,5W 6,5W 7,2W 7,2W 7,2W 134W 165W 276W 339W 520W DC Fuse 7.5A 100-240V CA, a través del chasis del IF-7P4/0E. Alimentación 24V CC, con conexión independiente para cada amplificador. R + D Department IF-7P4/0E versión 5.2.002 ESP... -
Page 66: Versiones De Software Y Firmware
R+D Department 10. Versiones de software y firmware. 5.0.001 Septiembre 2020 Software 5.0 R+D Department 5.2.002 Noviembre 2023 IF-7P4/0E SERIE 2. Software 5.2. Líneas A / B. R+D Department Approved By Function Date Ferran Gironès i Puig R+D Director 11/2023 R + D Department IF-7P4/0E versión 5.2.002 ESP... -
Page 67: Garantía
30 días. No obstante, se deja aclarado que el plazo usual no supera los 30 días. OPTIMUS S.A. tampoco asumirá costes en el marco de la garantía por este tipo de modificaciones.
Need help?
Do you have a question about the IF-7P4/0E and is the answer not in the manual?
Questions and answers