
Related Manuals for Optimus UP-1000U3


Summary of Contents for Optimus UP-1000U3
- Page 1 AMPLIFICADOR AMPLIFIER UP-1000U3 Manual de instalación y funcionamiento v1.0 Installation and operating instructions v1.0...
- Page 2 ASEGURARSE de que todos los altavoces estén en fase. ASEGURARSE de que no existe ningún cortocircuito en la línea de altavoces antes de conectarla al amplificador. UP-1000U3 Versión 1.0 Página 1 de 9...
-
Page 3: Table Of Contents
5.1. Conexión a la red eléctrica ....................6 5.2. Conexiones de audio ......................6 5.3. Conexiones de líneas de altavoces..................6 5.4. Recomendaciones de ajuste ....................7 5.5. Indicaciones especiales ......................7 ESPECIFICACIONES TÉCNICAS ................8 CERTIFICADO DE GARANTÍA..................9 UP-1000U3 Versión 1.0 Página 2 de 9... -
Page 4: Especificaciones
Le recomendamos leer atentamente las instrucciones del aparato antes de su uso, ya que éstas contienen importante información de interés para su seguridad. 3. ACCESORIOS El UP-1000U3 se suministra con un manual de instrucciones. Guarde la caja por si es necesario el envío de la unidad para revisión o reparación. UP-1000U3 Versión 1.0... -
Page 5: Funcionamiento
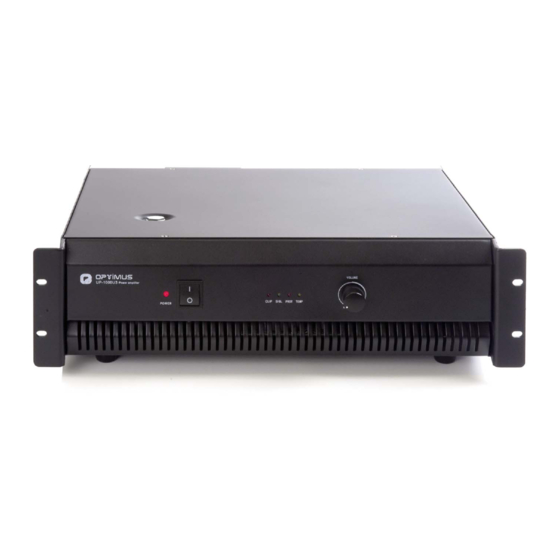
UP-1000U3 Amplificador 4. FUNCIONAMIENTO 4.1. Panel frontal Fig 1. Panel frontal UP-1000U3 (1) Indicador POWER: Se ilumina cuando el amplificador está alimentado. (2) Interruptor ON/OFF: Interruptor de alimentación, enciende y apaga el amplificador. (3) Indicadores CLIP, SIGNAL, PROT Y TEMP: El LED Rojo CLIP se encenderá... -
Page 6: Panel Posterior
UP-1000U3 Amplificador 4.2. Panel posterior Fig 2. Panel posterior UP-1000U3 (5) Entradas de audio (Line input): Entradas de audio no balanceadas, disponibles en conector XLR y JACK de 6’35 mm. (6) Salidas de audio (Line output): Salidas de audio no balanceadas, disponibles en conector XLR y JACK de 6’35 mm. -
Page 7: Instalación Y Conexiones
Atención: Seleccione sólo un terminal de salida: 4-16 Ohms, 70 V o 100 V. No conecte nunca dos terminales positivos. Si se necesitan más salidas o más potencia, por favor utilice la salida “Line Output” para conectar otros amplificadores. UP-1000U3 Versión 1.0 Página 6 de 9... -
Page 8: Recomendaciones De Ajuste
El indicador LED de Temperatura (TEMP) se activará y el amplificador dejará de emitir señal de audio si se detecta un sobrecalentamiento. En este caso, no apague el amplificador, baje el volumen al mínimo para permitir que el ventilador interno reduzca la temperatura. UP-1000U3 Versión 1.0 Página 7 de 9... -
Page 9: Especificaciones Técnicas
Fusible AC, temperatura, voltaje DC y Protecciones cortocircuito CA 110 ~ 230 V, 50 ~ 60 Hz Alimentación de Red 2600 VA Consumo 483 (w) x 133 (h) x 486 (d) Dimensiones (mm) 32 kg Peso neto UP-1000U3 Versión 1.0 Página 8 de 9... -
Page 10: Certificado De Garantía
No obstante, se deja aclarado que el plazo usual no supera los 30 días. OPTIMUS S.A. tampoco asumirá costes en el marco de la garantía por este tipo 13. Todas las piezas o productos sustituidos al amparo de los servicios en de modificaciones. - Page 11 ALWAYS use a mains grade double insulated cable for the loudspeaker cable runs. ENSURE that all loudspeakers are in-phase. ENSURE that there are no short circuits on the loudspeaker line before connecting to the amplifier. UP-1000U3 Version 1.0 Page 1 of 9...
- Page 12 5.1. AC mains connection ....................6 5.2. Audio connections....................... 6 5.3. Speaker lines connection.................... 6 5.4. Setup recommendations ..................... 7 5.5. Special Indications ...................... 7 TECHNICAL SPECIFICATIONS .................. 8 GUARANTEE CERTIFICATE ..................9 UP-1000U3 Version 1.0 Page 2 of 9...
- Page 13 Please, read carefully the instructions of this device before use, as they contain important information relevant to their security. 3. ACCESSORIES The UP-1000U3 is supplied with an instruction manual. Maintain the packaging for in case of the unit needs to be returned for service or repair UP-1000U3 Version 1.0...
- Page 14 UP-1000U3 Amplifier 4. FUNCTIONALITY 4.1. Front panel Fig 1. UP-1000U3 Front Panel (1) POWER indicator: It lights when the amplifier is working. (2) Power ON/OFF switch: It turns on and off the amplifier. (3) CLIP, SIGNAL, PROT and TEMP indicators: The red LED CLIP lights when the signal level is near the saturation limit.
- Page 15 UP-1000U3 Amplifier 4.2. Rear Panel Fig 2. UP-1000U3 Rear Panel (5) Audio Inputs (Line input): Unbalanced audio inputs, available on XLR and 6’35 mm JACK. (6) Audio Outputs (Line output): Unbalanced audio outputs, available on XLR and 6’35 mm JACK.
- Page 16 NOTE: One speaker line output can be used at the same time only: 4-16 Ohms, 70 V o 100 V. Never connect two voltage/impedance terminals at the same time. If more power is needed use the line output connector to expand the system with other amplifiers. UP-1000U3 Version 1.0 Page 6 of 9...
- Page 17 TEMP indicator is lighting and no audio is broadcasted if amplifier has been over-heated. In this case, do not turn off the power but decrease the volume to minimum level to allow the internal fan to reduce the temperature. UP-1000U3 Version 1.0 Page 7 of 9...
- Page 18 AC fuse, temperature, DC voltage & Protection shortcircuit AC 110 ~ 240 V, 50 ~ 60 Hz Power Requirements 2600 VA Power Consumption 483 (w) x 133 (h) x 486 (d) Dimensions (mm) 32 kg Net Weight UP-1000U3 Version 1.0 Page 8 of 9...
- Page 19 In the event that the guarantee rights do not replacement parts are applied which improve the unit, OPTIMUS S.A. reserves apply, OPTIMUS S.A. shall duly inform the client. If, within a period of 6 weeks the right to charge the client for the additional cost of these components.
Need help?
Do you have a question about the UP-1000U3 and is the answer not in the manual?
Questions and answers