Advertisement
Quick Links
WARNINGS:
• READ AND FOLLOW ALL SAFETY INSTRUCTIONS.
• TO AVOID FIRE, SHOCK, OR DEATH; TURN OFF POWER AT CIRCUIT BREAKER OR FUSE AND TEST THAT POWER IS OFF
BEFORE WIRING!
• To be installed and/or used in accordance with appropriate electrical codes and regulations.
• If you are unsure about any part of these instructions, consult an electrician.
• Use this device with copper or copper clad wire only.
• Installation and servicing should be performed by qualified personnel.
• DO NOT use outdoors.
• DO NOT mount near gas or electric heaters.
• Equipment should be mounted in locations and at heights where it will not readily be subjected to tampering by unauthorized personnel.
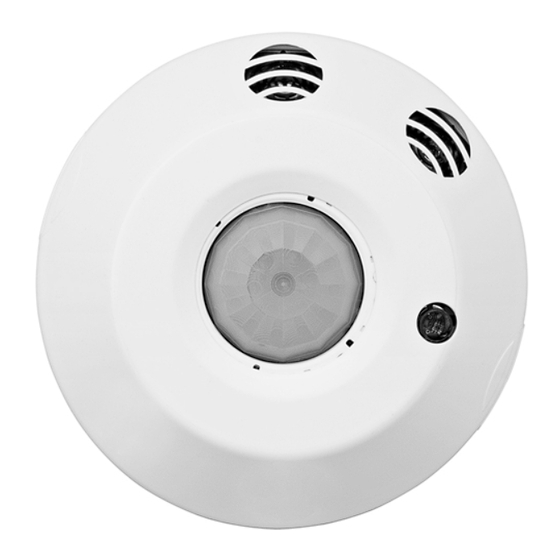
DESCRIPTION
The next generation of line voltage occupancy sensors is here with the new
Smart Ceiling Sensors with Bluetooth
®
Technology. The Smart Sensor app
is required to configure the sensor settings per installment application and
energy code requirements. Multiple Smart Sensors can be joined together
wirelessly as a group to share behaviors and field-of-view (FOV). Local
control to each sensor or zone can be added when wired to PLVSW
low-voltage keypads. For best results, avoid adding switching and dimming
sensors to same group.
The Leviton Smart Sensor app can be easily downloaded to mobile devices
and is compatible with Android and iOS smartphones or tablets. The Smart
Sensor app is easy to use with simple, intuitive on-screen menu options to
control a Smart Sensor.
The ACS05-DMW, ACS10-DMW, ACS20-DMW, AC205-DMW, and
AC220-DMW models are multi-tech (PIR and Ultrasonic) sensors where the
ACS15-DIW is single tech (PIR only). All models include a photocell sensor
for natural ambient light detection. Multiple sensors and technology work
together to provide room lighting automatically and efficiently. Occupancy
sensors turn the lights ON and keep them ON, and will turn them OFF
when room is vacant and delayed-off timer expires. Photocell detects
natural light and will hold lights from turning ON regardless of occupancy
detection if sufficient ambient light is present to help provide additional
energy savings.
The sensors can be used in Vacancy (Manual-ON) applications when used
with PLVSW low-voltage keypads. The lights can be turned ON manually
by pressing the low-voltage/momentary toggle switch or PLVSW 1, 2, or 4
button switch. The sensor turns the lights OFF when vacancy is detected
and the delayed-off time has expired.
NOTES:
• Multiple PLVSW switches can be used with a single sensor. Multiple 2 and
4 button switches OR multiple 1 button or low-voltage momentary
or toggle switches.
• For dual relay models, AC205-DMW / AC220-DMW, two PLVSWs can be
connected for manual control of each zone.
The combination of ultrasonic (doppler shift) motion detection which gives
maximum sensitivity and infrared motion detection which gives higher false
triggering immunity yields a sensor with excellent performance.
Infrared motion detection gives higher false triggering immunity that yields a
sensor with excellent performance.
SMART LINE VOLTAGE OCCUPANCY SENSORS
CALIFORNIA TITLE 24 COMPLIANT
1-Zone Multi-Tech Cat. Nos. ACS05-DMW, ACS10-DMW, ACS20-DMW
2-Zone Multi-Tech Cat. Nos. AC205-DMW, AC220-DMW
1-Zone PIR Only Cat. No. ACS15-DIW
Rating: 120VAC, 50/60Hz, 8A LED/Ballast, 800VA Tungsten, 1/4 Hp / Current Consumption: 60mA
Rating: 277VAC, 50/60Hz, 5A LED/Ballast, 1200VA Tungsten, 1/3 Hp / Current Consumption: 30mA
Operating Temperature: 32˚ to 104˚F (0˚ to 40˚C) / Operating Humidity: 10 to 90%, non-condensing
INSTALLATION INSTRUCTIONS
TOOLS NEEDED
• Slotted/Phillips Screwdriver
• Wire stripper
• Small Slotted Screwdriver
• Cutters
PARTS INCLUDED LIST
• Sensor (1)
• Angled Light Pipe (1)
• 4" x 4" Mounting Plate (1)
• Flat Light Pipe (1)
(assembled)
• #6-32 x 1-1/2" Screw (2)
• 360˚ Perforated Mask (1)
• Mid-Range Lens [red frame] (1)
• Low-voltage Connector (1)
• Extended Range Lens [black frame] (1)
(assembled)
• Half Mask (1)
• High voltage terminal covers (1)
• Tubing Barrier (1)
INSTALLING YOUR SENSOR
1
. WARNING: TO AVOID FIRE, SHOCK, OR DEATH; TURN OFF POWER
at circuit breaker or fuse and TEST that power is OFF before wiring!
2.
PREPARING AND CONNECTING WIRES:
Connect wires per appropriate WIRING DIAGRAM as follows:
• Make sure that the ends of the wires from the electrical box are straight
• Remove insulation from each wire in electrical box as shown.
• Wire per specifications:
Strip Gauge
Wire
Line, Neutral, Load Wires (Copper)
Wire range: #12-18 AWG, 3.3 - 0.75 mm square
Torque rating: 20 lb-in, 23 kgf-cm.
Control Wires (External Input 1 & 2))
Wire range: #16-26 AWG, 4.0 - 0.12 mm square
Torque rating: 2.5 lb-in, 2.88 kgf-cm.
NOTE: Maximum system low-voltage wire length must be limited to 800 ft.
3.
INSTALLING YOUR SMART SENSOR:
Insert wires into proper terminals. Use a screwdriver to turn terminal
screws clockwise and secure wires.
NOTE: Wires need to be inserted from the top through the wire holes
provided on the sensor and clamped down using the washer to the
terminals. Cover terminals with provided high voltage terminals covers.
a) Load wire(s) to Load terminal(s).
b) Neutral wire to Neutral terminal.
c) Line wire(s) to Line terminal(s).
d) External 1 & 2 inputs to their respective terminals.
NOTES:
• Both loads of the 2-zone units MUST be fed from the same phase.
• When installing Class 2 wiring, use the provided tubing for insulation
inside the junction box.
WARNINGS:
• The use of accessory equipment not recommended by manufacturer may cause an unsafe condition.
• DO NOT use this equipment for other than the intended use.
CAUTIONS:
• Sensors must be mounted on a vibration free surface.
• Do not terminate using data type wire, such as Cat 5/5E.
• Do not mount sensors closer than 15 feet to each other.
• All units must be mounted at least 6 feet away from air vents, air handlers, and reflective surfaces (windows/mirrors).
• Do not touch the surface of the lens. Clean outer surface with a damp cloth only.
• SAVE THESE INSTRUCTIONS.
To mount inside 4 in. octagon 2.125 in. deep
ceiling electrical box:
• Dress line voltage wires to provide enough
clearance in electrical box when device is
installed.
• Partially thread two #8-32 screws (not
included) into the mounting holes of the
electrical box.
• Pull out the two coasters that align with the
two screws.
• Align sensor so that it fits between the
mounting holes of the electrical box and insert
over mounting screws.
• Push in the two coasters that align with the
two screws.
• Tighten mounting screws firmly.
3/4 in.
To mount inside 4 in. square 1.5 in. deep ceiling
electrical box with mud ring
• Ensure that conduit/cable entry clamp is
located in corner of electrical box.
• Dress line voltage wires to provide enough
clearance in electrical box when device is
installed.
• Install a two-gang mud ring
(not included) on electrical box.
• Partially thread the two #6-32 screws
provided into the mounting holes of the
electrical box.
• Pull out the two coasters that align with the
two screws.
• Align sensor so that it fits between the
mounting holes of the electrical box and
insert over mounting screws.
• Push in the two coasters that align with the
two screws.
• Tighten mounting screws firmly.
PK-A3475-10-00-2A
Wiring Diagram 1 ACS05-DMW, ACS10-DMW,
ACS20-DMW & ACS15-DIW
(1-Zone)
Line Voltage
Line
Line (L1)
Load OUT (L1)
Neut. N
Line
120-277VAC,
Load
50/60 Hz
Sensor
Neutral
Class 1 or Class 2 circuit
Radio Frequency: 2.4GHz
CONTAINS FCC ID: QOQGM210P
FOR CLASS 2 INSTALLATION:
CONTAINS IC: 5123A-GM210P
WIRING SHALL BE INSTALLED WITHIN
THE PROVIDED FLEXIBLE TUBING TO
MAINTAIN SEPARATION.
0-10V
Class 1 or
50mA Max.
Class 2
Circuit
-DIM+
-EXT1+
-EXT2+
N/C
N/C
EXT1-
EXT2+
EXT1+
EXT2-
Wiring Diagram 2 AC205-DMW & AC220-DMW
(2-Zone)
Line Voltage (both lines MUST be fed from the same phase)
Line 2
Line 2 (L2)
Load 2 OUT (L2)
Line 1 (L1)
Load 1 OUT (L1)
Line 1
Neut. N
Line
120-277VAC,
Load 1
Load 2
50/60 Hz
Sensor
Neutral
Class 1 or Class 2 circuit
Radio Frequency: 2.4GHz
CONTAINS FCC ID: QOQGM210P
FOR CLASS 2 INSTALLATION:
WIRING SHALL BE INSTALLED WITHIN
CONTAINS IC: 5123A-GM210P
THE PROVIDED FLEXIBLE TUBING TO
MAINTAIN SEPARATION.
0-10V
Class 1 or
50mA Max.
Class 2
Circuit
EXT1+
EXT2-
EXT2+
DIM
–
DIM1+
EXT1-
N/C
N/C
EXT1-
EXT2+
EXT1+
EXT2-
NOTE: External inputs are configurable using the Smart Sensor App as a
Manual Switch, Demand Response, and/or Emergency. If in a system with
0-10V Smart Sensor devices, Demand Response will be relayed to other
devices in the wireless group that support dimming.
ENGLISH
Advertisement

Subscribe to Our Youtube Channel
Related Manuals for Leviton ACS05-DMW


Summary of Contents for Leviton ACS05-DMW
- Page 1 Sensor • Low-voltage Connector (1) two screws. • Extended Range Lens [black frame] (1) The Leviton Smart Sensor app can be easily downloaded to mobile devices Neutral (assembled) • Half Mask (1) • Align sensor so that it fits between the and is compatible with Android and iOS smartphones or tablets.
- Page 2 1-800-824-3005. This warranty excludes and there is disclaimed liability for labor for removal of this product or reinstallation.
Need help?
Do you have a question about the ACS05-DMW and is the answer not in the manual?
Questions and answers