
Subscribe to Our Youtube Channel
Related Manuals for YUNEEC H600


Summary of Contents for YUNEEC H600
- Page 1 A COMPANY OF ATL DRONE H600 EN: Quick Start Guide DE:Kurzanleitung FR : Guide de démarrage rapide IT:Guida di avvio rapido ES: Guía de inicio rápido...
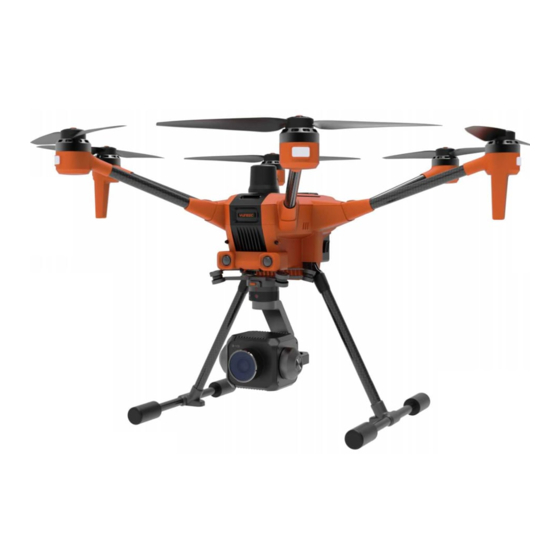
- Page 3 H600 Overview Rear View Bottom View Propeller Micro SD Slot XT30 Power Output Port LED Status Indicator Battery (19.8V-26.4V Max 3A) Obs. Avoidance Lens RTK Antenna (RTK Version Only) Autopilot Debug Type-C USB Port Landing Gears I/O Board LED Optical Flow Lens...
- Page 4 T-One Overview Antennas Previous Button Left Control Stick Zoom Knob Power Button 5D Button Flight Mode Switch Battery Level LEDs 04 05 06 07 Home Page Button Right Control Stick Motor Start/Stop Button Return to Launch Button Type C USB Charging Port Micro SD Card Slot Headphone Port HDMI Port...
-
Page 5: Battery Charging
Battery Charging Charge the Drone Battery Power the Charger from a Notice: 100-240V AC outlet. Then The batteries are a consumable material and that they have to be press the power button to replaced after they show weakness. switch on the charger. Plug the aircraft battery into the charger port as illustrated. -
Page 6: Installing The Flight Battery
[ ] points to until the propellers locked. Cross-check to be sure pro- pellers are properly locked in place. High Rechargeable Li-ion Battery 6SICP97/53/138 Nominal voltage:23.1V Rated Capcity:9800mAh 224.07Wh Yuneec International (China) Co., Ltd. Made in China... -
Page 7: Power On/Off
Power on /off the T-One Transmitter Press and hold the Power Button to power on/off the T-One. Power on /off the H600 Drone Press and hold the Power button on H600 Flight Battery to power on/off the drone. NOTICE: Always Power on the T-One before powering on the UAS. -
Page 8: Compass Calibration
Compass Calibration In the following situations recalibrating the compass is suggested for flight safety: 1.Before the first flight when you take the drone out of the box; 2.When feeling the drone is drifting after a long distance trip; 3.The drone alarms a compass warning; 4.There are metal materials beside the drone during storage and transport. -
Page 9: During Calibration
Step 3: Calibrating. Follow the onscreen display and instructions. During Compass calibration, the H600 will need to rotate along the specific axis which shown by the LED of each motor arm, until a tone is heard to change the next axis. Repeat this procedure for all six positi- ons. - Page 10 Calibration Finished for all Axis 5.8G Step 4: Reboot the drone. After all axis have been calibrated, tap the 5.8G “Reboot Vehicle” Button on the popped up dialog box to make the calibration effective. Port Config...
- Page 11 The Network CORS and RTK GPS have been disabled by de- Step 2: fault setting. The H600 Drone will be positioned and navigated Tap the Settings Icon, and then enter the “Vehicle” Menu. Tap by using the single GPS technology.
- Page 12 Step 3: Notice: Tap the Settings Icon then tap “GNSS RTK”. Select “NTRIP” as You must fill out the “Required” tagging forms. the RTCM Source, then tick Auto reconnect. Step 5: Tap “Apply” Button to finish the connection process. Auto-Position 5.8G General Notice:...
- Page 13 Take Off Take Off Operation 1: The drone has 4 different basic flight modes we suggest place the flight switch at the middle position to use the Angle mode After the drone was positioned by GPS we can start the motors to take off.
- Page 14 Always put down the landing gear before landing. Land Slowly lower the throttle/altitude joystick below the center MODE2 SHOWN position, H600 will descend slowly and land. After the drone lands, the motors will stop after 2 seconds without any opera- tion.
-
Page 15: Flight Control
Flight Control Angle Mode When in Angle Mode and GPS is available, the H600 will re- MANUAL MODE spond according to the T-One Transmitter. ANGLE MODE Sport Mode SPORT MODE In Sport Mode, the drone responses are optimized for agility and speed making it more responsive to joystick movements. -
Page 16: Rtl Mode
RTL Mode The Return to launch (RTL) function brings the drone back to the last recorded Home Point and land automatically. To enter the RTL Mode please press and hold the RTL Button on the T-One Transmitter after the drone took off. Manual Mode When in Manual Mode, GPS will be deactivated. - Page 17 The operator can follow the steps below if rebin- ding is needed. Step 1: Power on the H600 Drone. Wait a few seconds for all systems to be boot up. Step 2: After initialization completes, use a paperclip or similar item to push the Binding Button inside the hole as the picture shows.
- Page 18 Step 5: Connecting. Step 6: Tap the “Finish” Button to finish the bind process.
- Page 19 A waypoint defines a specific location and behavior at a specific point in time, allowing for intelligent auto-functions during flight. Waypoint flight is ideal for perimeter monitoring and many other uses. Pattern Pattern is designed for mapping and 3D scanning of ground-based objects. Read the H600 manual for operational information.
-
Page 20: Battery Warnings And Usage Guidelines
BATTERY WARNINGS AND USAGE GUIDELINES WARNING: Lithium ion (Li-ion) batteries are significantly more volatile than alkaline, NiCd or NiMH batteries. All instructions and warnings must be followed exactly to prevent property damage and/or serious injury as the mishandling of Li- ion batteries can result in fire. -
Page 21: General Safety Precautions And Warnings
Never drop batteries, chargers or power supplies. Always inspect the battery, charger and power supply before charging. Always ensure correct polarity before connecting batteries, chargers and power supplies. Always disconnect the battery after charging. Always terminate all processes if the battery, charger or power supply malfunctions. GENERAL SAFETY PRECAUTIONS AND WARNINGS WARNING: Failure to use this product in the intended manner as described in the quick start guide and instruction manual can result in dama-... - Page 22 The electronic speed controls (ESCs) installed in the H600 are not compatible with any other product, and H600 is not compatible with any other ESCs. Use of any other ESCs in H600 will cause a crash, which may result in damage to the product, property and/or...
-
Page 23: Fcc Statement
STATEMENT FCC STATEMENT This equipment has been tested and found to comply with the limits for Part 15 of the FCC rules. These limits are designed to pro- vide reasonable protection against harmful interference in a residential installation. This equipment generates, uses and can radiate radio frequency energy and, if not installed and used in accordance with the instructions, may cause harmful interference to radio communications. -
Page 24: Ce Warning Statement
5G: 5725-5850MHz (12dBm). EU Compliance Statement Hereby, Yuneec International (China) Co., Ltd. declares that this device is in compliance with the essential requirements and other relevant provisions of the Electromagnetic Compatibility Directive 2014/30/EU. The full text of the EU Declaration of Conformity is available at the following internet address: www.yuneec.com. - Page 25 This content is subject to change. Download the latest version from www.yuneec.com If you have any questions or inquiries about this document, please contact us by starting a conversation on www.yuneec.com ATL Drone – Global Headquarters Rütistrasse 18, 8952 Schlieren, Switzerland...
Need help?
Do you have a question about the H600 and is the answer not in the manual?
Questions and answers