Table of Contents
Advertisement
Advertisement
Table of Contents

Related Manuals for YUNEEC Typhoon H


Summary of Contents for YUNEEC Typhoon H
- Page 1 USER MANUAL T1.0...
-
Page 2: Table Of Contents
TEAM MODE (Wizard™&ST16) CHARGING Wizard™ LED STATUS ASSEMBLY - BINDING THE ST16 AND THE CGO3+ POWERING ON / OFF - BINDING THE Typhoon Wizard™ TO THE Typhoon H STARTING/STOPPING THE MOTORS - FLIGHT CONTROLS FLIGHT CONTROLS (SINGLE MODE) - FLIGHT MODES... -
Page 3: Introduction
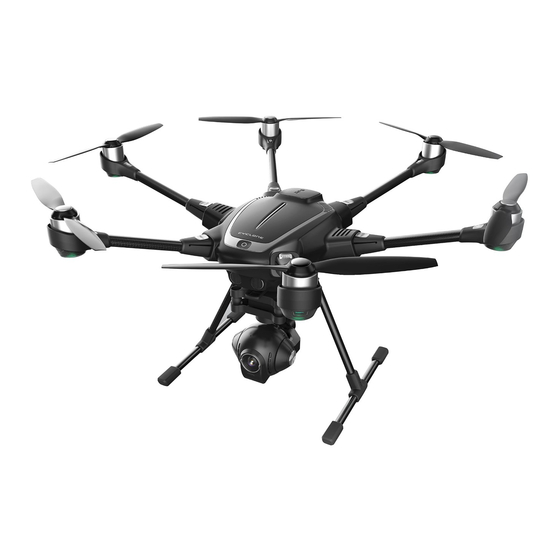
INTRODUCTION Typhoon H is an advanced aerial photography and videography platform, perfect for skilled pilots and photographers alike. It offers up to 25 minutes of flight time while filming with the CGO3+ 4K-resolution camera. Settings can be freely and remotely adjusted through the ST16 Personal Ground Station, an easy and intuitive remote controller which features a 7-inch Android touchscreen that displays live footage of your flight. -
Page 4: Specifictations
SPECIFICTATIONS TYPHOON H SPECIFICATIONS Flight Time Up to 25 min Maximum Rotation Rate 85°/s Size 20.5x18x12.2 in (520x457x310mm) Maximum Roll Angle 35° Takeoff Weight 68.8oz (1950g ) Maximum Climbing Speed 5m/s Battery 4S 14.8V LiPo Battery (POWER 4) Maximum Speed In Angle Mode 13.5m/s... -
Page 5: Placement Before Takeoff
Never attempt to operate Typhoon H nearby tall buildings/obstructions that do not offer a clear view of the sky (a minimum clearance of 100°). Be sure to place Typhoon H on a level and stable surface before powering ON the Ground Station and the aircraft. -
Page 6: Assembly
This distinction between 'A' and 'B' refers to propeller 'A' and 'B'. Mount propeller 'A' on motor 'A' and propeller 'B' on motor 'B',press and rotate propel- Place Typhoon H on a level and stable surface then power on the ST16 Ground lers in the direction the [ ] points to, and the propellers will be locked. -
Page 7: Flight Controls (Single Mode)
FLIGHT CONTROLS (SINGLE MODE) ST16 OVERVIEW Start/Stop Motors Button Gimbal Pan Mode (Follow Mode/Follow Pan Controllable Mode/Global Mode) Gimbal Tilt Mode (Angle Mode/ Velocity Mode) Gimbal Pan Control Rudder/Yaw Control (Mode 2 and Mode 1) Throttle/Altitude Control ( Mode 2) Elevator/pitch control (Mode 1) Take Still Photo Button Landing Gear Switch... -
Page 8: Flying
Aircraft Battery Voltage shown on the screen is below 14.1V, land Typhoon H immediately. TS01 300M TS02 12.6V To take off, slowly raise the left-hand stick to above the center position. Typhoon H TS03 NOTICE: When the aircraft gives the first-level low 125km/h WiFi TS04 Roll 120˚... -
Page 9: Flight Modes
Watch Me/Follow Me Button: When in Smart Mode, press [ ] to switch front/nose is pointed. So if you push the stick to the left, Typhoon H will always Typhoon H between the Watch Me and Follow Me function. The Follow Me move to the left, regardless of the direction the nose is pointing and even if it’s... - Page 10 So if you push the right-hand stick to the left confirmed orientation switch back to Angle (Pilot) (4-8m) Typhoon H will bank toward the left side and move to the left. This means if the Mode. If Typhoon H ever loses the link with the ST16 PILOT LOCATION...
-
Page 11: Additional Functions
Typhoon H to fly along. Once the pilot sets the point, START: Tap START, and slide the icon. Typhoon H will fly along the route newly Typhoon H will fly the set coordinates while remembering the heading. - Page 12 Tap JOUR to enter the journey function. then Typhoon H will fly around the pilot with the distance between the start point START: Press START, and slide the icon. Typhoon H will up and out and then take a selfie. and the pilot as the radius.
-
Page 13: Flight Controls (Team Mode)
FLIGHT CONTROLS (TEAM MODE) CAMERA OPERATOR ST16 PILOT ST12 PILOT WIZARD™ Motor Start/Stop Button Aircraft Mode LED Pan Mode: Landing Gear Switch Wizard™ GPS LED - Follow (yaw can’t be controlled) Rudder/Yaw Control (for Mode 2 and Mode 1) Aircraft Status LED - Follow Controllable Throttle/Altitude Control (for Mode 2) Turn / Fly to the Left Side Button... -
Page 14: Team Mode (St12&St16)
RC and WiFi connection process. center position. The Typhoon H will take off and climb slowly (or raise the stick STEP 3) Tap the 'Model Select' button, and if required press 'OK' to bypass any pop further until it does). -
Page 15: Landing
WARNING: Always land as soon as possible after the front/nose is pointed. So if you push the stick to the left Typhoon H will always first low level voltage battery warning, or land immedi- move to the left, regardless of the direction the nose is pointing and even if it’s... - Page 16 WATCH ME FUNCTION be in Home Mode, also known as Return to Home Mode. In Home Mode the GPS connectivity will fly Typhoon H back in a straight line in the WATCH ME FUNCTION direction of the pilots’ current location, and...
-
Page 17: Team Mode (Wizard™&St16)
NOTICE: Users can control pitch, roll and yaw directions during descent. The Typhoon H BINDING TYPHOON WIZARD™ TO TYPHOON H will hang over the home position at the current height when RC signal is lost. STEP 1) Power on the ST16 Ground Station first, and then switch on Typhoon CAUTION: You must be certain there are no obstacles in the ‘Return to Home’... -
Page 18: Wizard™ Led Status
Wizard™ LED STATUS: RETRACTING THE LANDING GEAR After the copter takes off, the pilot can retract the landing gear by pressing the two Aircraft Mode LED buttons [ ]at the same time. Make sure to press the two buttons at the same Smart Mode: LED solid green time again when landing. -
Page 19: Flight Modes
NOTICE: The recommended flying height is 33-66 ft WARNING: The maximun flight speed of the Typhoon H aircraft is 3.14MPH (7m/s). (10-20 m). The operating distance range of the Typhoon If the movement of the pilot is much faster than 3.14MPH (7m/s), the aircraft may Wizard™... -
Page 20: Camera Controls
It will take approximately 5 seconds to capture a still photo and before TEAM MODE you can take another. CAUTION: ALWAYS stop recording video before turning off Typhoon H 1. TILT Angle Mode: Use the SLIDER to control. to avoid data loss. -
Page 21: Taking Photos And Recording Video
Model: Typhoon H welcome,Pilot 12:27 AM TAKING PHOTOS AND RECORDING VIDEO VOLTS The ST16 seamlessly integrates control of the CGO3+ so you can easily Auto take still photos and start/stop video recording using the correspond- ing buttons located on top. -
Page 22: Gps Functionality / Disabling Gps
In order to acquire a suitable GPS signal/lock it ’s critical only be flown in Angle (Pilot) Mode. If you cannot properly control the that the GPS antenna installed in the top of Typhoon H always have a Typhoon in Angle (Pilot) Mode, the aircraft may crash or even 'fly clear view of the sky (100°... -
Page 23: Compass Calibration
CALIBRATION data will not display on the screen. STEP 3) Lift Typhoon H airframe straight & level. When the LEDs on two motors start to blink blue and green If the calibration has been successful, all the LED status indicators will blink continuously, separately as illustrated, turn it forward as shown by the red arrow above until the two LEDs turn off. -
Page 24: Led Status Indications
LED STATUS INDICATIONS LED STATUS INDICATIONS DURING STARTUP Main LED Status Indicator - Initialization in Progress Blinks red, green and blue (2 times per second) - Initialization failed Pulses red (3 times per second) - The Aircraft is in "Bind" Mode Blinks orange very rapidly (10 times per second) - The Aircraft is in a No-Fly Zone * Blinks red and white rapidly(5 times per second)... -
Page 25: Notices And Warnings
IMPORTANT NOTE: All safety precautions and warnings, instructions, warranties and other collateral information is subject to change at the sole discretion of Yuneec. For the most up-to-date information please visit the corresponding product page at www.Yuneec.com or contact the nearest Yuneec office or authorized distributor. -
Page 26: Lipo Battery Warnings And Usage Guidelines
• Always operate your aircraft starting with a fully charged battery. Always land as soon as possible after the first level low voltage battery warning or land immediately after the second level low voltage battery warning (as indicated by the vibrations and audible alerts from the transmitter/personal ground station). - Page 27 • Never attempt to charge low voltage, ballooned/swollen, damaged or wet batteries. • Never allow children under 14 years of age to charge batteries. • Never charge a battery if any of the wire leads have been damaged or shorted. •...
-
Page 28: Disclaimer
DISCLAIMER Yuneec Electric Aviation cannot be held liable for any damage, injury or for use of the product in violation with legal regulations, especially in the following circumstances: Damage and/or injury as well violation of legal regulations resulting from a failure to comply with the operating instructions or the instructions at www.yuneec.com, product information, user manual and other legally binding information. -
Page 29: Certification Information
CERTIFICATION INFORMATION FCC STATEMENT: This equipment has been tested and found to comply with the limits for Part 15 of the FCC rules. These limits are designed to provide reasonable protection against harmful interference in a residential installation. This equipment generates, uses and can radiate radio frequency energy and, if not installed and used in accordance with the instructions, may cause harmful interference to radio communications.
Need help?
Do you have a question about the Typhoon H and is the answer not in the manual?
Questions and answers
Need to purchase new battery for ST16 controller