Table of Contents
Advertisement
Quick Links
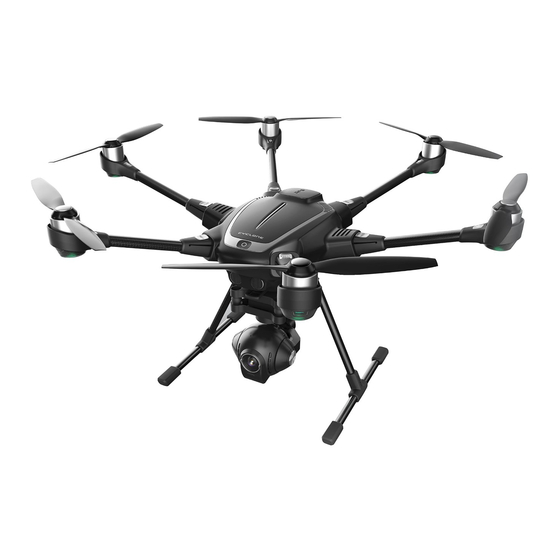
YUNEEC TYPHOON H INTEL SENSE TECHNOLOGY
The drone that knows its way around
Capable of detecting obstacles and intelligently
navigating around them, Typhoon H with Intel®
RealSense™ Technology gives you the freedom to explore
new creative options.
Stress-free obstacle navigation
RealSense integrates with Follow Me mode to avoid
objects while filming in any direction. The Intel®
RealSense™ R200 camera with Intel® Atom™ powered
module builds a 3D model of the world, allowing you to
focus on the subject without worrying about flying into
obstacles.
Advertisement
Table of Contents

Subscribe to Our Youtube Channel
Related Manuals for YUNEEC Typhoon H


Summary of Contents for YUNEEC Typhoon H
- Page 1 YUNEEC TYPHOON H INTEL SENSE TECHNOLOGY The drone that knows its way around Capable of detecting obstacles and intelligently navigating around them, Typhoon H with Intel® RealSense™ Technology gives you the freedom to explore new creative options. Stress-free obstacle navigation RealSense integrates with Follow Me mode to avoid objects while filming in any direction.
-
Page 2: How It Works
Stay on target Typhoon H uses GPS - not just vision - to track targets. From a tiny tree branch to a large building, Typhoon H can still navigate around obstacles, regardless of size, and stay in contact with the subject, even if it becomes obscured. - Page 3 SMART FEATURES Collision prevention and advanced obstacle navigation Sonar collision prevention Intelligent front sonar sensors allow Typhoon H to stop short of obstacles automatically, ensuring a safer, stress-free flying experience.
-
Page 4: Point Of Interest
Point Of Interest Select a subject and Typhoon H will orbit that subject autonomously, all the time keeping the camera trained on the point of interest. - Page 5 Journey Mode Typhoon H will go up and out, as far as 150ft, and capture the perfect aerial selfie.
-
Page 6: Return Home
Curve Cable Cam Easily program an invisible route for Typhoon H to fly along. Typhoon H will fly between pre-set coordinates while independently controlling camera position. Return Home With the flick of a switch on the ST16 controller, Typhoon H will fly home and land automatically. For added safety, Typhoon H will also land safely before the battery becomes too low to maintain flight. - Page 7 Smart Safety Ensuring utmost safety, the FAA compliant No Fly Zone feature prevents flight near commercial airports. The No Fly Zone feature also prevents flight above 400 feet from the ground. The built-in GPS establishes a 26 ft (8 m) diameter Smart Circle around the pilot when taking off and landing and also creates a Geo Fence that keeps the aircraft from traveling farther than 300 ft (91 m) from the pilot's position.
- Page 8 ST16 The ST16 Ground Station is an integrated transmitter, receiver and Android platform that gives you full control over Typhoon H, allowing you to easily program autonomous flight and capture stunning photos and videos. The large 7-inch integrated screen displays real-time footage of your flight, eliminating the need for an external device.
- Page 9 TECH SPECS All You Need To Know Aircraft FLIGHT TIME Up to 25 min SIZE 20.5x18x12.2 in (520x457x310mm) AIRFRAME WEIGHT (WITH BATTERY) 59.8oz (1695g) TAKE-OFF WEIGHT 368.8oz (1950g ) BATTERY 4S 14.8V LiPo Battery (POWER 4) BATTERY CAPACITY / VOLTAGE 5400mAh 4S/14.8V(79.9Wh)...
-
Page 10: Getting Started
GETTING STARTED Typhoon H Getting Started with your Typhoon H STEP 1: OUT OF THE BOX Unpack the box and you will see the following items: Typhoon H aircraft, CGO3+ camera (already connected on the aircraft) and the ST16 remote control. - Page 11 STEP 2: INSTALL THE ARM Expand the arm until you hear a 'clicking' sound. STEP 3: REMOVE TAG STICKERS Carefully remove the protective cover on the camera, protective sticker on the lens and the warning listed on the machine arm. After those items are removed, insert the included SD card into the camera.
-
Page 12: Step 4: Install The Propellers
Install propellers marked ‘A’ or ‘B’ on the corresponding rotors marked A or B. STEP 5: INSTALL THE AIRCRAFT BATTERY Insert the battery into the battery slot with the YUNEEC logo facing upward. A clicking sound indicates the battery is properly installed. - Page 13 STEP 6: POWER ON AND TAKE OFF Place Typhoon H in an open area, free from obstructions before taking off. Start the motors by holding the “Start/Stop Motors Button” on top of the ST16 Ground Station until the propellers start. Enjoy your flight!
Need help?
Do you have a question about the Typhoon H and is the answer not in the manual?
Questions and answers