Advertisement
Quick Links
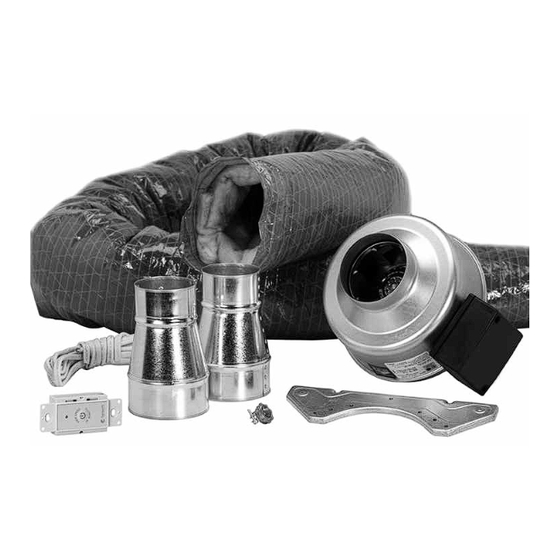
BFRK100
Bath Fan Retrofit Kit
PARTS IN THE BOX
Inline Fan FG4, 1 pc
Mounting Bracket, 1 pc
VT 20M Main Control, 1 pc
3" to 4" Adapters, 2 pcs
Wire Connectors. 2 pcs
Cable Restaint, 1 pc
8' Flexible Insulated 4" Duct, 1 pc
12' 14-2 Insulated Electrical Wire, 1 pc
Operation and Installation Manual, 1 pc
REGISTER* THIS PRODUCT TO
INCREASE YOUR PRODUCT
WARRANTY BY AN EXTRA YEAR
registration.fantech.app
Technical / Customer Support:
United States Tel.: 800.747.1762
Installation Manual
* in USA only
Canada Tel.: 800.565.3548
Item #: 450172
Rev Date: 2019-09-06
Advertisement

Subscribe to Our Youtube Channel
Related Manuals for SystemAir fantech BFRK100


Summary of Contents for SystemAir fantech BFRK100
- Page 1 Item #: 450172 Rev Date: 2019-09-06 Installation Manual BFRK100 Bath Fan Retrofit Kit PARTS IN THE BOX Inline Fan FG4, 1 pc Mounting Bracket, 1 pc VT 20M Main Control, 1 pc 3" to 4" Adapters, 2 pcs Wire Connectors. 2 pcs Cable Restaint, 1 pc 8' Flexible Insulated 4"...
- Page 2 Note Warning / Information Technical Practical tip Important information note Read and Save these instructions for future reference. Not for use with fan/light, heater/fan, or heater/fan/light combination units Warnings DO NOT CONNECT POWER SUPPLY until fan is completely installed. Make sure electrical service to the fan is locked in “Off” position 1.
-
Page 3: Installation
Installation Step 1 Switch power off at service panel and lock the service disconnecting means to prevent power from being switched on accidentally. Step 2 In the bathroom, remove the inlet grille. Step 3 Unplug the motor and remove the motor plate. If convenient, you may want to remove the motor from the motor plate at this stage. - Page 4 Installation (Cont'd) Step 8 Using the wood screws provided, attach the mounting bracket to a support beam at the selected location. Fan mounting can be at any point along the duct and in any angle, however, vertical mounting is recommended to reduce condensation buildup in the fan. If a horizontal installation is necessary and condensation buildup may pose a problem, either wrap insulation around the fan or drill a 1/4"...
-
Page 5: Limitation Of Warranty And Liability
Warranty Five (5) Year Warranty This warranty supersedes all prior warranties DURING ENTIRE WARRANTY PERIOD: END USER, AS CREDIT TO DISTRIBUTOR’S ACCOUNT WILL BE Fantech will repair or replace any part which has a factory defect in PENDING INSPECTION AND VERIFICATION OF ACTUAL DEFECT BY workmanship or material. - Page 6 Notes...
- Page 7 Notes...
- Page 8 Fantech reserves the right to make technical changes. For updated documentation please refer to www.fantech.net Fantech®...
Need help?
Do you have a question about the fantech BFRK100 and is the answer not in the manual?
Questions and answers