Table of Contents
Advertisement
Available languages
Available languages
Quick Links
Advertisement
Chapters
Table of Contents

Related Manuals for Häfele LAMBARD 533.66.480


Summary of Contents for Häfele LAMBARD 533.66.480
- Page 1 KOMPOR INDUKSI TANAM (BUILT-IN INDUCTION HOB) Panduan Instalasi dan Penggunaan...
- Page 2 No. Pendaftaran : IMKG.667.03.2021 PANDUAN INSTALASI DAN PENGGUNAAN UNTUK KOMPOR INDUKSI TANAM 533.66.480 LAMBARD HANYA UNTUK PENGGUNAAN DALAM RUANGAN...
-
Page 3: Table Of Contents
DAFTAR ISI Bagian 1 : Informasi Keselamatan ..............2 Informasi Keselamatan Umum ................. 2 Pengoperasian dan Perawatan ................. 3 Instruksi Keselamatan Penting ................4 Bagian 2 : Pengenalan Produk ............... 5 Nama - Nama Bagian ..................5 Panel Kontrol ..................... 5 Bagian 3 : Pemasangan .................. -
Page 4: Bagian 1 : Informasi Keselamatan
INFORMASI KESELAMATAN INFORMASI KESELAMATAN UMUM 1. Bacalah buku petunjuk ini dengan seksama sebelum memasang atau menggunakan peranti. 2. Tidak ada bahan atau produk yang mudah terbakar yang boleh diletakkan di peranti ini. 3. Untuk menghindari bahaya, peranti ini harus dipasang sesuai dengan instruksi pemasangan ini. -
Page 5: Pengoperasian Dan Perawatan
PENGOPERASIAN DAN PERAWATAN Bahaya Sengatan Listrik 1. Jangan memasak di atas kompor yang rusak atau retak. Jika permukaan kompor pecah atau retak, segera matikan peranti di catu daya listrik (sakelar dinding) dan hubungi teknisi yang berkualifikasi. 2. Putuskan sambungan peranti dari pasokan listrik utama sebelum melakukan pekerjaan atau pemeliharaan apa pun di atasnya. -
Page 6: Instruksi Keselamatan Penting
INSTRUKSI KESELAMATAN PENTING 1. Jangan pernah meninggalkan peranti tanpa pengawasan saat digunakan. Tumpahan air mendidih menyebabkan asap dan tumpahan berminyak yang dapat tersulut. 2. Jangan pernah menggunakan peranti Anda sebagai permukaan kerja atau tempat penyimpanan. 3. Jangan pernah meninggalkan benda atau peralatan apa pun di atas peranti. 4. -
Page 7: Bagian 2 : Pengenalan Produk
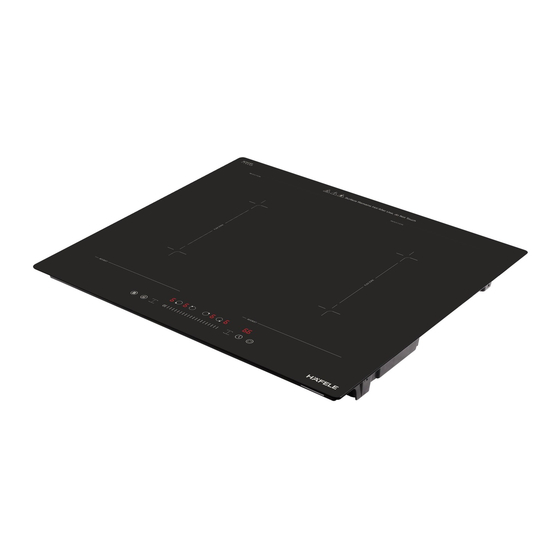
PENGENALAN PRODUK NAMA-NAMA BAGIAN Zona Memasak 1600/2000W (boost) Zona Memasak 2000/2400W (boost) Zona Fleksibel Kiri 2600/3000W (boost) Zona Fleksibel Kanan 2600/3000W (boost) Zona Memasak 2000/2400W (boost) Zona Memasak 1600/2000W (boost) Panel Kontrol Kaca Keramik Schott KONTROL PANEL Tombol Pemilih Zona Memasak Tombol Pendongkrak Daya (Boost) Pengunci Tombol Tombol Zona Fleksibel Kiri... -
Page 8: Bagian 3 : Pemasangan
PEMASANGAN Peranti harus dipasang dan dihubungkan sesuai dengan peraturan setempat. Setelah membongkar peranti, pastikan tidak ada kerusakan yang terlihat. Jika rusak selama transit, jangan gunakan, segera hubungi tempat Anda membeli. 1. Lubangi permukaan kerja sesuai dengan ukuran yang ditunjukkan pada gambar. -
Page 9: Menempatkan Kompor
MENEMPATKAN KOMPOR Unit harus ditempatkan pada permukaan yang stabil dan halus (gunakan kemasannya). Jangan memaksa masuk kontrol yang menonjol dari kompor. Perlengkapan Pemasangan Terdapat satu paket perlengkapan pemasangan untuk setiap kompor, termasuk klip penetap dan sekrup (untuk kompor induksi ada total 2 klip dan 2 sekrup). Temukan paket terlebih dahulu. -
Page 10: Bagian 4 : Pengoperasian
Metode Penyambungan Perhatian 1. Tolong jangan pernah melakukan pemasangan sendiri. Kompor harus dipasang oleh personel atau teknisi yang berkualifikasi. 2. Kompor listrik tidak boleh dipasang ke peralatan pendingin, mesin pencuci piring, dan pengering putar. 3. Kompor listrik harus dipasang sedemikian rupa sehingga radiasi panas yang lebih baik dapat dipastikan untuk meningkatkan keandalannya. -
Page 11: Fungsi Pendongkrak Daya (Boost)
Mengatur Zona Memasak 1. Sebelum menyesuaikan level pemanasan, tombol kontrol pemilihan zona pemanas perlu disentuh untuk memilih dan mengaktifkan zona memasak yang ingin Anda gunakan. 2. Indikator pengaturan panas dari zona yang dipilih berkedip dan menunjukkan "0" saat aktif, maka Anda dapat menyesuaikan tingkat panasnya. 3. -
Page 12: Zona Memasak Fleksibel
2. Sentuh tombol pendongkrak daya “ ” indikator zona pemanasan akan menunjukkan "b" dan berkedip selama 5 detik kemudian berhenti berkedip, maka fungsi pendongkrak daya aktif. Catatan: 1. Saat menggunakan fungsi pendongkrak daya, jika zona memasak lain dalam arah vertikal juga berfungsi sementara pengaturan daya lebih tinggi dari tingkat 2, program akan secara otomatis mengubah pengaturan daya zona lain ke tingkat 2. -
Page 13: Pengunci Tombol
atas tombol kontrol area fleksibel yang sesuai menyala, indikator tingkat daya berkedip, Anda dapat menyesuaikan tingkat daya area fleksibel dengan menggunakan kontrol geser. Mematikan area memasak fleksibel Untuk menonaktifkan area fleksibel saat berfungsi, tekan salah satu dari dua tombol pemilihan zona memasak dari area fleksibel ini, saat indikator tingkat daya berkedip, tekan tombol kontrol fleksibel lagi. -
Page 14: Fitur Keselamatan
4. Hitung mundur dimulai dan tampilan pengatur waktu menunjukkan waktu yang tersisa. Untuk menandai zona yang dipilih, titik di samping tampilan daya yang sesuai menyala. 5. Jika lebih dari satu zona pemanasan memiliki pengaturan waktu, indikator akan menunjukkan waktu terendah. Titik merah di sebelah indikator tingkat daya akan berkedip. -
Page 15: Tips Pengguna
3. Ketika panci dengan ukuran yang tidak sesuai atau non-magnetik (misalnya aluminium), atau barang kecil lainnya (misalnya pisau, garpu, kunci) ditinggalkan di atas kompor, zona memasak yang sesuai akan mati secara otomatis dalam 1 menit. Peringatan Sisa Panas Ketika kompor telah beroperasi selama beberapa waktu, akan ada sisa panas. Huruf "H"... - Page 16 5. Kompor induksi terbuat dari kaca keramik yang halus, panasnya berasal dari kumparan induksi magnetik yang memanaskan peralatan masak tetapi bukan permukaan memasak. Panas dari peralatan masak dipindahkan ke makanan. 6. Penting bagi Anda untuk hanya menggunakan panci logam yang dirancang khusus dan/atau disetujui untuk digunakan pada kompor induksi.
-
Page 17: Bagian 5 : Perawatan
PERAWATAN Gambar 1 Gambar 2 Gambar 3 Gambar 4 Gambar 5 Setelah menggunakan kompor, tunggu hingga dingin dan bersihkan; jika tidak, sisa makanan sekecil apa pun akan terbakar di permukaan yang panas pada saat Anda menggunakan peranti ini lagi. Untuk pembersihan dan perawatan rutin permukaan keramik kaca, gunakan bahan khusus yang membentuk lapisan pelindung pada permukaan, melindunginya dari kotoran. - Page 18 PERHATIAN 1. Sabut baja, spons abrasif, dan deterjen abrasif dapat menggores permukaan kompor. Permukaan keramik kaca juga dapat rusak oleh semprotan agresif dan tidak tepat atau tidak memadai (Gambar 1 and Gambar 2). 2. Tanda dan indikasi pada kompor rusak dapat terlihat jika terus menggunakan pembersih agresif pada tepi zona memasak, atau jika menggunakan panci dengan bagian bawah yang rusak.
-
Page 19: Bagian 6 : Penyelesaian Masalah
PENYELESAIAN MASALAH KODE GALAT Jika kelainan muncul, kompor induksi akan memasuki keadaan pelindung secara otomatis dan menampilkan kode pelindung yang sesuai. Kode Kemungkinan Penyebab Yang harus Dilakukan Tidak ada panci yang diletakkan Panci harus diletakkan di atas kompor Voltase lebih rendah dari 85V Periksa voltase, tunggu hingga voltase / tegangan listrik normal kembali Voltase lebih tinggi dari 285V... -
Page 20: Bagian 7 : Spesifikasi
SPESIFIKASI LAMBARD Model 633.66.480 Jumlah Zona Memasak Jumlah Zona Fleksible Warna Hitam Panel Kontrol Kontrol Sentuh + Geser Material Kaca Schott Glass Tegangan Listrik 220-240 V ~ 50/60 Hz Daya Listrik Total 7200 W • Zona Memasak Kiri Belakang 1600 / 2000 W (boost) •... - Page 21 INSTALLATION AND USER GUIDE FOR BUILT-IN INDUCTION HOB 533.66.480 LAMBARD FOR INDOOR USE ONLY...
- Page 22 TABLE OF CONTENT Chapter 1 : Safety Information ............... 2 General Safety ....................2 Operation and Maintenance ................3 Important Safety Information ................4 Chapter 2 : Product Description ..............5 Name of Parts ....................5 Control Panel ....................5 Chapter 3 : Installations ..................
-
Page 23: Chapter 1 : Safety Information
SAFETY INFORMATION GENERAL SAFETY 1. Read these instructions carefully before installing or using this appliance. 2. No combustible material or products should be placed on this appliance at any time. 3. To avoid a hazard, this appliance must be installed according to these instructions for installation. -
Page 24: Operation And Maintenance
OPERATION AND MAINTENANCE Electrical Shock Hazard 1. Do not cook on a broken or cracked hob. If the hob surface should break or crack, switch the appliance off immediately at the mains power supply (wall switch) and contact a qualified technician. 2. -
Page 25: Important Safety Information
IMPORTANT SAFETY INSTRUCTION 1. Never leave the appliance unattended when in use. Boiling over causes smoking and greasy spillovers that may ignite. 2. Never use your appliance as a work or storage surface. 3. Never leave any objects or utensils on the appliance. 4. -
Page 26: Chapter 2 : Product Description
PRODUCT DESCRIPTION NAME OF PARTS 1600/2000W (boost) cooking zone 2000/2400W (boost) cooking zone 2600/3000W (boost) Left Flexi Area 2600/3000W (boost) Right Flexi Area 2000/2400W (boost) cooking zone 1600/2000W (boost) cooking zone Control Panel Schott Ceramic Glass CONTROL PANEL Cooking Zone Selection Button Booster Function Button Child Lock Button Left Flexi Zone Button... -
Page 27: Chapter 3 : Installations
INSTALLATIONS The appliance must be installed and connected in accordance with current regulations. After unpacking the appliance, ensure there is no visible damage. If it has been damaged during transit, do not use, contact where you buy immediately. 1. Cut out the work surface according to the sizes shown in the figures. 2. -
Page 28: Placing The Unit
PLACING THE UNIT The unit should be placed on a stable, smooth surface (use the packaging). Do not apply force onto the controls protruding from the hob. Easy Fit Kits There is one easy fit kits package for each hob, include fixing clips and screws (for ceramic hob there are total 2pcs clip and 2pcs screw). -
Page 29: Chapter 4 : Operations
Method of Connection Cautions 1. Please never conduct the operation by yourself. The hob must be installed by qualified personnel or technician. 2. The electric hob shall not be mounted to cooling equipment, dishwashers, and rotary dryers. 3. The electric hob shall be installed such that better heat radiation can be ensured to enhance its reliability. -
Page 30: Booster Function
Set the Cooking Zone 1. Before adjust heating level, you need to touch the heating zone selection control key to select and active the cooking zone you wish to use. 2. The heat setting indicator of the selected zone is flashing and show “0” when active, then you could adjust its heat level. -
Page 31: Flexible Cooking Area
2. Touch the Booster function control key “ ” the heating zone indicator will show “b” and flashing for 5 seconds then stop flashing; Booster function is active. Notes: 1. When using booster function, if the other cooking zone in vertical direction also working meanwhile power setting higher than level 2, the program will auto turn power setting of the other zone to level 2. -
Page 32: Child Lock Function
keys light, the power level indicator flashing, you can adjust power level of the flexible area by using the slider. Disable the flexible cooking area To disable the flexible area when it works, press either of the two cooking zone selection keys of this flexible area, when power level indicator flashing, press the flexible control key again. -
Page 33: Safety Features
4. The countdown starts and the timer display shows the remaining time. To mark the selected zone, a dot next to the corresponding power display lights 5. If more than one heating zone has timer setting, the timer indicator will show the lowest time. -
Page 34: User Tips
3. When an unsuitable size or non-magnetic pan (e.g. aluminum), or some other small item (e.g. knife, fork, key) has been left on the hob, the corresponding cooking zone will automatically turn off in 1 minute. Residual Heat Warning When the hob has been operating for some time, there will be some residual heat. The letter “H”... - Page 35 5. Induction hob are made from smooth, ceramic glass, the heat comes from a magnetic induction coil which heats the cookware but not the cooking surface. The heat from the cookware is transferred to the food. 6. It’s important that you use only metal pans specifically designed and/or approved for use on induction hobs.
-
Page 36: Chapter 5 : Maintenance
MAINTENANCE Figure 1 Figure 2 Figure 3 Figure 4 Figure 5 After each use of the glass-ceramic hob, wait for it to cool down and clean it; otherwise, even the smallest food residue will be burnt onto the hot surface next time you use the appliance. - Page 37 ATTENTION 1. Steel wool, abrasive sponges, and abrasive detergents can scratch the hob surface. Glass ceramic surface can also be damaged by aggressive sprays and inappropriate or insufficiently. Shaken (mixed) liquid cleaning agents (Figure 1 and Figure 2). 2. Signs and indications on the hob may be worn if aggressive cleaning aids are used on cooking zone edges, or if pans with damaged bottom or used.
-
Page 38: Chapter 6 : Troubleshooting
TROUBLESHOOTING ERROR CODES If an abnormality comes up, the induction hob will enter the protective state automatically and display corresponding protective codes. Code Possible Cause What to Do No pan is placed on the hob Pan must be placed Voltage is lower than 85V Check the voltage, wait until the voltage normal again Voltage is higher than 285V... -
Page 39: Chapter 7 : Specification
SPECIFICATION LAMBARD Model 633.66.480 Cooking Zone Qty Flexible Zone Qty Color Black Control Panel Touch + Sliding Control Glass Material Schott Glass Voltage 220-240 V ~ 50/60 Hz Total Power 7200 W • Left Rear Cooking Zone 1600 / 2000 W (boost) •... - Page 40 PT. Hafele Indotama Taman Tekno Blok A No. 3 Serpong, Tangerang 15314 Phone, +62 21 7587 8888 Email: service@hafeleindonesia.com www.hafele.co.id AUTHORIZED SERVICE CENTER 0816 862 937 www.hafele.co.id Page 19...
Need help?
Do you have a question about the LAMBARD 533.66.480 and is the answer not in the manual?
Questions and answers