Advertisement
Available languages
Available languages
Quick Links
Gebrauchsanleitung (Deutsch) | Seiten 1-7
Art.-Nr.: 362 2605
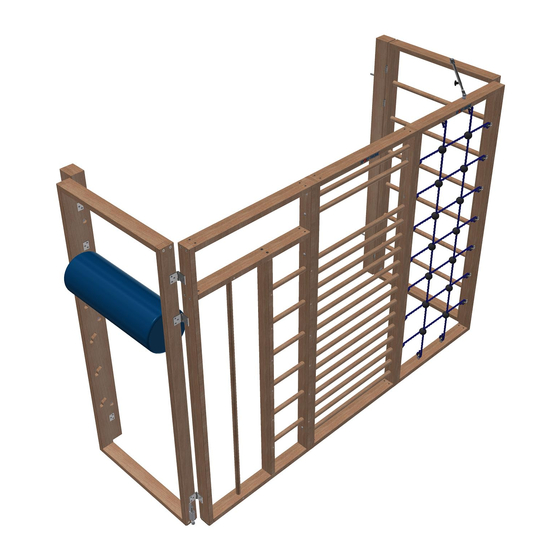
Sport-Thieme Turnwand
Vielen Dank, dass Sie sich für ein Sport-Thieme Produkt entschieden haben!
Damit Sie viel Freude an diesem Produkt haben und die Sicherheit gewährleistet ist,
sollten Sie diese Anleitung vor dem Gebrauch zunächst vollständig durchlesen.
Bewahren Sie die Anleitung gut auf. Für Fragen und Wünsche stehen wir Ihnen gerne zur Verfügung.
Abb. 1: Sport Thieme Turnwand
Version 09/2023 | Seite 1
Advertisement

Subscribe to Our Youtube Channel
Related Manuals for Sport-thieme Turnwand


Summary of Contents for Sport-thieme Turnwand
- Page 1 Gebrauchsanleitung (Deutsch) | Seiten 1-7 Art.-Nr.: 362 2605 Sport-Thieme Turnwand Vielen Dank, dass Sie sich für ein Sport-Thieme Produkt entschieden haben! Damit Sie viel Freude an diesem Produkt haben und die Sicherheit gewährleistet ist, sollten Sie diese Anleitung vor dem Gebrauch zunächst vollständig durchlesen.
-
Page 2: Montage
Die verschiedenen Kletterelemente bieten Kindern vielseitige Spiel- und Klettermöglichkeiten. Das ausklappbare Turnwandelement in der Mitte der Turnwand ist die Grundlage für viele abwechslungsreiche Übungen. Im ausgeklappten Zustand lässt sich das Turnwandelement an einen Turnkasten oder eine Bank anlegen, sodass Sie weitere Spielmöglichkeiten erhalten. - Page 3 Spaxschraube 6x35 Spaxschraube 6x90 Winkel Fußbodenheizung Sicherungsstift Schlossschraube 10x60 Sechskantmutter M10 Scheibe 10 Kunststoffdübel GD 14 Schlüsselschraube 10 x 80 Kunststoffdübel GD 8 Schlüsselschraube 8 x 80 Dübel GD12 Scheibe DIN 125 Abb. 2: Explosionsdarstellung Turnwand Version 09/2023 | Seite 3...
- Page 4 Gebrauchsanleitung zu Art.-Nr. 362 2605 Montageschritt 1 Zu Beginn montieren Sie die festen Wandelemente. Stellen Sie die TuWa Elemente mit einem Abstand von 40 cm vor die Wand, an der Sie montiert werden soll, unter die festen Elemente legen Sie je zwei Scheiben für Holzkonstruktion !. Halten Sie den in Abbildung 3 vorgegebenen Abstand zwischen den Einzelelementen ein.
- Page 5 Gebrauchsanleitung zu Art.-Nr. 362 2605 Elemente wie in Abb. 4. Setzen Sie ebenfalls die Bohrungen in der unteren Wange des mittleren Elements für die Aufnahme der Sicherungsstifte mit Bohrungsdurchmesser Ø 11 mm. Als nächstes befestigen Sie die Wandwinkel mit Hilfe der Schlossschrauben, Unterlegscheiben und Muttern an den ⑰⑱⑲...
- Page 6 ⑦ ⑫ Bedienungshinweise für die Klapp-Turnwand Bitten beachten Sie die folgenden Hinweise: Die Klapp-Turnwand besteht aus 2 festen Elementen und einem neigbaren Element. Das neigbare Element hat zur Sicherung oben 2 Sicherungsstifte mit Gewinde und unten 2 Bodenstifte. Diese Bodenstifte stecken ca.
- Page 7 Überprüfen Sie den Zustand der Seile, denn durch die Nutzung können Gebrauchsspuren entstehen (z. B. Aufrauhungen, Auffaserung, Schnitte). Wartungsarbeiten: Der Artikel sollte jährlich einer Sicherheitsrevision durch eine Fachfirma unterzogen werden. • Kontakt für Wartung: • Bei Fragen stehen wir Ihnen gerne zur Verfügung. Ihr Sport-Thieme Team Version 09/2023 | Seite 7...
- Page 8 User manual (English) | Pages 1–7 Product code 362 2605 Sport-Thieme Gymnastics Wall Thank you for choosing a Sport-Thieme product! Please read the following notes carefully before use so you can enjoy this product safely and keep these instructions for future reference.
-
Page 9: Product Description
User manual for product code 362 2605 Product description Intended use: These gymnastics wall frames allow children to engage in a variety of games, activities and exercises. For more flexible options, the middle section can be tilted and it can even be jacked up on a vaulting box or gymnastics bench. The equipment must not be used for any other purpose than intended, as that could compromise safety and render the warranty void. - Page 10 User manual for product code 362 2605 Parts list: Quantity Description Gymnastics wall frame M8 threaded insert M8×50 wall plug Baseplate Floor pin Slider Castor Nylon wall plug M17 washer (DIN 9021, for wood) Rail Bracket M5×30 Spax screw M6×35 Spax screw M6×90 Spax screw Bracket for floors with underfloor heating Locking pin...
- Page 11 User manual for product code 362 2605 Assembly stage 1 Start by assembling the fixed (non-tilting) gymnastics wall frames. Place them at a distance of 40 cm from the wall they will be mounted on and add two washers ⑨ under each frame. Maintain the distance between the individual frames as specified in figure 3.
- Page 12 User manual for product code 362 2605 holes into the floor. Please note: Do not drill any holes into the floor if the room has underfloor heating; instead, drill two 12 mm holes into the wall so the relevant brackets can be attached to the frames, with their edges aligned as shown in figure 4. Now, drill two 11 mm holes into the bottom of the middle section for the floor pins.
- Page 13 User manual for product code 362 2605 Figure 4: Recommended drilling dimensions for the rails Assembly stage 3 Your next job is to insert the middle section into the rails. Mark the 6 mm holes for the baseplates ④ and floor pins ⑤ based on the holes you’ve already drilled into the frame.
-
Page 14: Maintenance And Care
Additional information Due to continuous quality control of our products, technical changes may occur which could lead to minor alterations to the instructions. If you have any questions, our experts at Sport-Thieme are here for you. Version 09/2023 | Page 7...
Need help?
Do you have a question about the Turnwand and is the answer not in the manual?
Questions and answers