Venta LW15 Comfort Plus, LW25 Comfort Plus, LW45 Comfort Plus - Air Humidifier Manual
- Instructions for use manual (382 pages) ,
- Quick start manual (8 pages) ,
- Instructions for use manual (122 pages)
Advertisement
- 1 Introduction
- 2 SCOPE OF DELIVERY
- 3 SYMBOLS
- 4 INTENDED USE
- 5 IMPROPER USE
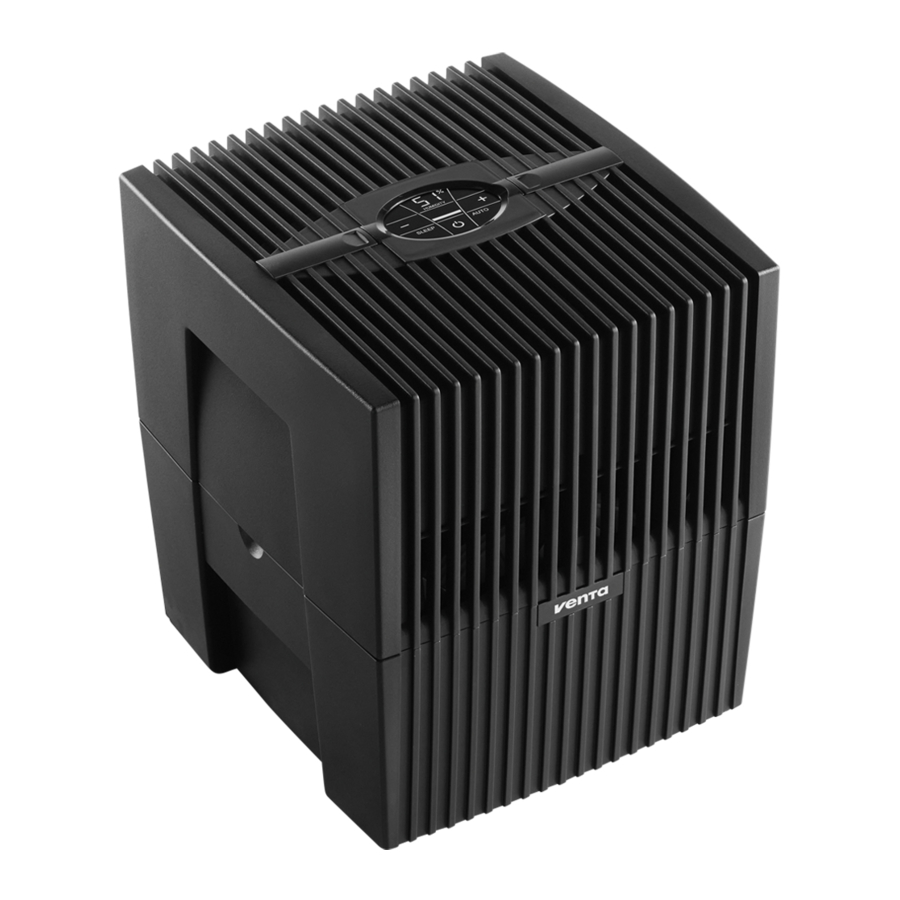
- 6 OVERVIEW
- 7 BEFORE THE FIRST USE
- 8 PUTTING INTO OPERATION
- 9 DISPLAYS, FUNCTIONS & SETTINGS
- 10 CLEANING & MAINTENANCE
- 11 TECHNICAL DATA
- 12 CLEANING OF THE UPPER HOUSING
- 13 ACCESSORIES
- 14 VENTA SERVICE TEAM
- 15 WHAT TO DO IF...
- 16 SERVICE AND SUPPORT
- 17 SAFETY INSTRUCTIONS
- 18 Documents / Resources
Introduction
We are confident that this Venta model will exceed your expectations and hope that you enjoy it.

Please register your Venta appliance here: www.venta-air.com
Please read this operating manual in its entirety, keep it for later reference and note all safety instructions as well as instructions for the proper use of the appliance. You can find the latest version of the operating manual on our website www.venta-air.com
With the LW25 or LW45 Comfort Plus air humidifier, you have purchased a highperforming premium product. The Comfort Plus creates healthy humidity and naturally reduces harmful substances in the air.
Here's how the Venta principle works
A fan directs the ambient air into the water-filled humidifier, where it flows through specially arrayed disk stacks. Hygienically clean air evaporates from their surfaces into the room.
SCOPE OF DELIVERY
1 Venta appliance
1 bottle of hygiene additive 50 ml
1 quick-start guide
1 safety instruction sheet
If any parts are missing or damaged, please contact the Venta Service Team or your local dealer.
SYMBOLS
 | Please read the Safety Instructions carefully. Follow the instructions to prevent injuries or damage to property. |
 | Additional information |
 | Helpful tips |
INTENDED USE
This Venta appliance is a domestic appliance for humidifying the air in interior rooms. The appliance is not suitable for outdoor areas. Any other use or modification of the appliance is considered to be improper use. Venta is not liable for damage or injuries resulting from improper use.
IMPROPER USE
Using the appliance for something other than the intended purpose can endanger health and lives. This includes use under the following conditions:
- in rooms or locations where there is risk of explosion and/or where there is an aggressive atmosphere
- in rooms where there is a high concentration of solvents
- in the vicinity of swimming pools or other wet areas
- outdoors
OVERVIEW

- Display
- Upper housing
- Switching power supply (assembled)
- Transport protection
- Disk stack
- Transport protection
- Lower housing
- Bottle of hygiene additive 50 ml
BEFORE THE FIRST USE
Unpack and set up the appliance. Remove the 50 ml bottle of hygiene additive 8 from the carton. Remove upper housing 2. Remove transport protection 4 from upper housing 2. Remove disk stack 5 from lower housing 7 and remove transport protection 6.
PUTTING INTO OPERATION
- Fill lower housing 7 with tap water up to maximum WATERLINE marking and add 50 ml hygiene additive 8 (complete content of bottle).
![warning]() Never fill the appliance before taking off the upper housing!
Never fill the appliance before taking off the upper housing!
![information]() Adding the hygiene additive is very important, because this optimally humidifies the air.
Adding the hygiene additive is very important, because this optimally humidifies the air.

- Insert disk stack 5 into lower housing 7 and place upper housing 2 onto lower housing 7.
![]()
- Connect the switching power supply 3 to the mains and switch on the appliance by tapping the power button in the display 1.
![information]() Only once the appliance is connected to the mains will the power button
Only once the appliance is connected to the mains will the power button ![]() light up to switch the appliance on and off.
light up to switch the appliance on and off.


DISPLAYS, FUNCTIONS & SETTINGS

| Display | Function | |
| 1 | Humidity | Display the humidity in the room (0 – 99%). |
| 2 | Power level | Display speeds 1 - 2 - 3. |
| 3 | - and + | Set the power level by tapping: - reduces and + increases the speed. |
| 4 | SLEEP | Tap to turn the sleep mode on or off. ON: The appliance dims the display lighting and reduces the power level to 1. Power level 2 can be changed manually with the + or - button 3. Automatic mode 6 is not possible.OFF: Bright display illumination and appliance runs in power levels 1 – 3. |
| 5 |  | Switch the appliance on or off by tapping the power button. |
| 6 | AUTO | Switch Automatic mode on or off by tapping the AUTO button. ON: In the display, AUTO flashes continuously and the appliance automatically regulates the power level according to the humidity in the room. When switching on AUTO, the desired humidity (50% pre set) flashes twice and then the measured humidity in the room is shown in the HUMIDITY display 1. When the preset humidity is exceeded by more than 5%, the fan shuts off after approx. 60 sec. and no power level appears in the speed reading 2. No humidification occurs.OFF: AUTO in the display is continuously illuminated and the appliance operates with the power level set at 1 – 3. Set desired humidity 30 – 70%: Hold AUTO button for 3 seconds. The HUMIDITY 1 display flashes continuously. Set the desired humidity (in 5% increments) using the or + buttons 3. Hold AUTO button for 3 seconds again until the flashing in display HUMIDITY 1 stops and the humidity measured in the room is shown again. Please make sure that automatic mode is switched on: AUTO flashes continuously in the display! |
CLEANING & MAINTENANCE


Ensure the appliance is switched off during all actions and the switching power supply is disconnected from the power outlet!
| Display | Actions | |
| 7 | WATER | Remove upper housing. Fill lower housing with tap water to the WATERLINE marking. Place upper housing on lower housing and put appliance in operation again.As soon as there is not enough water in the lower housing, the appliance is switched off automatically and the WATER display appears. In the HUMIDITY display 1, two lines will flash and the humidity in the room is not shown. To humidify the indoor air continuously, we recommend refilling the water in a timely manner. |
| 8 | SERVICE | Remove upper housing. Drain residual water from lower housing. Rinse lower housing and disk stack. Fill lower housing with tap water up to the WATERLINE marking maximum and add the Venta hygiene additive (for dosage see scale on rear of bottle). Re-assemble the appliance. Touch the SERVICE indicator 8 on the display and hold for 3 sec. until it switches off. For flawlessly hygienic continuous operation, the SERVICE display indicates a reminder every 14 days that this action needs to be carried out. This action can be carried out if required, even if the SERVICE message is not shown. When it is completed, simply touch the SERVICE indicator 8 and hold for 3 sec. The next reminder will now be shown again in 14 days with the SERVICE message |
Any remaining liquid in the water tray and on the disk stack (white, green-yellow or brown deposits or discolorations) do NOT impair the function of the appliance. For the six-monthly cleaning, we recommend the Venta Cleaner. Please note the instruction manual included with the Venta Cleaner.
TECHNICAL DATA
| Model | LW15 Comfort Plus | LW25 Comfort Plus | LW45 Comfort Plus |
| For room sizes* | ≤ 35 m² | ≤ 45 m² | ≤ 60 m² |
| Interactive touch display | Standard | ||
| Colours | brillant white / brillant black | ||
| Power levels | 3 + Automatic | ||
| Noise emission (speeds 1–3) | 24/34/44 dB(A) | 24/34/44 dB(A) | 24/35/45 dB(A) |
| Power consumption (speeds 1–3) | 3/5/8 watts | ||
| Mains voltage | 100–240 V, 50 / 60 Hz | ||
| Water capacity (max.) | 5 litres | 7 litres | 10 litres |
| Dimensions (L x W x H) | 26×28×31 cm | 30×30×33 cm | 45×30×33 cm |
| Weight | approx. 3 kg | approx. 3.5 kg | approx. 5.2 kg |
* based on a ceiling height of max. 2.5 metres
May be subject to modifications and errors
CLEANING OF THE UPPER HOUSING
Ensure the appliance is switched off during all actions and the switching power supply is disconnected from the power outlet!
- Detach upper housing from lower housing. Press locking buttons so that the ends stand up.

- Fold side parts out of the way.

- Fold ribbed wings out of the way.

- Unplug the switching power supply from the drive unit
![]() . Lift the drive unit upwards and out
. Lift the drive unit upwards and out ![]() . Disconnect the switching power supply cable by releasing the bracket
. Disconnect the switching power supply cable by releasing the bracket ![]() and pull downward and out through the opening of the upper housing
and pull downward and out through the opening of the upper housing ![]() .
.

![warning]()


 . Lift the drive unit upwards and out
  . Disconnect the switching power supply cable by releasing the bracket
  and pull downward and out through the opening of the upper housing
  .
.
- Do not disassemble the drive unit and the switching power supply, immerse them in water or bring them into contact with liquids!
- Only clean the drive unit with fan blades and gear with a dry cloth!
- The disassembled upper housing can be cleaned under running water!
- The disassembled upper housing must be absolutely dry before assembly!
- Insert the drive unit into the upper housing from the correct side
![]() . Pull the switching power supply from the bottom upwards and through the opening of the upper housing
. Pull the switching power supply from the bottom upwards and through the opening of the upper housing ![]() and plug it into the drive unit until it clicks into place
and plug it into the drive unit until it clicks into place ![]() . Affix the cable with the bracket
. Affix the cable with the bracket ![]() .
.

- The outer ends of the locking buttons must be standing up. Fold the ribbed side wings
![]() and
and ![]() upwards, then the side elements
upwards, then the side elements ![]() and
and ![]() . Close the upper housing correctly by pressing down on the outer ends of the locking latches
. Close the upper housing correctly by pressing down on the outer ends of the locking latches ![]() and
and ![]() .
.


 and
and  .
.
ACCESSORIES
You can order accessories by phone or online at www.venta-air.com
VENTA SERVICE TEAM
Do you need additional information about your Venta appliance, do you want advice or to order accessories? Our Service Team is there for you! Call us directly, or visit the Venta website: www.venta-air.com
+49 751 5008 88
WHAT TO DO IF...
Ensure the appliance is switched off during all actions and the switching power supply is disconnected from the power outlet!
E1 is shown in the display?
The appliance has switched off automatically because the locking latches on the upper housing are not closed properly.
Close upper housing properly again by pushing on the outer ends of the locking latches. Switch appliance off and on with the power button .
E2 is shown in the display?
The appliance has switched off automatically, because the motor is overstrained (e.g. through the intrusion of foreign objects or similar).
Action: Remove upper housing. Check whether the disk stack in the lower housing as well as fan blades in the upper housing are freely movable. Then switch the appliance on again.
... white spots appear in the background when you touch the display?
In dry rooms, electrostatic charging can cause white areas to appear in the background on the display. These do not affect the functioning or ability to control the appliance and do not constitute a defect.
... the power button to switch on the appliance does not appear in the display?
Please check whether the switching power supply is connected to the mains.
... the power button to switch on the appliance does not appear in the display, even though the switching power supply is connected to the mains?
Please check whether the switching power supply is firmly plugged into the drive unit.
Action: Remove upper housing. Check for correct positioning (see cleaning instructions for the upper housing). Then switch the appliance on again.
... WATER is shown in the display, even though there is water in the lower housing?
Please check whether there is sufficient water in the lower housing and/or whether the upper housing is placed correctly on the lower housing.
Action: Remove upper housing. Fill lower housing with tap water to the WATERLINE mark. Place upper housing correctly on lower housing. Make sure that the switching power supply cable is not trapped between the upper and lower housings. Then switch the appliance on again.
SERVICE AND SUPPORT
GERMANY
Venta-Luftwäscher GmbH
Weltestraße 5
88250 Weingarten
Tel.: +49 751 50 08 0 Fax: +49 751 50 08 20 info@venta-air.com www.venta-air.com
AUSTRIA
Stromayer Elektro Service GmbH
Strohmayergasse 8
1060 Wien Österreich Tel.: +43 1 5961706 office@stromayer.at
CHILE
Venta Air Technologies, Inc. US Headquarters
1111 North Plaza Drive Suite 715
Schaumburg, IL 60173
Tel.: +1-888-333-8218 Fax: +1-224-567-8349 info-us@venta-air.com www.venta-air.com/en_us
CZECH REPUBLIC
LetMeRepair GmbH
Fichtestrasse 1a 02625 Bautzen service-cz@venta-air.com www.letmerepair.com
FINLAND
Suomen Allergiakauppa
Länsiportintie 14
13430 HÄMEENLINNA
Finnland Tel.: +358400855000 myynti@allergiakauppa.fi www.allergiakauppa.fi
FRANCE
LetMeRepair GmbH
Fichtestrasse 1a 02625 Bautzen service-fr@venta-air.com www.letmerepair.com
SERVICE AND SUPPORT BENELUX
Venta Benelux B.V.
Van Heemstraweg Oost 8
5301 KE Zaltbommel
Niederlande Tel.: +31 4 18 54 13 43 info-nl@venta-air.com www.venta-air.com
HUNGARY
LetMeRepair GmbH
Fichtestrasse 1a 02625 Bautzen service-hu@venta-air.com www.letmerepair.com
ITALY
LetMeRepair GmbH
Fichtestrasse 1a 02625 Bautzen service-it@venta-air.com www.letmerepair.com
JAPAN
Address Service Co., Ltd.
17-9, Shinoda, Togane-shi,
Chiba, 283-0013 Japan Tel.: +81-120-407-554 venta_support@adservice. co.jp
LATVIA / LITHUANIA
SIA „BALTIJAS
TIRDZNIECĪBAS
UZŅĒMUMS"
Dārzaugļu iela 1-201,
Riga LV-1012, Latvia Tel.: +371 67790720 info@btu.lv
MALAYSIA / SINGAPORE / PHILLIPINES / VIETNAM
GA MAKMUR SDN BHD
No. 27, Jalan PP 11/4, Alam Perdana Industrial Park, Taman Putra Perdana, 47130 Puchong,
Selangor, Malaysia
Tel.: +603-8322 6628 Fax: +603-8322 6066 info@gasales.com.my
SWITZERLAND
Venta-Luftwäscher AG
Bösch 65
6331 Hünenberg
Schweiz
Tel.: +41 41 781 15 15 Fax: +41 41 781 15 50 info-ch@venta-air.com www.venta-air.com
MONGOLIA
AERIS LLC
SUITE 316, Barilga Architecture Building, Chinggis Avenue, Oron Suuts Street, 2nd horoo, Khan-Uul district, Ulaanbaatar,
Mongolia 17032
Tel.: +976-99101185, +976-99096696 sales@aeris.mn www.aeris.mn
PORTUGAL
LetMeRepair GmbH
Fichtestrasse 1a 02625 Bautzen service-pt@venta-air.com www.letmerepair.com
RUSSIA
Venta Russia TSK IMPORT
(offizieller Importeur) 124683, Moskau, Selenograd, 1505, Raum III Russland
Tel.: +7 499 733 10 10 Fax: +7 499 733 10 10 venta@venta.ru
SCOTLAND, UK
LetMeRepair UK Ltd
1 Langlands Court
Kelvin South Business
Park, East Kilbride, G75
0YB, Scotland, UK Tel.: +44 (0) 1355 241 222 service-uk@venta-air.com Fax +44 1355 246575
USA
Venta Air Technologies, Inc.
US Headquarters
1111 North Plaza Drive Suite 715
Schaumburg, IL 60173
Tel.: +1-888-333-8218 Fax: +1-224-567-8349 info-us@venta-air.com www.venta-air.com/en_us
SLOVAKIA
LetMeRepair GmbH
Fichtestrasse 1a 02625 Bautzen service-sk@venta-air.com www.letmerepair.com
SPAIN
LetMeRepair GmbH
Fichtestrasse 1a 02625 Bautzen service-es@venta-air.com www.letmerepair.com
SOUTH AFRICA
EUROCARE Wellness
5 Star Business Park,
Unit 2, Persimmon Close, Honeydew, Johannesburg
Südafrika
Tel.: +27 11 888 3255 Fax: +27 11 888 9874 info@eurocarewellness. co.za
SOUTH KOREA
VENTA KOREA CO., LTD.
3/F., Seojin Bldg., 754,
Seolleung-ro, GangnamGu, Seoul 135-948, Korea
Tel.: +82 22 03 40 114 Fax: +82 22 03 40 119
UKRAINE
Venta-Centre Ukrein
Schlichtera, 11
Kharkov, Ukraine
Tel.: +38 057 752 72 72 Fax: +38 057 768 01 57 venta@venta.com.ua
www.venta-air.com/Service/Service-Support/
VENTA WORLD WIDE
www.venta-air.com/en_de/Venta-worldwide/
SAFETY INSTRUCTIONS

- This appliance is suitable for use by children over the age of 8 years and people with restricted physical, sensory, or mental capacities or lack of experience and knowledge, providing they are supervised or have received instructions on the safe use of the appliance and understand the existing hazards.
- Read the operating instructions completely before putting the appliance into operation and keep them for later reference.
- The appliance is not a toy for children.
- Cleaning and user maintenance may not be performed by children under the age of 8 years or without supervision.
- Keep the appliance and its switching power supply out of the reach of children under the age of 8 years.
- Improper use can damage the appliance and cause physical injuries.
- Plug the appliance into suitable power outlets only – the mains voltage must correspond to the nameplate data on the appliance.
- This appliance can only be operated with the "Model No. BI13-240050-Cd / FJSW1982400500" switching power supply.
- Never use the appliance if it has a damaged switching power supply plug or cable, or after it has malfunctioned or if it has been dropped or damaged in any other way.
- Disconnect the power plug before every cleaning or maintenance operation or transportation of the appliance.
- Never use the appliance if it has been dropped or damaged in any other way.
- Electrical appliances should only be repaired by professional specialists. Amateur repairs could result in considerable danger to the user.
- Do not sit on the appliance and do not place any objects on it.
- Do not put any foreign objects into the appliance.
- Do not immerse the upper housing in water or any other liquid.
- Never overfill the appliance.
- Never transport or tilt the appliance when the tank is full.
- Never unplug the appliance by pulling on the cable or pulling the switching power supply out with wet hands.
- The appliance should only be operated when it is completely assembled.
- Place the appliance on a stable surface which is flat and dry.
- Set up the appliance so that it cannot be knocked over, and so that no one can trip over it or its cable.
- Ensure the appliance is at least 50 cm from any objects such as furniture or walls.
- Maximum installation altitude: 2000 metres
- Never cover or block the vents to prevent overheating/damage to the appliance.
- A persistent relative ambient humidity of more than 60%, especially in winter, can enable the formation of biological organisms.
- The design of the appliance and the cold evaporation technology make it impossible for water to leak directly from it in the form of droplets, vapour, mist or lime deposits, providing you use it correctly.
- Only operate the appliance with original Venta accessories designed for the purpose. Venta-Luftwäscher GmbH does not accept any liability for damage caused by the use of third-party accessories.
- If you do not use the appliance for several days or put it into storage for a longer period, empty the water tray completely, clean it and dry thoroughly to prevent odours or biological organisms from developing in standing water or water residues.
- Unplug the appliance when it is not in use.
- Ensure the area surrounding the appliance does not become damp or wet. If moisture leaks out, switch to a lower setting. If it is not possible to switch to a lower setting, use the appliance with interruptions. Make sure no absorbent material such as carpets, curtains, net curtains or tablecloths get damp.
Documents / Resources
References
![www.venta-air.com]() http://www.venta-air.com
http://www.venta-air.com![www.venta-air.com]() Venta Air Technologies | Simply Good Indoor Air Quality with Venta
Venta Air Technologies | Simply Good Indoor Air Quality with Venta![www.letmerepair.com]() LetMeRepair
LetMeRepair![www.allergiakauppa.fi]() http://www.allergiakauppa.fi
http://www.allergiakauppa.fi![www.aeris.mn]() Home
Home![www.venta-air.com]() http://www.venta-air.com/Service/Service-Support/
http://www.venta-air.com/Service/Service-Support/![www.venta-air.com]() http://www.venta-air.com/en_de/Venta-worldwide/
http://www.venta-air.com/en_de/Venta-worldwide/
Download manual
Here you can download full pdf version of manual, it may contain additional safety instructions, warranty information, FCC rules, etc.
Download Venta LW15 Comfort Plus, LW25 Comfort Plus, LW45 Comfort Plus - Air Humidifier Manual
Advertisement


Need help?
Do you have a question about the LW15 Comfort Plus and is the answer not in the manual?
Questions and answers