
Related Manuals for Quick MILL 938545


Summary of Contents for Quick MILL 938545
- Page 1 since 1945 2044 Manuale per Utente e Manutentore PROFESSIONAL HOME COFFEE MACHINES...
- Page 2 Per eventuali altre domande, rivolgetevi al vostro rivenditore di fiducia o alla nostra sede. QUICK MILL S.r.l. azienda costruttrice della macchina in oggetto verrà indicata nel manuale come Costruttore. Novembre 2023...
- Page 3 ISTRUZIONI DI SICUREZZA • Verificare che i dati della targhetta corrispondano a quella dell'alimentazione elettrica principale alla quale la macchina sarà collegata. • Posizionare la macchina su un piano orizzontale e stabile. • La macchina deve essere installata solo in luoghi indicati nella sezione "INFORMAZIONI GENERALI"...
- Page 4 Non lavare la macchina con getti d’acqua diretti in pressione o con vapore; Non immergere la macchina in acqua o in altro tipo di liquido; La macchina non è destinata a bambini con meno di otto anni e a persone con capacità mentali fisiche o sensoriali ridotte, fatti salvi i casi in cui tali persone abbiano ricevuto assistenza o formazione per l’uso dell’apparecchio da una persona responsabile della loro incolumità.
-
Page 5: Istruzioni Specifiche Per Il Personale Di Manutenzione
• Se la macchina presenta difetti di funzionamento, parti compromesse o smette di funzionare, spegnerla e scollegare l’alimentazione elettrica: non tentare di riparare la macchina. Qualsiasi riparazione deve essere effettuata da un tecnico specializzato. Contattare l’assistenza del Costruttore. Gli scambiatori sono dotati di protettore termico che interrompe il riscaldamento in caso di guasto o surriscaldamento. -
Page 6: Table Of Contents
INDICE Istruzioni specifiche per il personale di manutenzione: ........5 PREMESSA ......................8 Simboli......................8 Avvertenze ..................... 9 INFORMAZIONI GENERALI ..............10 1.1 Destinazione d’uso ................. 10 1.2 Controindicazioni d’uso ................10 1.3 Informazioni generali ................11 1.4 Vibrazioni ....................11 COMPONENTI MACCHINA E FUNZIONAMENTO ......... - Page 7 10.3 Pulizia gruppo caffè ................30 10.4 Decalcificazione circuito caffè .............. 31 10.5 Decalcificazione circuito acqua ............31 10.6 Inconvenienti possibili ................32 11. MESSA IN FUORI SERVIZIO ..............33 11.1 Temporanea ..................33 11.2 Definitiva ....................33 12. IL BUON CAFFÈ ..................34 12.1 Portata ed impostazioni macinature .............
-
Page 8: Premessa
PREMESSA Conservare il libretto istruzioni in un luogo sicuro, per eventuali informazioni o problematiche trattate in modo non esaustivo rivolgersi al personale competente. Simboli Il triangolo d’avvertimento identifica tutte le spiegazioni di natura importante per la sicurezza della persona. Attenersi a tali indicazioni per evitare incidenti! Indica un’avvertenza o una nota su funzioni chiave o su informazioni utili. -
Page 9: Avvertenze
Avvertenze • Gli elementi d’imballaggio (sacchetti di plastica, polistirolo espanso, chiodi, cartoni, ecc...) non devono essere lasciati alla portata di bambini in quanto potenziali fonti di pericolo. • Il cavo di alimentazione deve essere ben steso (evitare arrotolamenti o sovrapposizioni) in posizione non esposta ad eventuali urti o manomissioni di minori, non deve essere in prossimità... -
Page 10: Informazioni Generali
1. INFORMAZIONI GENERALI Il presente manuale di istruzioni è parte fondamentale per operare in sicurezza con la Vostra macchina da caffè; pertanto, è importante leggere attentamente tutte le avvertenze e le cautele da adottare descritte in seguito. 1.1 Destinazione d’uso La macchina è... -
Page 11: Informazioni Generali
1.3 Informazioni generali La macchina deve essere utilizzata introducendo nella tanica acqua dolce e pulita: utilizzare un addolcitore se l’acqua locale è ad alto contenuto minerale. Un accumulo di minerali può ostruire i sistemi idraulici e causare danni alla macchina nonché... -
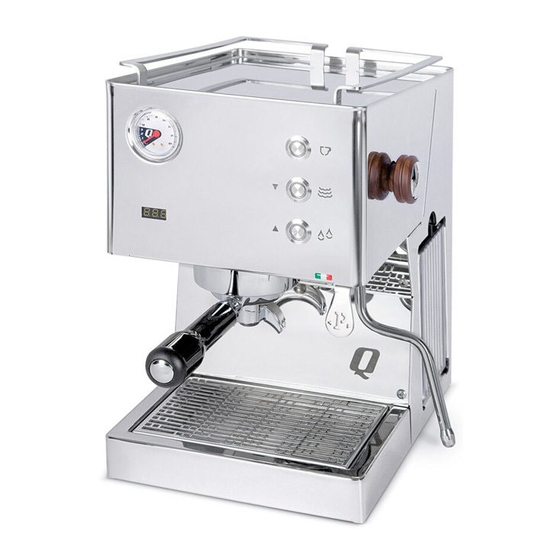
Page 12: Componenti Macchina E Funzionamento
2. COMPONENTI MACCHINA E FUNZIONAMENTO 2.1 Caratteristiche La macchina è stata progettata e realizzata per eseguire l’erogazione del caffè, dell’acqua e del vapore. Essa è priva di macinino. Sul lato destro è presente un vano per l’inserimento della tanica d’acqua. I pulsanti presenti nella parte frontale consentono l’erogazione delle bevande e la programmazione delle funzioni della macchina. -
Page 14: Accessori
3. ACCESSORI Legenda: Filtro due dosi Spazzolino di pulizia Filtro una dose Pressino Portafiltro doppio Misurino Filtro cieco... -
Page 15: Trasporto
4. TRASPORTO 4.1 Imballo Durante il trasporto tenere sempre il collo in posizione corretta facendo riferimento all’indicazione stampata all’esterno del cartone. Non capovolgere o coricare su un fianco l’imballo. Nell’imballo sono contenute le parti staccate e la documentazione a corredo che va conservata per ulteriori consultazioni. -
Page 16: Installazione
5. INSTALLAZIONE La macchina viene consegnata pronta per l’installazione secondo i dati di targa. La macchina è predisposta per funzionare con una tanica. Accertarsi che la linea elettrica abbia le stesse caratteristiche della macchina. L’impianto di alimentazione energia elettrica deve essere dotato di salvavita o di interruttore generale automatico con una efficiente presa a terra. -
Page 17: Funzionamento
6. FUNZIONAMENTO Si raccomanda di fare attenzione alle parti calde della macchina, in special modo al gruppo erogazione caffè e alla lancia vapore / acqua. Durante l’uso della lancia vapore / acqua prestare molta attenzione a non mettere le mani sotto e non toccarla subito dopo l’uso. 6.1 Messa in funzione Riempire la tanica d’acqua. -
Page 18: Comandi Manuali
7. COMANDI MANUALI Nella parte frontale della macchina sono presenti i seguenti comandi manuali multifunzione: Questi tre pulsanti di erogazione hanno le seguenti funzioni: Erogazione caffè singolo: durante l’erogazione del caffè il led interno di questo pulsante resta acceso. Premuto cinque secondi consente l’accesso al menu. Erogazione vapore. -
Page 19: Descrizione Letture A Display
8. DESCRIZIONE LETTURE A DISPLAY Per entrare nel menu tenere premuto il tasto erogazione caffè (1) per cinque secondi. Per spostarsi tra i parametri premere i tasti (2) e (3) I parametri appaiono nel seguente ordine: • Temperatura Premere il tasto (1) per modificare l’unità di misura [Celsius / Fahreneit] e spostarsi in alto e in basso con i tasti (2) e (3) per sceglierla. - Page 20 • Funzione ECO Premere il tasto (1) per modificare i minuti di attesa prima che la macchina entri in modalità Eco. Scegliere i minuti con le frecce dei tasti (2) e (3) tra 0 _ 30 _ 60 _ 90 Premere il tasto (1) due secondi per confermare la scelta.
- Page 21 • Preinfusione Premere il tasto (1) per impostare la preinfusione su Premere nuovamente il tasto (1) per impostare i secondi di preinfusione. Scegliere con le frecce dei tasti (2) e (3) tra 0on_1on_2on→ 9on Premere il tasto (1) due secondi per confermare la scelta. •...
- Page 22 • Temperatura vapore da 130°C a 140°C Premere il tasto (1) per modificare la temperatura. Scegliere con le frecce dei tasti (2) e (3) tra 130 → 140 Premere il tasto (1) due secondi per confermare la scelta. • Temperatura caffè Premere il tasto (1) per modificare la temperatura.
- Page 23 Tabella riassuntiva livelli menu Primo livello Secondo Terzo livello Note livello “C-F” Temperatura in °C Temperatura in °F “-t-“ Se °C → da 40 a 105 – 93/199 Temperatura °C/°F 93 Default Se °F → da 104 a 221 – 199 Default “”oFS Impostabile da 0-25°C o 32-...
-
Page 24: Erogazioni
9. EROGAZIONI 9.1 Erogazione del caffè • Controllare che il rubinetto di erogazione (1) sia chiuso e la valvola di profilazione (2) sia rivolta verso il fronte macchina (come nell’immagine riportata in questa pagina). • Sganciare il portafiltro (3) dalla propria sede ruotandolo in senso orario. •... -
Page 25: Erogazione Del Caffè Profilazione Manuale
9.2 Erogazione del caffè profilazione manuale • Controllare che il rubinetto di erogazione (1) sia chiuso e la valvola di profilazione (2) sia rivolta verso il fronte macchina (come nell’immagine riportata in questa pagina). • Sganciare il portafiltro dalla propria sede ruotandolo in senso orario. •... -
Page 26: Erogazione Acqua Calda
9.3 Erogazione acqua calda • Assicurarsi che la leva di profilazione (1) sia in pozione. Porre il recipiente atto a raccogliere l’acqua sotto la lancia vapore / acqua • (2). • Premere il pulsante di erogazione acqua calda (3): il led interno resta acceso e sul display appare la lettera •... -
Page 27: Erogazione Vapore
9.4 Erogazione vapore • Assicurarsi che la leva di profilazione (1) sia in pozione. Premendo il pulsante vapore (2) la macchina si prepara all’erogazione e sul • display appare la scritta Steam Up ad indicare che la temperatura sta salendo per l’esecuzione del vapore. •... - Page 28 Caffè dopo vapore Sul display lampeggia la temperatura con le lineette: ciò significa che la temperatura è elevata per un caffè. … → → → → Premere il tasto di erogazione caffè: la macchina in automatico mette in circolo acqua raffreddando il circuito. Al raggiungimento della temperatura ideale viene visualizzato macchina pronta per esecuzione caffè.
-
Page 29: Pulizia Della Macchina
PULIZIA DELLA MACCHINA Per la pulizia della macchina non utilizzare getti d’acqua né strumenti metallici o abrasivi tipo pagliette, spazzole metalliche, aghi, ecc.…, e detergenti ma usare un panno o una spugna umidi. Un’attenta e accurata pulizia della macchina è molto importante per l’affidabilità, la durata e la sicurezza nel funzionamento dell’apparecchio. -
Page 30: Pulizia Gruppo Caffè
10.3 Pulizia gruppo caffè • Svitare in senso antiorario con una brugola la vite del gruppo (1). • Una volta svitato rimuovere lo spruzzatore doccetta prestando attenzione a non perdere la molla posta al suo interno. • Ora si può rimuovere la doccetta (2) e il disco supporto doccetta (3). •... -
Page 31: Decalcificazione Circuito Caffè
10.4 Decalcificazione circuito caffè Utilizzare prodotti decalcificanti per macchine da caffè di tipo non tossico, reperibili in commercio. Rispettare le istruzioni della casa produttrice riportate sulla confezione del prodotto. • Impostare il set point di temperatura caffè al valore più basso possibile •... -
Page 32: Inconvenienti Possibili
10.6 Inconvenienti possibili In caso di danneggiamento del cavo di alimentazione, fare riferimento ad un centro di assistenza autorizzato per la sostituzione in quanto è necessario l’uso di un utensile speciale. I materiali di scarto usati per la lavorazione o manutenzione, se non biodegradabili o inquinanti, vanno riposti in separati contenitori e consegnati negli appositi centri di raccolta. -
Page 33: Messa In Fuori Servizio
MESSA IN FUORI SERVIZIO 11.1 Temporanea • Svuotare la tanica dell’acqua. • Staccare la spina di alimentazione elettrica. • Effettuare le operazioni di pulizia. • Riporre la macchina in un ambiente asciutto, al riparo da intemperie e di esclusivo accesso (evitare di lasciarla alla portata di minori o incapaci). 11.2 Definitiva Oltre alle operazioni della messa fuori servizio temporanea, provvedere a: •... -
Page 34: Il Buon Caffè
IL BUON CAFFÈ 12.1 Portata ed impostazioni macinature La macinatura del caffè serve a aumentare la superficie di contatto tra il caffè e l’acqua per permettere all’acqua di estrarre al meglio queste sostanze. Per regolare una corretta macinatura del caffè espresso bisogna trovare il giusto punto di macinatura, la giusta granulometria. -
Page 35: Buone Norme Per Ottenere Un Ottimo Espresso
12.2 Buone norme per ottenere un ottimo espresso 1. I L PURGE O FLUSSAGGIO Un'operazione fondamentale da effettuare prima di ogni espresso, per garantire massima igiene e pulizia della bevanda. Si sgancia il portafiltro e si eroga acqua per eliminare i residui del caffè precedente e pulire le doccette della macchina. Questo passaggio va fatto sempre prima di ogni nuovo espresso. - Page 36 – 5. L A PULIZIA DEL PORTAFILTRO SECONDA PARTE Si passa poi a pulire nuovamente il portafiltro, questa volta sui bordi, per eliminare la polvere in eccesso. Senza questo passaggio, la polvere di caffè finita ai lati del portafiltro andrà a bruciarsi durante il processo di estrazione, portando sentori sgradevoli alla bevanda.
-
Page 37: Il Cappuccino
12.3 Il cappuccino Per la preparazione di un cappuccino si consiglia di seguire alcune regole basi quali: Utilizzare latte fresco intero all’interno di una lattiera di acciaio inossidabile. La quantità di latte da utilizzare deve essere circa 100ml; il latte deve essere freddo poiché... -
Page 38: Come Versare La Crema Di Latte In Tazza
12.4 Come versare la crema di latte in tazza Iniziare a versare delicatamente il latte appena montato al centro della tazza, assicurandosi che la crema rimanga compatta. Quando il latte e il caffè sono ben mescolati e la tazza è mezza piena, aumentare la velocità... -
Page 39: Menù
12.5 Menù AFFÈ ISTRETTO HITE • Tazzina da 150 ml • • Tazzina da 90 ml 40 ml espresso • • 110 ml latte caldo, poca 20 ml espresso crema AFFÈ ESPRESSO AFFÈ ATTE • Tazza/bicchiere da 220 ml • •... - Page 40 NOTE: _______________________________________________ _______________________________________________ _______________________________________________ _______________________________________________ _______________________________________________ _______________________________________________ _______________________________________________ _______________________________________________ _______________________________________________ _______________________________________________ _______________________________________________ _______________________________________________ _______________________________________________ _______________________________________________ _______________________________________________ _______________________________________________ _______________________________________________ _______________________________________________ _______________________________________________ _______________________________________________ _______________________________________________ _______________________________________________ _______________________________________________ _______________________________________________ _______________________________________________ _______________________________________________ _______________________________________________ _______________________________________________ _______________________________________________ _______________________________________________ _______________________________________________...
- Page 41 since 1945 2044 Handbuch für Fachtechniker und Service PROFESSIONAL HOME COFFEE MACHINES...
- Page 42 Informationen zur korrekten Anwendung des Produktes zu erhalten. Für eventuelle weitere Fragen wenden Sie sich bitte an Ihren Fachhändler oder an unsere Büros. Die Firma QUICK MILL S.r.l. ist der Hersteller der den Gegenstand dieses Handbuchs bildenden Maschine und wird im Folgenden als Hersteller bezeichnet.
- Page 43 Bei Schäden am Kabel, Stecker oder an einem sonstigen Teil oder bei Funktionsstörungen darf die Maschine nicht verwendet werden. Senden Sie in diesem Fall die Maschine an den Hersteller Quick Mill zurück. • Die in dieser Anweisung beschriebenen Maschinen sind ausschließlich für die Herstellung von Kaffee, Heißwasser und Dampf für heiße Getränke geplant...
- Page 44 Kontrolle vorgenommen werden, um festzustellen, ob die elektrischen Komponenten beschädigt sind. • Benutzen Sie die Maschine bei Raumtemperaturen zwischen 5° C und 45° C, damit sie einwandfrei funktionieren kann. • Verwenden Sie immer nur von Quick Mill zertifizierte Ersatzteile und Zubehör.
-
Page 45: Spezielle Anleitungen Für Das Wartungspersonal
Maschine ausgeschaltet und von der Stromversorgung getrennt werden. Versuchen Sie nicht, die Maschine zu reparieren. Reparaturen dürfen nur von Fachleuten von Quick Mill ausgeführt werden. Setzen Sie sich dazu mit dem Kundendienst von Quick Mill in Verbindung. Die Wärmetauscher sind mit einem Wärmeschutzgerät ausgestattet, das das Heizen im Schadensfall oder bei Überhitzung unterbricht. - Page 46 INHALT Spezielle Anleitungen für das Wartungspersonal: ........45 VORWORT ....................... 48 Symbole ....................... 48 Warnhinweise ....................49 ALLGEMEINE ANGABEN ................ 50 1.1 Bestimmungsgemäße Verwendung............50 1.2 Gegenanzeigen ..................50 1. Allgemeine Informationen ................. 51 1.4 Vibrationen ..................... 51 MASCHINENBAUTEILE UND FUNKTIONSWEISE ......... 52 2.1 Merkmale ....................
- Page 47 10.3 Reinigung der Brühgruppe ..............70 10.4 Entkalkung des Kaffeekreislaufs ............71 10.5 Entkalkung Wasserkreislauf ..............71 10.6 Mögliche Fehlfunktionen ............... 72 11. AUSSERBETRIEBSETZUNG ..............73 11.1 Vorübergehend ..................73 11.2 Für immer ..................... 73 12. GUTER KAFFEE ..................74 12.1 Mahlen einstellen .................
-
Page 48: Vorwort
VORWORT Bewahren Sie diese Anleitung an einem sicheren Ort auf. Weitere Hinweise oder Antworten auf Fragen, die nicht ausreichend behandelt wurden, erhalten Sie von Ihrem Einzelhändler. Symbole Das Warndreieck kennzeichnet alle wichtigen Erklärungen zur Sicherheit der Person. Bitte halten Sie sich an diese Anweisungen, um Unfälle zu vermeiden! Hinweis oder Anmerkung bezüglich Schlüsselfunktionen oder nützlicher Informationen. -
Page 49: Warnhinweise
Warnhinweise • Verpackungsmaterialien (Plastikhüllen, Styropor, Nägel, Pappe usw.) dürfen nicht in die Hände von Kindern gelangen, für die sie eine Gefährdung darstellen können. • Das Stromkabel muss flach liegen (das Aufrollen oder Verwinden von Kabeln ist zu vermeiden). Kinder dürfen es nicht erreichen oder mitreißen können; es darf nicht in der Nähe von Flüssigkeiten, Wasser und Wärmequellen verlaufen und muss unversehrt sein (beschädigte Kabel sind von Fachpersonal zu ersetzen). -
Page 50: Allgemeine Angaben
1. ALLGEMEINE ANGABEN Diese Gebrauchsanleitung grundsätzlich wichtig, damit Ihre Kaffeemaschine in aller Sicherheit verwenden können. Daher ist es sehr wichtig, dass Sie alle nachstehend angegebenen Hinweise und Vorsichtsmaßnahmen aufmerksam lesen. 1.1 Bestimmungsgemäße Verwendung Das Gerät wurde für die Ausgabe von ein oder zwei Tassen Kaffee auf Basis von gemahlenem Kaffee sowie die Ausgabe von Heißwasser und Dampf entwickelt und hergestellt. -
Page 51: Allgemeine Informationen
1. Allgemeine Informationen Die Maschine darf nur mit sauberem Süßwasser im Tank verwendet werden. Bei stark mineralhaltigem Wasser Enthärter benutzen. Hydrauliksysteme können durch Kalkansammlungen verstopft werden. Dadurch können Personen- und Sachschäden verursacht werden. 1.4 Vibrationen Die Maschine ist mit vibrationshemmenden Gummifüßen ausgestattet. Bei normalen Arbeitsbedingungen entstehen keine für Personen und/oder Sachen schädlichen Vibrationen. -
Page 52: Maschinenbauteile Und Funktionsweise
2. MASCHINENBAUTEILE UND FUNKTIONSWEISE 2.1 Merkmale Das Gerät wurde für die Ausgabe von Kaffee, Wasser und Dampf entwickelt und hergestellt. Es hat keine Kaffeemühle. Auf der rechten Seite befindet sich ein Fach zum Einsetzen des Wassertanks. Die Tasten an der Front dienen für die Ausgabe der Getränke und für die Programmierung der Maschinenfunktionen.. -
Page 54: Zubehör
3. ZUBEHÖR Legende: Siebeinsatz 2 Tassen Kaffeemehlpresser Siebeinsatz 1 Tasse Messlöffel Siebträger mit Doppelauslauf Blindfilter Reinigungsbürste... -
Page 55: Transport
4. TRANSPORT 4.1 Verpackung Das Packstück muss immer aufrecht transportiert werden, unter Beachtung der an der Außenseite aufgedruckten Angaben. Die Verpackung nicht kippen oder auf eine Seite legen. In der Verpackung sind die losen Teile und die mitgelieferte Dokumentation enthalten, die zum Nachschlagen aufbewahrt werden muss. 4.2 Auspacken •... -
Page 56: Installation
5. INSTALLATION Die Maschine wird installationsbereit gemäß den Daten des Typenschilds geliefert. Die Maschine ist für den Betrieb mit einem Tank vorgesehen. Prüfen Sie nach, ob die Stromleitung den Merkmalen der Maschine entspricht. Die elektrische Anlage muss mit einem Fehlerstromschutzschalter oder einem Sicherungsautomaten mit leistungsfähiger Erdung ausgestattet sein. -
Page 57: Funktionsweise
6. FUNKTIONSWEISE Achten Sie auf die heißen Teile der Maschine, besonders auf den Auslauf und auf die Dampf-/Wasserlanze. Benutzen Sie die Dampf-/Wasserlanze mit großer Vorsicht, greifen Sie mit den Händen niemals darunter und berühren Sie die Dampf- /Wasserlanze nicht sofort nach der Verwendung. 6.1 Inbetriebnahme •... -
Page 58: Manuelle Bedienung
7. MANUELLE BEDIENUNG An der Frontseite des Geräts befinden sich folgende manuell bedienbare Multifunktionstasten: Diese drei Ausgabetasten haben folgende Funktionen: Ausgabe einer Tasse Kaffee: Während der Ausgabe leuchtet die interne LED dieser Taste auf. Durch fünf Sekunden langes Drücken wird das Menü aufgerufen. Dampfausgabe Während der Ausgabe leuchtet die interne LED dieser Taste auf. -
Page 59: Beschreibung Der Displayanzeigen
8. BESCHREIBUNG DER DISPLAYANZEIGEN Zum Aufrufen des Menüs die Taste Kaffeeausgabe (1) fünf Sekunden lang drücken. Um zwischen den Parametern zu wechseln, die Tasten (2) und (3) drücken. Die Parameter erscheinen in folgender Reihenfolge: • Temperatur Über die Taste (1) die Maßeinheit [Celsius / Fahrenheit] ändern und dabei zur Auswahl mit den Tasten (2) und (3) nach unten bzw. - Page 60 • ECO-Funktion Über die Taste (1) die Zeit in Minuten ändern, bevor die Maschine in den Eco- Modus übergeht. Mit den Pfeiltasten (2) und (3) die Minuten auswählen zwischen 0 _ 30 _ 60 _ 90 Zum Bestätigen der Auswahl die Taste (1) zwei Sekunden lang drücken. Befindet sich die Maschine im Eco-Modus, erscheint ein Punkt auf dem Display.
- Page 61 • Pre-Infusion Taste (1) drücken zur Einstellung der Pre-Infusion auf Drücken Sie die Taste (1) erneut, um die Vorinfusionssekunden einzustellen. Mit den Pfeiltasten (2) und (3) auswählen zwischen 0on_1on_2on→9on Zum Bestätigen der Auswahl die Taste (1) zwei Sekunden lang drücken. •...
- Page 62 • Dampftemperatur 130–140 °C Taste (1) drücken, um die Temperatur zu ändern. Mit den Pfeiltasten (2) und (3) auswählen zwischen 130 → 140 Zum Bestätigen der Auswahl die Taste (1) zwei Sekunden lang drücken. • Kaffeetemperatur Taste (1) drücken, um die Temperatur zu ändern. Über die Pfeiltasten (2) bzw. (3) den gewünschten Wert auswählen.
- Page 63 Übersichtstabelle der Menüebenen Level 1 Level 2 Level 3 Hinweis “C-F” Temperatur in °C Temperatur in °F „-t-“ Temperatur Falls °C → 40–105 – 93/199 °C/°F 93 Standard Falls °F → 104–221 – 199 Standard “”oFS 15°C/59°F Einstellbar auf 0–25 °C oder 32–77 °F „Pr1“...
-
Page 64: Ausgaben
9. AUSGABEN 9.1 Kaffeeausgabe • Sicherstellen, dass der Ausgabehahn (1) geschlossen ist und das Regelventil (2) zur Vorderseite der Maschine ausgerichtet ist (siehe Bild auf dieser Seite). • Lösen Sie den Siebträger aus seinem Sitz durch Drehung im Uhrzeigersinn. • Füllen Sie den Siebeinsatz mit einer oder zwei Dosen Kaffee (je nach Siebeinsatz). -
Page 65: Manuell Geregelte Kaffeeausgabe
9.2 Manuell geregelte Kaffeeausgabe • Sicherstellen, dass der Ausgabehahn (1) geschlossen ist und das Regelventil (2) zur Vorderseite der Maschine ausgerichtet ist (siehe Bild auf dieser Seite). • Lösen Sie den Siebträger (3) aus seinem Sitz, indem Sie ihn im Uhrzeigersinn drehen. -
Page 66: Heißwasserausgabe
9.3 Heißwasserausgabe • Sicherstellen, dass das Regelventil (1) in Position ist. • Wasserauffangbehälter unter die Wasser-/Dampflanze(2) stellen. • Die Taste für die Heißwasserausgabe (3) drücken: Die interne LED leuchtet weiter und auf dem Display erscheint der Buchstabe • Die Pumpe läuft an und das Wasser wird auf Temperatur gebracht (einige Sekunden abwarten). -
Page 67: Dampfausgabe
9.4 Dampfausgabe • Sicherstellen, dass das Regelventil (1) in Position ist. • Durch Drücken der Taste Dampf (2) bereitet sich die Maschine auf die Ausgabe vor und auf dem Display erscheint die Schrift Steam Up Sie zeigt an, dass die Temperatur für die Dampfausgabe entsprechend ansteigt. Ist die Pumpe auf OFF eingestellt, startet sie erst, wenn die Temperatur erreicht ist. - Page 68 Kaffee nach dem Dampf Auf dem Display blinkt die Temperatur mit Strichen: Das bedeutet, die Temperatur ist für einen Kaffee zu hoch. … → → → → Die Taste Kaffeeausgabe drücken: Die Maschine lässt automatisch Wasser zirkulieren und kühlt den Kreislauf. Ist die ideale Temperatur erreicht, erscheint Die Maschine ist bereit für die Kaffeezubereitung.
-
Page 69: Reinigung Der Maschine
REINIGUNG DER MASCHINE Reinigen Sie das Gerät nicht mit einem Wasserstrahl, metallischen oder scheuernden Hilfsmitteln Scheuerschwämme, Drahtbürsten, Nadeln usw. oder sonstigen Reinigungsmitteln, sondern verwenden Sie lediglich ein feuchtes Tuch oder einen feuchten Schwamm. Eine sorgfältige und gründliche Reinigung ist sehr wichtig für Zuverlässigkeit, Lebensdauer und sicheren Betrieb des Geräts. -
Page 70: Reinigung Der Brühgruppe
10.3 Reinigung der Brühgruppe • Drehen Sie die Montageschraube (1) mit einem Inbusschlüssel gegen den Uhrzeigersinn heraus. • Nach dem Lösen der Schraube die Duschbrause herausnehmen und dabei darauf achten, dass die Feder im Inneren nicht verloren geht. • Nach dem Abschrauben Duschsieb entfernen. Dabei darauf achten, dass Feder (2) und Federstift (3) im Inneren nicht verloren gehen. -
Page 71: Entkalkung Des Kaffeekreislaufs
10.4 Entkalkung des Kaffeekreislaufs Handelsübliche, ungiftige Entkalkungsmittel für Kaffeemaschinen verwenden. Die jeweiligen Hinweise des Herstellers auf der Produktverpackung beachten. • Sollwert der Kaffeetemperatur auf den niedrigsten Wert einstellen. • Das Entkalkungsmittel in den Wassertank geben. • Bei einer kalten, gerade eingeschalteten Maschine oder bei Erreichen der niedrigsten eingestellten Temperatur die Kaffeeausgabetaste so oft betätigen, bis der Tank völlig leer ist. -
Page 72: Mögliche Fehlfunktionen
10.6 Mögliche Fehlfunktionen Wenn das Netzkabel beschädigt ist, wenden Sie sich zum Austausch an eine autorisierte Kundendienststelle, da ein Spezialwerkzeug erforderlich ist. Abfälle, die bei Betrieb oder Wartung anfallen, müssen, wenn sie nicht biologisch abbaubar oder gar umweltschädlich sind, in getrennten Behältern bei entsprechenden Sammelstellen abgegeben werden. -
Page 73: Ausserbetriebsetzung
AUSSERBETRIEBSETZUNG 11.1 Vorübergehend • Wassertank entleeren • Netzstecker abziehen • Reinigungen durchführen • Maschine in trockener Umgebung lagern, geschützt vor Witterungseinflüssen und Unbefugten (außerhalb der Reichweite von Kindern oder eingeschränkt handlungsfähigen Personen abstellen). 11.2 Für immer Zusätzlich zu den Verfahren für die vorübergehende Außerbetriebsetzung sind folgende Maßnahmen zu ergreifen: •... -
Page 74: Guter Kaffee
GUTER KAFFEE 12.1 Mahlen einstellen Der Kaffee wird gemahlen, damit eine größere Kontaktfläche zwischen Kaffee und Wasser entsteht und das Wasser die Stoffe besser extrahieren kann. Für die richtige Einstellung zum Mahlen der Kaffeebohnen für den Espresso muss der richtige Mahlpunkt, richtige Korngröße... -
Page 75: Einige Regeln Für Einen Richtig Guten Espresso
12.2 Einige Regeln für einen richtig guten Espresso 1. S PÜLEN ODER LUSHEN Dieser wichtige Vorgang sollte vor jeder Espresso-Zubereitung erfolgen, um ein Maximum an Hygiene und Sauberkeit des Getränks zu garantieren. Nehmen Sie den Siebträger ab und lassen Sie Wasser auslaufen, um die vorhandenen Kaffeereste zu beseitigen und die Duschen der Maschine zu reinigen. - Page 76 5. R EINIGUNG DES IEBTRÄGERS ZWEITER Der Siebträger muss nochmals gereinigt werden, aber dieses Mal am Rand, um das überschüssige Kaffeepulver zu entfernen. Ohne diese Reinigung verbrennt der seitlich am Siebträger haftende Kaffee beim Brühen und verleiht dem Getränk einen unangenehmen Geschmack. Außerdem besteht in diesem Fall auch das Risiko, dass die Gummidichtungen in der Maschine beschädigt werden.
-
Page 77: Cappuccino
12.3 Cappuccino Bei der Zubereitung eines Cappuccinos empfiehlt es sich, einige Grundregeln zu beachten, z. B.: Verwenden Sie frische Vollmilch in einer Milchkanne aus Edelstahl. Die Milchmenge muss etwa 100 ml betragen. Die Milch muss kalt sein, da sie bei einer Temperatur von über 65 °C nicht mehr aufschäumt. Vorzugsweise sollte die Milchkanne nicht... -
Page 78: Wie Sie Den Milchschaum Richtig In Die Tasse Gießen
12.4 Wie Sie den Milchschaum richtig in die Tasse gießen Beginnen Sie, die soeben aufgeschäumte Milch in Tassenmitte einzugießen, damit der Schaum kompakt bleibt. Sobald Milch und Kaffee gut vermischt sind und die Tasse halb voll ist, gießen Sie schneller ein; bringen Sie dazu den Ausguss der Milchkanne näher zur Tasse und erhöhen Sie den Einlaufwinkel. -
Page 79: Menü
12.5 Menü AFFÈ ISTRETTO HITE • 150 ml - Tasse • • 90 ml - Tasse 40 ml Espresso • • 110 ml heiße Milch, wenig 20 ml Espresso Schaum SPRESSO ILCHKAFFEE • Tasse/Glas 220 ml • • 90 ml - Tasse 40 ml Espresso •... - Page 80 ANMERKUNGEN: _______________________________________________ _______________________________________________ _______________________________________________ _______________________________________________ _______________________________________________ _______________________________________________ _______________________________________________ _______________________________________________ _______________________________________________ _______________________________________________ _______________________________________________ _______________________________________________ _______________________________________________ _______________________________________________ _______________________________________________ _______________________________________________ _______________________________________________ _______________________________________________ _______________________________________________ _______________________________________________ _______________________________________________ _______________________________________________ _______________________________________________ _______________________________________________ _______________________________________________ _______________________________________________ _______________________________________________ _______________________________________________ _______________________________________________ _______________________________________________ _______________________________________________...
- Page 81 since 1945 2044 User and Maintenance Manual PROFESSIONAL HOME COFFEE MACHINES...
- Page 82 If you have any questions, please contact your retailer or our offices. QUICK MILL S.r.l. the machine manufacturing company, is indicated in the handbook with the name: Manufacturer. November 2023...
- Page 83 SAFETY INSTRUCTIONS • Check the data on the rating plate: they have to correspond to that of the main electrical supply to which the machine will be attached. • Place the machine on a horizontal stable surface. • The machine is only to be installed in the places indicated in the section "GENERAL INFORMATION"...
- Page 84 • If operating defects, faulty parts are found, or the machine does not function, switch it off and disconnect the electric power supply: do not try to repair the machine. All repairs are to be carried out by a specialised Quick Mill technician. Contact Quick Mill Service Department.
-
Page 85: Specific Instructions For Maintenance Staff
The exchangers are fitted with thermal protection that stops the heating in the case of failure or overheating. All parts for heating and with electrical voltage are located inside the machine panelling. Specific instructions for maintenance staff: • If stored for long periods at temperatures below 2° C, the equipment hydraulic circuit has to be emptied. - Page 86 TABLE OF CONTENTS Specific instructions for maintenance staff: ..........85 INTRODUCTION ....................88 Symbols......................88 Warnings ...................... 89 GENERAL INFORMATION ..............90 1. Destination for use ................... 90 1.2 Improper use ..................90 1.3 General information ................91 1.4 Vibrations ....................91 MACHINE COMPONENTS AND FUNCTIONING ........
- Page 87 10.3 Coffee unit cleaning ................110 10.4 Descaling coffee circuit ............... 111 10.5 Descaling water circuit ................ 111 10.6 Possible drawbacks ................112 11. DECOMMISSIONING ................113 11.1 Temporary ..................113 11.2 Definitive ..................... 113 12. THE GOOD COFFEE ................114 12.1 Scope and grinding settings ...............
-
Page 88: Introduction
INTRODUCTION Keep this instruction manual in a safe place. For any information or difficulties not fully explained, please contact the service personnel. Symbols The warning triangle identifies all the explanations of an important nature for the safety of persons. Follow these instructions to avoid accidents! Indicates a warning or note of key functions or useful information. -
Page 89: Warnings
Warnings • The packaging material (plastic bags, polystyrene, nails, cardboard, etc.) must not be left within the reach of children as they are a potential source of danger. • The power cable must lie flat (avoid curling or overlapping) in a position which is not exposed to any impacts or handling by minors. -
Page 90: General Information
1. GENERAL INFORMATION This user manual is an essential part of the safe operations of your Machine; therefore, it is important that you read the enclosed warnings and cautions carefully. 1. Destination for use The machine has been designed and built for single and double dispensing of ground coffee, hot water and steam. -
Page 91: General Information
1.3 General information The machine must be operated with soft, clean drinking water introduced in the tank. If the local water supply has a high mineral content use a water softener. A build-up of mineral deposit may restrict the flow of water within the hydraulic systems causing damage to the machine and risking personal injury. -
Page 92: Machine Components And Functioning
2. MACHINE COMPONENTS AND FUNCTIONING 2.1 General characteristics The machine has been designed and built to supply coffee, water and steam. It has no grinder. On the right side there is a compartment for the insertion of the water tank. The buttons on the front are used to distribute the drinks and to program the machine functions. -
Page 94: Accessories
3. ACCESSORIES Key: Filter two doses Presser One-dose filter Scoop Double filter holder Blind filter Cleaning brush... -
Page 95: Transport
4. TRANSPORT Packaging During transport, always keep the package in the correct position referring to the indications printed on the outside of the box. Do not turn over or lay the machine and packaging on its side. The packaging contains loose parts and accompanying documentation which is to be kept for further consultation. -
Page 96: Installation
5. INSTALLATION The machine is delivered ready for installation according to the plate data. The machine is provided to function with a container. Make sure that the power line has the same characteristics as the machine. The electric power supply system is to be fitted with a circuit breaker or an automatic main switch with an efficient ground socket. -
Page 97: Functioning
6. FUNCTIONING It is recommended to pay attention to the hot parts of the machine, especially to the coffee dispenser group and to the steam lance / water. When using the steam lance / water be very careful not to place the hands underneath and do not touch it immediately after use. -
Page 98: Manual Commands
7. MANUAL COMMANDS In the front of the machine there are the following multi-function manual controls: These three dispensing buttons have the following functions: Single coffee dispensing: during coffee dispensing, the internal led on this button remains lit. Pressed for five seconds it allows access to the menu. Steam dispensing: during the dispensing process the internal led of this button remains lit. -
Page 99: Description Of Readings On Display
8. DESCRIPTION OF READINGS ON DISPLAY To enter the menu, press and hold the coffee key (1) for five seconds. To move between parameters, press the (2) and (3). Parameters appear in the following order: • Temperature Press the button (1) to change the unit of measurement [Celsius / Fahrenheit], then move up and down with the buttons (2) and (3) to choose one. - Page 100 • ECO function Press the button (1) to change the minutes to wait before the machine enters Eco mode. Choose the minutes with the arrow keys (2) and (3) between 0 _ 30 _ 60 _ 90 Press the button (1) two seconds to confirm the choice. When the machine is in Eco mode, a dot appears on the display.
- Page 101 • Pre-infusion Press button (1) to set the pre-infusion to Press button (1) again to set the pre-infusion seconds. Choose with the arrow keys (2) and (3) between 0on_1on_2on→ 9on Press the button (1) two seconds to confirm your choice. •...
- Page 102 • Steam temperature from 130°C to 140°C Press the button (1) to change the temperature. Choose with the arrow keys (2) and (3) between 130 → 140 Press the button (1) two seconds to confirm the choice. • Coffee temperature Press the button (1) to change the temperature.
- Page 103 Menu level summary table First level Second Third level Notes level “C-F” Temperature in °C Temperature in °F “-t-“ If °C → from 40 to 105 – 93/199 Temperature °C/°F 93 Default If °F → from 104 to 221 – 199 Default “”oFS 14°C/57°F...
-
Page 104: Brewings
9. BREWINGS 9.1 Coffee brewing • Check that the dispensing tap (1) is closed and the profiling valve (2) is facing the front of the machine (as in the picture on this page). • Unhook the filter holder (3) from its seat by rotating it clockwise. •... -
Page 105: Coffee Dispensing Manual Profiling
9.2 Coffee dispensing manual profiling • Check that the dispensing tap (1) is closed and the profiling valve (2) is facing the front of the machine (as in the picture on this page). • Unhook the filter holder from its seat by turning it clockwise. •... -
Page 106: Hot Water Supply
9.3 Hot water supply • Make sure the profiling lever (1) is in position. • Place the container for collecting water under the steam/water lance (2). • Press the hot water draw-off button (3): the internal led remains lit and the display shows the letter •... -
Page 107: Steam Supply
9.4 Steam supply • Make sure the profiling lever (1) is in position. • By pressing the steam button (2) the machine prepares to dispense and the display shows the message Steam Up to indicate that the temperature is rising for steam execution •... - Page 108 Coffee after steam The display flashes the temperature with dashes: this means that the temperature is high for a coffee. … → → → → Press the coffee brewing button: the machine automatically circulates water, cooling the circuit. When the ideal temperature is reached, the display shows ready-to-run coffee machine.
-
Page 109: Machine Cleaning
MACHINE CLEANING For cleaning the machine do not use water jets or metal or abrasive tools such as flakes, metal brushes, needles, etc... and detergents but use a damp cloth or sponge. Careful and accurate cleaning of the machine is very important for reliability, durability and safety in the operation of the device. -
Page 110: Coffee Unit Cleaning
10.3 Coffee unit cleaning • Unscrew the assembly screw anti-clockwise with an Allen key (1). • Once unscrewed, remove the hand shower sprayer, taking care not to lose the spring inside. • You can now remove the hand shower (2) and the hand shower support disc (3). -
Page 111: Descaling Coffee Circuit
10.4 Descaling coffee circuit Use commercially available, non-toxic descaling products for coffee machines. Follow the manufacturer's instructions on the product packaging. • Set the set point for coffee temperature to the lowest possible value. • Place the descaling agent in the water tank. •... -
Page 112: Possible Drawbacks
10.6 Possible drawbacks In case of damage to the power cord, please refer to an authorized service centre for replacement as it is necessary to use a special tool. Waste materials used for processing or maintenance, if not biodegradable or polluting, shall be stored in separate containers and delivered to the appropriate collection centres. -
Page 113: Decommissioning
DECOMMISSIONING 11.1 Temporary • Empty the tank of water. • Unplug the power supply plug. • Carry out cleaning operations. • Store the machine in a dry environment, protected from the weather and exclusive access (avoid leaving it within the reach of minors or incapacitated). 11.2 Definitive In addition to the operations of temporary release from service, provide for: •... -
Page 114: The Good Coffee
THE GOOD COFFEE 12.1 Scope and grinding settings Coffee grinding is used to increase the contact surface between the coffee and the water to allow the water to extract these substances as best as possible. To adjust a correct grinding of the espresso coffee you need to find the right grinding point, the right grain size. -
Page 115: Good Rules For A Great Espresso
12.2 Good rules for a great espresso 1. P URGE OR FLUXING A fundamental operation to be carried out before each espresso, to guarantee maximum hygiene and cleaning of the drink. The filter holder is released and water is dispensed to eliminate the residues of the previous coffee and clean the shower heads of the machine. - Page 116 5. C LEANING THE FILTER HOLDER SECOND PART The filter holder is then cleaned again, this time on the edges, to remove excess dust. Without this step, the finished coffee powder on the sides of the filter holder will burn out during the extraction process, bringing unpleasant hints to the drink. Not only: this excess dust also risks ruining the rubber seals inside the machine.
-
Page 117: Cappuccino
12.3 Cappuccino For the preparation of a cappuccino it is recommended to follow some basic rules such as: Use fresh whole milk inside a stainless steel milk jug. The quantity of milk to be used must be about 100 ml; the milk must be cold as it does not rise above the temperature of 65 ºC. -
Page 118: How To Pour The Cream In A Cup
12.4 How to pour the cream in a cup Begin to gently pour the freshly fitted milk into the centre of the cup, making sure that the cream remains compact. When the milk and coffee are well mixed and the cup is half full, increase the speed of the hand by bringing the milk jug close to the cup and increasing the dosage angle. -
Page 119: Menu
12.5 Menu HORT COFFEE HITE • Cup 150 ml • Cup of 90 ml • 40 ml espresso • 20 ml espresso • 110 ml hot milk, little cream SPRESSO AFFÈ ATTE • Cup/Glass of 220 ml • Cup of 90 ml •... - Page 120 NOTES: _______________________________________________ _______________________________________________ _______________________________________________ _______________________________________________ _______________________________________________ _______________________________________________ _______________________________________________ _______________________________________________ _______________________________________________ _______________________________________________ _______________________________________________ _______________________________________________ _______________________________________________ _______________________________________________ _______________________________________________ _______________________________________________ _______________________________________________ _______________________________________________ _______________________________________________ _______________________________________________ _______________________________________________ _______________________________________________ _______________________________________________ _______________________________________________ _______________________________________________ _______________________________________________ _______________________________________________ _______________________________________________ _______________________________________________ _______________________________________________ _______________________________________________...
- Page 121 _______________________________________________ _______________________________________________ _______________________________________________ _______________________________________________ _______________________________________________ _______________________________________________ _______________________________________________ _______________________________________________ _______________________________________________ _______________________________________________ _______________________________________________ _______________________________________________ _______________________________________________ _______________________________________________ _______________________________________________ _______________________________________________ _______________________________________________ _______________________________________________ _______________________________________________ _______________________________________________ _______________________________________________ _______________________________________________ _______________________________________________ _______________________________________________ _______________________________________________ _______________________________________________ _______________________________________________ _______________________________________________ _______________________________________________ _______________________________________________ _______________________________________________ _______________________________________________...
- Page 122 _______________________________________________ _______________________________________________ _______________________________________________ _______________________________________________ _______________________________________________ _______________________________________________ _______________________________________________ _______________________________________________ _______________________________________________ _______________________________________________ _______________________________________________ _______________________________________________ _______________________________________________ _______________________________________________ _______________________________________________ _______________________________________________ _______________________________________________ _______________________________________________ _______________________________________________ _______________________________________________ _______________________________________________ _______________________________________________ _______________________________________________ _______________________________________________ _______________________________________________ _______________________________________________ _______________________________________________ _______________________________________________ _______________________________________________ _______________________________________________...
- Page 123 _______________________________________________ _______________________________________________ _______________________________________________ _______________________________________________ _______________________________________________ _______________________________________________ _______________________________________________ _______________________________________________ _______________________________________________ _______________________________________________ _______________________________________________ _______________________________________________ _______________________________________________ _______________________________________________ _______________________________________________ _______________________________________________ _______________________________________________ _______________________________________________ _______________________________________________ _______________________________________________ _______________________________________________ _______________________________________________ _______________________________________________ _______________________________________________ _______________________________________________ _______________________________________________ _______________________________________________ _______________________________________________ _______________________________________________ _______________________________________________ _______________________________________________...
- Page 124 The taste of Perfection Via Stati Uniti D’America 6/8-20030 Senago (MI) Ph.02/9986106- Fax.02/99010947 Reg.delle Imprese di Milano (MI-1999-193954) Cap.Soc.€ 52.000,00i.v. – R.E.A.Milano 1593567 C.F.-P.IVA 12859930153 – N.Mecc.MI 300877 Http:/www.quickmill.it November 2023 Revision 00...
Need help?
Do you have a question about the 938545 and is the answer not in the manual?
Questions and answers