
Subscribe to Our Youtube Channel
Related Manuals for Patpet B630 Plus


Summary of Contents for Patpet B630 Plus
- Page 1 B630 Plus Bark Control Collar User Manual Instruction Manual, Version WT-B630 Plus-V1 Please carefully peruse this manual prior to utilization...
-
Page 2: Table Of Contents
Contents ..........Safety Instructions .......... Product Parameters ............What You Get ....Function and Operation Description ............1.At a glance ............2.Charging ............... 3.Installation ............. 4.Turn on/off ..........5.Operating instructions ....... 6.How to test the Static Stimulation function? ..........7.Training instructions ............ -
Page 3: Safety Instructions
Safety Instructions This product cannot be tested directly on humans, otherwise it will violate local laws. Turn off or remove the Bark Control Collar before playing with the dog. Please do not wear the device on your dog for a long time. Do not place the product near a stove or at high temperatures. -
Page 4: Product Parameters
Product Parameters Product Name : Bark Control Collar Product Model: B630 Plus Operating Voltage : 3.7V Battery Capacity : 450mAh Rated Input: DC 5V /0.5A Waterproof rating : IP67 Operating temperature: -10°c-+50°c Storage temperature: -20°c~+60c Device volume: 67.4mm*40mm*33mm Net weight : 56 g... -
Page 5: What You Get
What You Get COMPONENTS Bark control collar Type-C charging cable Static stimulation test light Contact points 2 pairs B630 Plus Bark Control Collar User Manual User manual Instruction Manual, Version WT-B630 Plus-V1 Please carefully peruse this manual prior to utilization... -
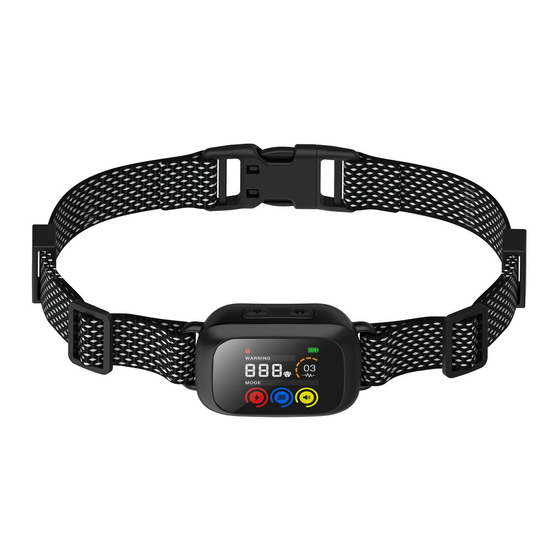
Page 6: Function And Operation Description
Function and Operation Description 1.At a glance Mode Button Power Button/Sensitivity ② ① Adjustment Button Type-C Charging Port ③ Contact Point ④... - Page 7 Battery Icon Unlock Icon lock Icon Sensitivity Level Icon Warning Record Tone Icon Vibration Icon Static Icon Icons Meaning Status This icon that Battery Fully Charged signifies a fully Icon charged battery This icon indicates Low Battery Icon low battery The operation Unlock Icon interface is locked...
- Page 8 Icons Meaning Status The operation Lock Icon interface is unlocked Indicates the Tone function on going product is currently in sound mode Indicates the Vibration function product is currently on going in vibration mode Indicates the Static stimulation product is currently function on going in static mode Used to display the...
-
Page 9: Charging
2.Charging Tips: Please fully charge before use! The battery is low The battery is fully charged Display Charging Status and Prompt Successful Charging Connection. 3.Installation ① Install the contact points ② Static test light ③ Use the test light to tighten the contact points... -
Page 10: Turn On/Off
4.Turn on/off Press and hold the power Press and hold the power button for 2 seconds to button for 2 seconds to turn turn on. The screen will off. The screen will display display "I am coming / "Waiting for you." The Bark Control Collar."... - Page 11 Lock: Press and hold the power button and the M button simultaneously. The screen will display the lock icon, and after 2 seconds, the device will be locked. Unlock: Press and hold the power button and the M button simultaneously. The screen will display the unlock icon, and after 2 seconds, the device will be unlocked.
- Page 12 Vibration Mode ③ The levels range from 1 to 6, exclusively offering vibration. The intensity of the vibrations increases with higher levels. ④ Sound + Vibration Mode The levels range from 1 to 6, with increasing levels indicating more intense vibrations and heightened auditory alerts.
- Page 13 The levels range from 1 to 6, with higher levels progressively increasing the intensity of vibration and transitioning from weak to strong static warning, while maintaining a consistent duration. ⑥ Sound + Vibration + Static Stimulation Mode The sound, vibration, and static are synchronized with 6 available levels.
- Page 14 ⑦ Sensitivity Adjustment After power on, press the power button once to adjust sensitivity. Level 1-3 is suitable for environments with background noise, such as music or TV playing. Level 2-4 is suitable for typical home environments. Level 5 is ideal for extremely quiet situations, such as late at night (may be easily triggered).
-
Page 15: How To Test The Static Stimulation Function
⑧ Trigger Settings The product is set to default Progressive Mode, adjusting levels based on the duration of dog barking intervals. For example, if at Level 1 warning, continuous barking raises the warning level by one step. If the dog remains silent for a period and then barks again, the warning level decreases by one step. -
Page 16: Training Instructions
Turn on the bark collar and switch to Vibration + Static Stimulation Mode.Put the static test light on the contact points, then shout "woof, woof" to the collar while shaking it. Normally, the test lamp will flash when triggered. 7.Training instructions 1.Initial 1-7 Days of Wear: During the first week of your dog wearing the product, please remain nearby and attentive. -
Page 17: Level Chart
2.Days 8-15 of Wear: During this phase, it's important to note that your dog is likely barking less randomly. However, the training is not yet complete. Whenever you want your dog to remain calm, continue using the bark control collar. When your dog behaves well, consider rewarding them with treats. -
Page 18: Wearing Methods And Precautions
Wearing Methods and Precautions 1.Wearing methods Please keep the dog in a comfortable standing position and ① ensure that the device is turned off before wearing. Please place the device in the middle of the dog's neck and ensure that the direction of the switch button is upward, and ②... - Page 19 You should be able to easily insert a finger between the collar and your dog’s neck. ③ If the collar is too loose or too tight, the operation of the device will be affected. Mark the desired length of the collar with a pen, remove the collar and cut off the excess.
- Page 20 2.Wearing precautions Wearing a collar for an extended period of time, or being too tight, will cause the dog’s skin to become irritated. This must be avoided. Please make sure your dog doesn't wear the collar more than 12 hours a day. Please try to readjust the collar position on the pet's neck every 1 to 2 hours.
-
Page 21: Frequently Asked Questions
Please stop using the collar until the skin heals if you notice a rash or pain in your dog. If the condition persists for more than 48 hours, seek medical attention immediately. Frequently Asked Questions Question Problem Action Use the charging cable that Charging cable came with the device does not fit... - Page 22 Question Problem Action Check whether the touch of No response means the key is damaged normal No display/ Recharge again sound prompt 2.The product does not turn The product Connect charging cable enters the low and wait for the battery to power charge protection mode...
- Page 23 Question Problem Action The device is worn in the middle of the dog's neck, The collar is with a finger width gap too loose between the collar and the neck The excess The collar straps should be 4. The collar was not tightened correctly in each falls off easily...
- Page 24 Question Problem Action It has been It should not be worn for worn for too more than 12 hours and long a period should be checked every of time 2 hours ①Keep your dog's neck If the device is area dry and clean, and do worn when the not wear products while dog is wet or...
- Page 25 Question Problem Action 7. Accessories Damaged in Contact customer service to missing, transport or initiate a repair/return. May accessories packing mistake require photos or video. damage, etc The bark control collar requires the user to interact A brief vibration with and train the pet to or static achieve the desired effect 8.
- Page 26 Question Problem Action There was only Both sound AND vibration sound without are required to trigger the movement device The dog barked The dog must bark 2 time once in 10 within 10 seconds to seconds activate the device 11. Barking After being triggered 6 does not consecutive times, a...
-
Page 27: About After-Sales
Question Problem Action Check to see Charge the device if the battery is completely Adjust the device so the The dog’s hair contact points touch the 13. No static is too long dog’s skin stimulation/No vibration The device is worn in the middle of the dog's neck, The collar is with a finger width gap... - Page 28 2.If the device becomes defective after 30 days from the date of purchase, but before the end of the 1 year warranty period, the customer will be required to ship the device back to the factory at their own expense. We will test and replace any faulty parts, then return the device to you free of charge.
-
Page 29: Compliance
Compliance This symbol means that the product has been CE certified, and any product with CE mark is proved in compliance with the local regulations of EEAs. This symbol means that the electromagnetic interference of the equipment is lower than the limit approved by the Federal Communications Commission.
Need help?
Do you have a question about the B630 Plus and is the answer not in the manual?
Questions and answers