Advertisement
Introduction
We take pride in the craftsmanship, innovation and design that goes into every Café product, and we think you will too. Among other things, registration of your appliance ensures that we can deliver important product information and warranty details when you need them. Register your Café appliance now online. Helpful websites are available in the Consumer Support section of this Owner's Manual. You may also mail in the pre-printed registration card included in the packing material.
Getting Started
Unpacking
- Remove and safely discard all packing materials. Avoid using sharp tools that can damage the contents. Remove all labels before first use.
- Verify all components are present. If any item is missing, please contact us at cafeappliances.com (if in Canada, contact us at cafeappliances.ca).
NOTE: This appliance is intended for indoor household use only.
Preparing the Oven
- It is recommended to wipe the interior walls of the oven with a damp wet sponge before first use. Do not use abrasive cleaners, pads, or cloths that can damage the cavity surfaces.
- It is recommended to thoroughly clean all accessories before first use. Accessories may be cleaned in a dishwasher, but it is recommended to clean by hand with warm, soapy water. Rinse and dry thoroughly.
- Place the oven on a level, stable, and heat-resistant surface. Ensure the oven has at least 4" (10cm) of clearance on all sides of the unit.
- Do not place or store any items on top of the oven, except for the included accessories.
Powering the Oven
- Unravel the power cord and plug it into a grounded 120V power outlet. The appliance alarm will sound, and the control display will illuminate.
- Do not let the power cord hang over edge of table or counter. Do not let the power cord contact hot surfaces. Read and follow all safeguards.
Before First Use
- It is recommended to operate the oven empty on Air Fry mode for 20 minutes at 400F before first use. This will ensure that any protective films on the heating elements are removed.
- When using the oven for the first time, the oven may emit visible vapors and/or a slight odor. The vapors and odor are normal, safe, and not detrimental to the oven. Ensure that the room is well ventilated.
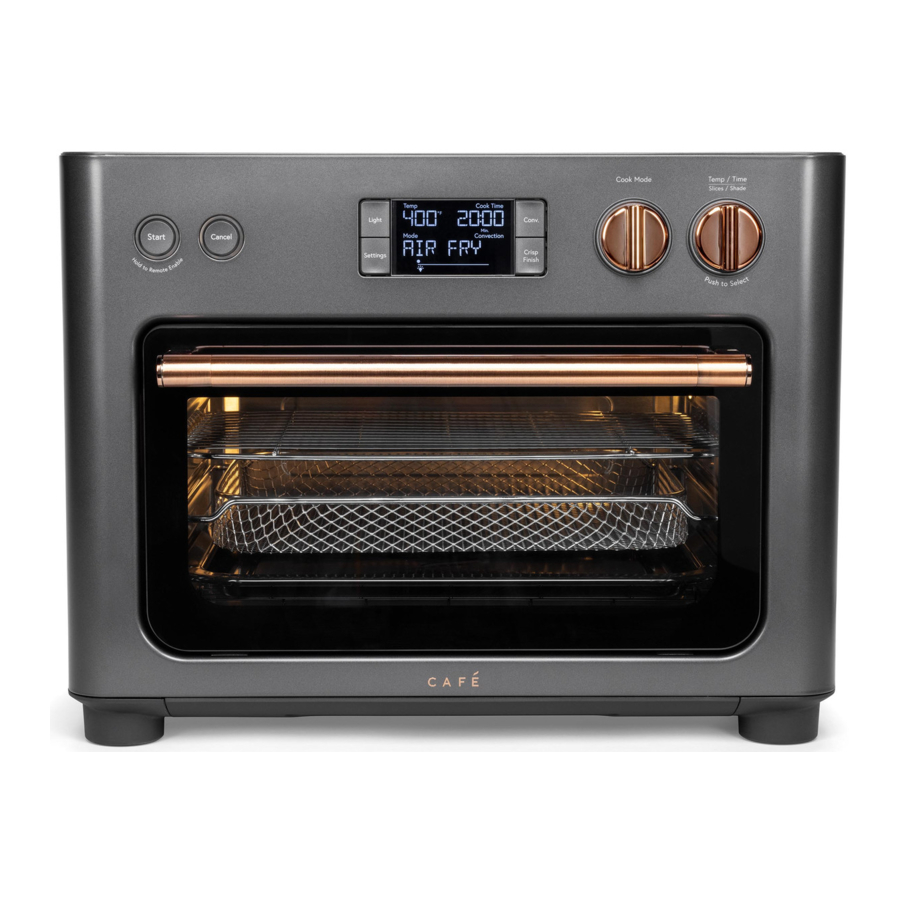
Components

- Oven
- Door Handle
- Oven Controls
- Removable Crumb Tray
- Wire Rack
- Baking Tray
- Pizza Pan
- Air Fry/Dehydrate Basket
NOTE: Do not place the crumb tray in the dishwasher.
Controls
Control Panel

- Start Button
- Cancel Button
- Oven Light Button
- Settings Button
- Convection Fan Button
- Crisp Finish Button
- Control Display
- Cook Mode Knob
- Cooking Settings Knob
Control Display

- Temperature Display
Displays the selected oven temperature or number of slices. - Time Display
Displays the cook time remaining or selected shade level. - Cooking Mode Display
Displays the selected cooking mode. - Convection Indicator
Illuminates when convection fan is active. - WiFi Indicator
Illuminates when the appliance is connected to a WiFi network. - Remote Enable Indicator
Illuminates when Remote Enable setting has been activated.
- Oven Light Indicator
Illuminates when the Oven light is turned on. - Control Lock Indicator
Illuminates when the Control Lock feature is activated. - Preheating Indicator
Illuminates when oven is preheating to selected temperature. - Press Start Reminder
Illuminates to prompt user to start oven cooking cycle. - Crisp Finish
Indicator Illuminates when oven is in Crisp Finish mode. - Progress Bar
Shows progress of the current cooking cycle.
Functions
Cooking Modes
Your Café oven includes 14 unique oven modes to provide versatility in cooking and food preparation.
Air Fry
The Air Fry mode is ideal for browning and crisping the exterior of foods. By combining intense heat and airflow, it can produce a taste and texture similar to deep frying without the need to submerge the food in oil.
Bake
The Bake mode is ideal for cooking foods that generally lack structure before the cooking process, such as cakes, muffins, pastries, pies, lasagnas, and casseroles. Food will be cooked thoroughly and evenly, which also makes this mode suitable for packaged frozen meals.
Broil
The Broil mode is ideal for quickly searing meats (e.g. steaks or fish), crisping vegetables (e.g. potatoes), or browning the top surface of foods (e.g. casseroles).
Roast
The Roast mode is ideal for cooking foods that are generally solid before the cooking process, including a wide variety of meats, poultry, and vegetables. Foods will be tender and moist on the inside, while developing a crispy texture on the exterior.
Reheat
The Reheat mode is ideal for reheating already cooked foods, such as leftovers, without overcooking or drying out the food.
Warm
The Warm mode is useful for keeping freshly cooked meals warm while waiting for guests or preparing the rest of the meal.
Slow Cook
The Slow Cook mode is ideal for cooking foods that require extended cooking times at lower oven temperatures.
Dehydrate
The Dehydrate mode is ideal for dehydrating foods, such as fruits, vegetables, and jerky. By combining low heat and steady airflow, the food will dry out evenly without cooking it.
Proof
The Proof mode can maintain low oven temperatures, which make it ideal for proofing dough or fermenting yogurt.
Cookie
The Cookie mode is ideal for baking cookies. Regardless of whether homemade or pre-packaged, cookies will be cooked gently and evenly.
Pizza
The Pizza mode is ideal for cooking frozen pizzas. The oven will melt the cheese, heat up toppings, and crisp the crust.
Bagel
The Bagel mode is ideal for browning the cut sides of bagels while lightly toasting the opposite surface. This mode may also be used to toast other similar foods such as English muffins.
Toast
The Toast mode is ideal for browning the outside surfaces of bread slices while maintaining a soft and moist inside. This mode may be used for a wide variety of bread types and thicknesses.
Crisp Finish
The Crisp Finish mode is ideal for melting, caramelizing, browning, or crisping the top of any food. Use Crisp Finish after any other cooking mode to add the perfect finishing touch on any of your signature dishes.
Cooking Modes Overview

* To turn off preheat for all cook modes, toggle the "Preheat" setting to OFF position in the settings menu.
Cook food thoroughly to help protect against foodborne illness. Minimum safe food temperature recommendations can be found at IsItDoneYet.gov. Always check internal food temperature to confirm minimum safe temperatures have been reached.
Using Your Oven
Selecting the Cooking Mode
To select the cooking mode, rotate the Cook Mode knob until the desired cooking mode is shown on the control display. When using the oven for the first time, default cooking settings will be displayed. Otherwise, the oven will always store the last used settings for any given cooking mode.
NOTE: The Crisp Finish cooking mode must be selected by pressing the Crisp Finish button.

Adjusting Cooking Mode Settings
The settings for each cooking mode can be adjusted by using the Temp/Time knob. The knob can be rotated clockwise to increase the setting value, or it can be rotated counterclockwise to decrease the setting value.
The Temp/Time knob also functions as a button. Pushing the button will toggle between the settings being adjusted (Slices/Shade or Temperature/Time).

Starting the Oven
After selecting the desired cooking mode and adjusting the settings, place the food in the oven and press the Start button to begin the cooking cycle.

Preheating the Oven
For AIR FRY, BAKE, ROAST, PIZZA and COOKIE modes only:
Upon starting one of these cooking modes, the "Preheating" indicator will illuminate on the control display and the oven will begin heating to the set temperature. During this time, the progress bar will scroll, and the cooking timer will not count down.

NOTE: If PREHEAT OFF is selected in the oven settings, the oven will skip the preheat mode and the cooking timer will begin counting down immediately.
NOTE: The Preheat mode may be skipped manually by pressing the Start button a second time. The cooking timer will begin counting down immediately.
When the oven temperature reaches the set temperature, the oven alarm will sound, and the "Preheating" indicator will disappear. The "Press Start" reminder will illuminate on the control display, indicating that the oven is ready. The oven will maintain the set temperature for 10 minutes. If the Start button is not pressed within 10 minutes, the oven will automatically turn off.

Place food in the oven and then press the Start button to begin the cooking timer.
For all other cooking modes:
These cooking modes do not require preheating. Upon starting one of these cooking modes, the cooking timer will begin counting down immediately.
Adjusting the Settings While Cooking
At any time during the cooking cycle, the temperature, time, shade, and/or slices settings may be adjusted. Push the Temp/Time knob and then rotate it to adjust the oven temperature. Push the knob again to toggle between adjusting the temperature and cook time. Once the settings are as desired, no further action is required. The new settings will be applied.

NOTE: The Cook mode cannot be changed while the oven is in operation. Press the Cancel button to end the current cooking cycle and then select the desired cook mode.
Opening the Door While Cooking
Whenever the oven door is opened while cooking, the cooking timer will pause, the oven will stop heating, and the oven light will illuminate automatically.
When the oven door is closed, the cooking timer will resume, the oven will begin heating again, and the oven light will turn off automatically.
NOTE: If the oven door is left open for 10 minutes during a cooking cycle, the oven will automatically turn off and return to standby mode.

Stopping or Cancelling a Cooking Mode
When the selected cooking time has elapsed, the oven will shutoff automatically, and the oven alarm will sound to indicate that the cooking cycle is complete. The control display will show "DONE". The oven alarm will sound every 5 minutes until the oven door is opened or the Cancel button is pressed.
The cooking cycle can also be ended manually at any time by pressing the Cancel button.

NOTE: The oven has internal cooling fans that will continue to operate for 2 minutes after the cooking cycle has completed. This is to ensure that the internal components of the oven are properly cooled. Even though the fans may be running during this time, the unit will return to standby mode and the heating elements will be turned off until the next cooking mode is started.
Turning on the Oven Light
To turn on the oven light, press the Light button to the left of the control display. To turn off the oven light, press the Light button again. The oven light will also automatically turn on whenever the oven door is opened.
NOTE: The oven light will automatically turn off after 10 minutes.

Activating the Convection Fan
Some cooking modes offer an optional convection feature (see Cooking Modes Overview). To manually activate the convection fan for these cooking modes, press the Conv. button to the left of the control display. The "Convection" indicator will illuminate on the control display.
To deactivate the convection fan, press the Conv. button again. The "Convection" indicator on the control display will disappear.

Settings
Your Café oven has a variety of settings and features that may be configured to your preferences. To access the Settings menu, press the Settings button next to the control display. Then rotate the Temp/Time knob to scroll through the available settings. Push in the Temp/Time knob to select the setting to be adjusted.

WiFi Connect – SmartHQ™ App
Your Café oven is WiFi Connect Enabled. A WiFi module is built into the product allowing it to communicate with your Smart Phone for remote monitoring, control, notifications, and appliance software updates. To take advantage of your appliance's connected features, please download the SmartHQ™ mobile app.
To connect the oven to your WiFi network:
- Press the Settings button and use the Temp/Time knob to select "WIFI".
- Rotate the Temp/Time knob to toggle the WiFi status (On/Off).
- Push the Temp/Time knob to confirm the setting "WIFI ON". The control display will show "PAIRING" and the WiFi icon in the display will begin to flash.
- Follow instructions in the SmartHQ™ app to continue WiFi setup.
- When the appliance has successfully connected to WiFi, the WiFi icon will be solid on.
![]()
To disconnect from WiFi:
- Press the Settings button and use the Temp/Time knob to select "WIFI".
- Rotate the Temp/Time knob to toggle the WiFi status.
- Push the Temp/Time knob to confirm the setting "WIFI OFF".
NOTE: Connecting the machine may take multiple attempts.
NOTE: In case of loss of power or connection, the oven may take a up to five minutes to reconnect.
Please visit geappliances.com/ge/connected-appliances/ to learn more about connected appliance features and to learn what connected appliance apps will work with your Smart Phone.
Remote Enable
Whenever the oven is connected to a WiFi network, you will be able to adjust oven temperature, add or reduce cooking time, and/or stop a cooking cycle from the SmartHQ app. However, an additional step is required before the oven can be remotely started. The Remote Enable mode must be activated before a cooking cycle may be started from the SmartHQ app. This is to ensure that the user has properly inspected the immediate area around the oven for hazards and potentially flammable materials, as the the exterior surface of the oven can get hot while cooking.
To activate the Remote Enable mode, press and hold the Start button for three seconds. The LED ring around the Start button will begin to flash and the Remote Enable icon ![]() will illuminate on the control display. At this time, you will have 10 minutes to program and start a cooking cycle from the SmartHQ app. If the oven is not started within 10 minutes, then the Remote Enable mode will be automatically deactivated.
will illuminate on the control display. At this time, you will have 10 minutes to program and start a cooking cycle from the SmartHQ app. If the oven is not started within 10 minutes, then the Remote Enable mode will be automatically deactivated.
To manually deactivate the Remote Enable mode, press and hold the Start button for three seconds. The LED ring around the Start button will stop flashing and the Remote Enable icon will disappear on the control display.
NOTE: Opening the oven door after activating Remote Enable but before starting the oven will automatically deactivate the Remote Enable mode.
Control Lock
The oven features a Control Lock mode. When enabled, the oven will ignore any user input and the oven cannot be operated.
To enable Control Lock mode:
- Press the Settings button and use the Temp/Time knob to select "CONTROL LOCK".
- Rotate the Temp/Time knob to toggle the Control Lock status (On/Off).
- Press the Temp/Time knob to confirm the desired setting.
When enabled, a lock icon will appear on the control display. If a button is pressed or a knob is turned when Control Lock is enabled, the oven will beep and the lock icon will flash.
To disable Control Lock mode, simply follow the same steps as above.
Preheat
By default, some of the cooking modes for the oven have a built-in preheating mode. If desired, preheating may be disabled for all cooking modes.
To toggle preheating on or off:
- Press the Settings button and use the Temp/Time knob to select "PREHEAT".
- Rotate the Temp/Time knob to toggle the Preheat setting (On/Off).
- Press the Temp/Time knob to confirm the desired setting.
NOTE: If Preheat is enabled, the preheating mode may be skipped manually by pressing the Start button once to start the cooking mode and pressing the Start button a second time to skip preheat. The cooking timer will immediately begin counting down.
Brightness
The brightness of the control display may be adjusted. By default, the display brightness is set to the maximum level.
To adjust the brightness setting:
- Press the Settings button and use the Temp/Time knob to select "BRIGHTNESS".
- Rotate the Temp/Time knob to increase or decrease the brightness to the desired level.
- Press the Temp/Time knob to confirm the desired setting.
Sound
The volume of the oven alarm may be adjusted. By default, the volume is set to the maximum level.
To adjust the sound level:
- Press the Settings button and use the Temp/Time knob to select "SOUND".
- Rotate the Temp/Time knob to toggle the sound ON or OFF.
- Press the Temp/Time knob to confirm the desired sound setting.
- I f sound is set to ON, then the volume level may be adjusted. Rotate the Temp/Time knob to increase or decrease the volume level.
- Press the Temp/Time knob to confirm the desired volume setting.
Temperature Conversion
The displayed units for the oven temperature may be toggled between Fahrenheit and Celsius.
To change the temperature units displayed:
- Press the Settings button and use the Temp/Time knob to select "DEGREES".
- Rotate the Temp/Time knob to switch between "F" (Fahrenheit) and "C" (Celsius).
- Press the Temp/Time knob to confirm the desired temperature units.
Factory Reset
Customized settings for the oven are stored in the memory of the appliance, even if the oven is unplugged or power is otherwise lost. These settings may be restored to their original factory defaults.
To perform a factory reset:
- Press the Settings button and use the Temp/Time knob to select "FAC RESET".
- Rotate the Temp/Time knob to switch to "RESET YES".
- Press the Temp/Time knob to begin the factory reset process.
Care and Cleaning

Allow oven to cool completely and unplug the appliance prior to cleaning or servicing the oven.
Cleaning the Oven Exterior
Clean the oven exterior with a sponge or soft cloth and soapy water. Do not use aggressive cleaning agents such as alcohol, bleach, or chemical sprays, as these may damage the finish. To avoid scratching or marring the outside surfaces, do not scrub the appliance with a metal or nylon brush.
Cleaning the Oven Interior
Remove all accessories from the oven. Wipe the walls of the oven cavity with sponge or soft cloth and warm water. If the interior is severely stained or dirty, use a towel saturated with a diluted solution of a mild dishwashing liquid.
To avoid damage, do not attempt to clean the heating elements. Any food that comes into contact with the elements will be burned off when the oven is heated.
Cleaning the Crumb Tray
Remove the crumb tray and discard of any crumbs or oils present on the tray. Wipe the tray with a sponge and soapy water. Do not place the crumb tray in the dishwasher.
Cleaning the Accessories
The included accessories may be placed in a dishwasher. However, to prolong the life and appearance of the accessories, it is recommended to clean them by hand. Use a sponge and soapy water to thoroughly clean the rack, basket, or pans. A soft polyester or nylon pad may be used to remove stubborn spots.
Troubleshooting
Save time and money! Review the charts on the following pages first and you may not need to visit the website for service.
| Problem | Possible Solution |
The oven does not turn on or fails to get hot |
|
Oven omits a burnt smell | Ensure that the cooking time is appropriately set and that food is not being overcooked. Fats, oils, and sauces that have dripped onto the lower heating elements may cause some smoke or burning smell during oven operation. Ensure that the baking tray, oven rack, and drip tray are thoroughly clean before each use. |
Heater tubes turn off during cooking | The heating elements of the oven turn on and off intermittently to maintain the set oven temperature. This is normal behavior and not a malfunction. |
The oven emits smoke | The fat from the food sticking to the heater may cause smoke during cooking especially using "Broil" menu. Set lower temperature if necessary. |
The food is undercooked after recommended time |
|
The food is not evenly cooked |
|
| The food is not crispy after using Air Fry mode |
|
If the problem persists after trying these solutions, please contact GE Appliances Customer Support. See Customer Support contact information.
Consumer Support
CAFÉ WEBSITE
Have a question or need assistance with your appliance? Try the Café Appliances Website 24 hours a day, any day of the year! You can also shop for more great Café Appliances products and take advantage of all our on-line support services designed for your convenience. cafeappliances.com
REGISTER YOUR APPLIANCE
Register your new appliance on-line at your convenience! Timely product registration will allow for enhanced communication and prompt service under the terms of your warranty, should the need arise. You may also mail in the pre-printed registration card included in the packing material. cafeappliances.com/register
PARTS AND ACCESSORIES
Individuals qualified to service their own appliances can have parts or accessories sent directly to their homes (VISA, MasterCard and Discover cards are accepted). Order on-line today 24 hours every day.
cafeappliances.com/parts
Instructions contained in this manual cover procedures to be performed by any user. Other servicing generally should be referred to qualified service personnel. Caution must be exercised, since improper servicing may cause unsafe operation.
CONTACT US
If you are not satisfied with the service you receive from Café Appliances, contact us on our Website with all the details including your phone number, or write to: General Manager,
General Manager, Customer Relations | GE Appliances, Appliance Park | Louisville, KY 40225
cafeappliances.com/contact
IMPORTANT SAFETY INFORMATION
READ ALL INSTRUCTIONS BEFORE USING THE APPLIANCE
Read all safety instructions before using the product. Failure to follow these instructions may result in fire, electrical shock, serious injury, or death.
IMPORTANT SAFEGUARDS
Always follow these safety precautions when using this appliance.
- Carefully read all instructions before operating the oven.
- Remove and discard all packaging materials prior to operating the oven.
![]()
Remove plug from outlet when the appliance is not in use, before putting on or taking off parts, and before cleaning. Allow to cool before cleaning.![]()
To reduce risk of fire or electric shock, always operate oven with crumb tray properly installed.- To protect against electrical shock do not immerse cords, plugs, or appliance in water or other liquid.
- Always place oven on a level, stable, and heat-resistant surface whenever oven is in operation
- Keep at least 4" (10 cm) clearance on all sides of the appliance whenever oven is in operation. Do not operate appliance underneath wall cabinets.
- Do not place any of the following materials in the oven: paper, plastic, pot holders, linens, gasoline or other flammable vapors and liquids.
- A fire may occur if the toaster-oven is covered or touching flammable material, including curtains, draperies, walls, and the like, when in operation. Do not store any item on top of the appliance when in operation.
- The exterior surfaces of the appliance can be hot during and after oven operation. Allow appliance to cool completely before handling.
- Do not touch hot surfaces. Use handle or knobs.
- Do not store items on top of the appliance, as this surface can be very hot during and after oven operation.
- To prevent burns or injury, always use proper protection, such as hot pads or oven mitts, when removing or handling items from oven.
- Do not touch heating elements or interior surface of oven during or after use. Allow to cool before cleaning or handling.
- Do not let power cord hang over edge of table or counter. Do not let power cord contact hot surfaces.
- Always clean the oven according to cleaning and care instructions.
- Do not clean with metal scouring pads. Pieces can break off the pad and touch electrical parts involving a risk of electric shock.
- Do not operate any appliance with a damaged cord or plug or after the appliance malfunctions or has been damaged in any manner. Return appliance to the nearest authorized service facility for examination, repair, or adjustment.
- Oversize foods or metal utensils must not be inserted in a toaster-oven as they may create a fire or risk of electric shock.
- The use of accessory attachments not recommended by the appliance manufacturer may cause injuries.
- Do not store any materials, other than manufacturers recommended accessories, in this oven when not in use.
- Do not store or operate outdoors.
- Do not use appliance for other than intended use.
- Do not leave children alone - children should not be left alone or unattended in an area where an appliance is in use.
- Always stop oven operation before unplugging the appliance.
- Before handling, moving, or cleaning the appliance, always unplug the power cord from the wall outlet and ensure the appliance has properly cooled.
- Do not place on or near a hot gas or electric burner, or in a heated oven.
- Cook food thoroughly to help protect against foodborne illness. Minimum safe food temperature recommendations can be found at IsItDoneYet.gov and fsis.usda.gov. Use a food thermometer to take food temperatures and check several locations.
- Extreme caution should be exercised when using containers constructed of other than metal or glass.
- Extreme caution must be used when moving an appliance containing hot oil or other hot liquids.
- Use extreme caution when removing tray or disposing of hot grease.
- Do not cover crumb tray or any part of the oven with metal foil. This will cause overheating of the oven.
- To disconnect, turn any control to "off", then remove plug from wall outlet.
- Avoid contacting moving parts.
READ AND SAVE THESE INSTRUCTIONS

RISK OF FIRE OR ELECTRIC SHOCK

- TO REDUCE THE RISK OF FIRE OR ELECTRIC SHOCK, DO NOT REMOVE COVER (OR BACK).
- Do not attempt to repair or replace any part of your oven unless it is specifically recommended in this manual. All other servicing should be performed by authorized service personnel.

To ensure continued protection against risk of electric shock, connect to properly grounded outlets only.
KEEP FLAMMABLE MATERIALS AWAY FROM THE OVEN
Failure to do so may result in fire or personal injury.
- Do not store or use flammable materials in a toaster or near the toaster opening, including paper, plastic, pot holders, linens, wall coverings, curtains, drapes and gasoline or other flammable vapors and liquids.
- Never wear loose-fitting or hanging garments while using the appliance. These garments may ignite if they contact hot surfaces causing severe burns.
A short power-supply cord is provided to reduce the risk resulting from becoming entangled in or tripping over a longer cord. If an extension cord is used:
- The marked electrical rating of the cord set or extension cord should be at least as great as the electrical rating of the appliance;
- The cord should be arranged so that it will not drape over the countertop or tabletop where it can be pulled on by children or tripped over unintentionally;
- The cord set or extension cord should be a grounding-type 3-wire cord.
READ AND SAVE THESE INSTRUCTIONS
Documents / Resources
References
![geappliances.com]() GE Smart Appliances | GE Appliances
GE Smart Appliances | GE Appliances![cafeappliances.com]() Café Appliances
Café Applianceshttp://cafeappliances.com/register
![cafeappliances.com]() Appliance Parts, Accessories & Water Filters | GE Appliances
Appliance Parts, Accessories & Water Filters | GE Appliances![cafeappliances.com]() Contact Us or Get Help with Questions About Café Appliances
Contact Us or Get Help with Questions About Café Appliances
Download manual
Here you can download full pdf version of manual, it may contain additional safety instructions, warranty information, FCC rules, etc.
Download CAFE Couture C9OAAAS3RD3 - Oven with Air Fry Manual
Advertisement


Need help?
Do you have a question about the Couture and is the answer not in the manual?
Questions and answers