Table of Contents
Advertisement
Available languages
Available languages
Quick Links
Advertisement
Chapters
Table of Contents

Related Manuals for Silvercrest 300029


Summary of Contents for Silvercrest 300029
- Page 1 ASPIRATORE PORTATILE RICARICABILE SAS 7.4 LI B3 ASPIRATORE PORTATILE ASPIRADOR DE MÃO RICARICABILE Manual de instruções Istruzioni per l‘uso HAND-HELD VACUUM CLEANER HANDSTAUBSAUGER Operating instructions Bedienungsanleitung IAN 300029...
- Page 2 Prima di leggere aprire la pagina con le immagini e prendere confidenza con le diverse funzioni dell'apparecchio. Antes de começar a ler abra na página com as imagens e, de seguida, familiarize-se com todas as funções do aparelho. Before reading, unfold the page containing the illustrations and familiarise yourself with all functions of the device.
-
Page 4: Table Of Contents
Indice Introduzione . . . . . . . . . . . . . . . . . . . . . . . . . . . . . . . . . . . . . . . . . . . . . . . . . . 2 Uso conforme . -
Page 5: Introduzione
Introduzione Congratulazioni per l’acquisto del Suo nuovo apparecchio . È stato scelto un prodotto di alta qualità . Il manuale di istruzioni è parte integrante del presente prodotto . Esso contiene importanti indicazioni per la sicurezza, l’uso e lo smaltimento . Prima di utilizzare il prodotto, familiarizzare con tutte le indicazio- ni relative ai comandi e alla sicurezza . -
Page 6: Descrizione Dell'apparecchio
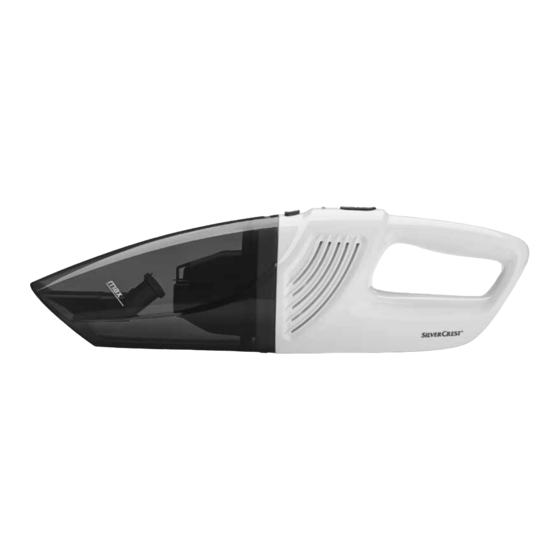
Descrizione dell’apparecchio Figura A: 1 Bocchetta di aspirazione materiali bagnati 2 Bocchetta per giunti 3 Supporto a parete 4 Alimentatore 5 Spinotto cavo 6 Interruttore ON/OFF 7 Spia di controllo della carica (rossa/verde) 8 Tasto di sbloccaggio 9 Sacchetto-filtro della polvere 0 Filtro della polvere q Contenitore dello sporco w Blocco motore... -
Page 7: Importanti Indicazioni Di Sicurezza
Importanti indicazioni di sicurezza PERICOLO DI FOLGORAZIONE! Non caricare e non usare l'apparecchio all'aperto . ► Non utilizzare mai l'apparecchio in presenza di danni al ► cavo, alla spina o all'alloggiamento . Fare sostituire immediatamente il cavo o la spina danneggia- ►... - Page 8 AVVERTENZA! PERICOLO DI LESIONI Riporre l’apparecchio sempre in luoghi chiusi . Per evitare infor- ► tuni, dopo l’uso riporre l’apparecchio in un luogo asciutto . In condizioni estreme possono verificarsi delle perdite dagli ► elementi delle batterie . In caso di contatto del liquido con la cute o con gli occhi, lavare e risciacquare immediatamente con acqua pulita .
-
Page 9: Prima Di Utilizzare L'apparecchio Per La Prima Volta
ATTENZIONE! PERICOLO DI DANNI MATERIALI! Verificare sempre che le aperture di ventilazione non siano ► ostruite . L'ostruzione alla circolazione dell'aria può dare luogo al surriscaldamento dell'apparecchio e provocare dei danni . L’apparecchio è sì predisposto anche per aspirare ridotte ►... -
Page 10: Informazioni Relative Alle Batterie
Informazioni relative alle batterie 1) L’aspirapolvere portatile è azionato da batterie agli ioni di litio ricaricabili . 2) Per la manutenzione delle batterie consigliamo quanto segue: dopo che le batterie sono state caricate, staccare l’alimentatore 4 dalla presa . Collegare nuovamente l’alimentatore 4 alla presa di rete solo quando si nota che il potenza di aspirazione dell’aspiratore portatile si è... -
Page 11: Ricarica
Ricarica AVVERTENZA ► Verificare che l'interruttore ON/OFF 6 sia stato spostato all'indietro (in posizione "0”) prima di avviare il procedimento di carica . ■ Inserire l’aspirapolvere portatile dall’alto nel supporto a parete 3, in modo che lo spinotto cavo 5 scivoli nella presa dell’aspirapolvere portatile . La spia di controllo della carica 7 lampeggia di colore rosso e il procedimento di carica comincia . -
Page 12: Pulizia
1) Rimuovere l’aspirapolvere portatile dal supporto a parete 3 o se non si utilizza il supporto a parete 3, estrarre lo spinotto cavo 5 dalla presa . 2) Se lo si desidera, inserire la bocchetta adatta nell’apertura di aspirazione: – la bocchetta per giunti 2 per pulire punti stretti e difficili da raggiungere . -
Page 13: Smaltimento
7) Reinserire il filtro della polvere q sul blocco motore w . – Infilare il nasello di plastica che si trova sul lato inferiore dell’aspirapolvere portatile nell’apposito intaglio del contenitore di raccolta dello sporco q . – Premere il tasto di sbloccaggio 8 e infilare contemporaneamente il contenitore di raccolta dello sporco q sul blocco motore w . -
Page 14: Garanzia Della Kompernass Handels Gmbh
Garanzia della Kompernass Handels GmbH Egregio Cliente, Questo apparecchio ha una garanzia di 3 anni dalla data di acquisto . Qualora questo prodotto presentasse vizi, Le spettano diritti legali nei confronti del venditore del prodotto . La garanzia qui di seguito descritta non costituisce alcun limite a tali diritti legali . -
Page 15: Assistenza
E-Mail: kompernass@lidl .it Service Malta Tel .: 80062230 E-Mail: kompernass@lidl .com .mt IAN 300029 Importatore Badi che il seguente indirizzo non è quello del servizio di assistenza clienti . Contatti innanzitutto il servizio di assistenza clienti indicato . KOMPERNASS HANDELS GMBH... - Page 16 Índice Introdução . . . . . . . . . . . . . . . . . . . . . . . . . . . . . . . . . . . . . . . . . . . . . . . . . . . 14 Utilização correta .
-
Page 17: Introdução
Introdução Parabéns pela compra do seu novo aparelho . Optou por um produto de elevada qualidade . O manual de instruções é parte integrante deste produto . Este contém instruções importantes para a segurança, utilização e eliminação . Antes de utilizar o produto, familiarize-se com todas as instruções de operação e segurança . -
Page 18: Descrição Do Aparelho
Descrição do aparelho Figura A: 1 Bocal para líquidos 2 Bocal para frestas 3 Suporte de parede 4 Fonte de alimentação 5 Ficha fêmea 6 Interruptor Ligar/Desligar 7 Luz de controlo de carregamento (vermelha/verde) 8 Botão de desbloqueio 9 Saco do filtro de pó 0 Filtro de pó... -
Page 19: Indicações De Segurança Importantes
Indicações de segurança importantes PERIGO - CHOQUE ELÉTRICO! Não carregue ou utilize este aparelho ao ar livre . ► Nunca utilize o aspirador manual se o cabo, a ficha ou a ► caixa estiver danificado(a) . Cabos ou fichas de alimentação elétrica danificados devem ►... - Page 20 AVISO! PERIGO DE FERIMENTOS! O aparelho não é adequado para substâncias inflamáveis ► e explosivas ou para líquidos químicos e agressivos . Guarde sempre o aparelho em espaços fechados . Para ► evitar acidentes, guarde o aparelho num local seco após a utilização .
-
Page 21: Antes Da Primeira Colocação Em Funcionamento
ATENÇÃO! DANOS MATERIAIS! Certifique-se de que o aspirador manual não é colocado ► perto de aquecedores, fornos ou outros aparelhos ou super- fícies aquecidos . Certifique-se sempre de que as ranhuras de ventilação não ► ficam cobertas . Um circuito de ar bloqueado pode resultar no sobreaquecimento e na danificação do aparelho . -
Page 22: Informações Sobre Os Acumuladores
Informações sobre os acumuladores 1) O aspirador manual é operado com acumuladores de iões de lítio recarregáveis . 2) Para a conservação dos acumuladores, recomendamos o seguinte: após o carregamento dos acumuladores, remova a fonte de alimentação 4 da tomada . Ligue novamente a fonte de alimentação 4 à tomada apenas quando a potência de aspiração do aspirador manual diminuir significativa- mente . -
Page 23: Carregamento
Carregamento NOTA ► Certifique-se de que o interruptor Ligar/Desligar 6 está deslocado para trás (posição "0"), antes de iniciar o carregamento . ■ Insira o aspirador manual no suporte de parede 3, por cima, de modo que a ficha fêmea 5 deslize para a entrada no aspirador manual . A luz de controlo de carregamento 7 pisca na cor vermelha e o carregamento é... -
Page 24: Limpeza
1) Retire o aspirador manual do suporte de parede 3 ou, caso não utilize o suporte de parede 3, retire a ficha fêmea 5 da entrada . 2) Coloque, se desejar, o bocal adequado na abertura de aspiração: – O bocal para frestas 2 para limpar locais estreitos e pouco acessíveis . –... -
Page 25: Eliminação
7) Volte a colocar o depósito de resíduos q sobre o bloco do motor w: – Desloque a patilha de plástico, na parte inferior do aspirador manual, para dentro do entalhe do depósito de resíduos q . – Prima o botão de desbloqueio 8 e desloque simultaneamente o depósito de resíduos q para cima do bloco do motor w . -
Page 26: Garantia Da Kompernass Handels Gmbh
Garantia da Kompernass Handels GmbH Estimada Cliente, Estimado Cliente, Este aparelho tem uma garantia de 3 anos a contar da data de compra . No caso deste produto ter defeitos, tem direitos legais contra o vendedor do produto . Estes direitos legais não são limitados pela nossa garantia que passamos a transcrever . -
Page 27: Assistência Técnica
Assistência Portugal Tel .: 70778 0005 (0,12 EUR/Min .) E-Mail: kompernass@lidl .pt IAN 300029 Importador Por favor, observe que a seguinte morada não é a morada do Serviço de Assis- tência Técnica . Primeiro entre em contacto com o Serviço de Assistência Técnica . - Page 28 Contents Introduction . . . . . . . . . . . . . . . . . . . . . . . . . . . . . . . . . . . . . . . . . . . . . . . . . . 26 Intended use .
-
Page 29: Introduction
Introduction Congratulations on the purchase of your new appliance . You have selected a high-quality product . The operating instructions are part of this product . They contain important information on safety, usage and disposal . Before using the product, familiarise yourself with all operating and safety instructions . Use the product only as described and for the specified areas of application . -
Page 30: Description Of The Appliance
Description of the appliance Figure A: 1 Wet suction nozzle 2 Crevice nozzle 3 Wall bracket 4 Mains adapter 5 Barrel plug 6 On/off switch 7 Charge indicator lamp (red/green) 8 Release button 9 Dust filter bag 0 Dust filter q Dirt container w Motor unit Figure B:... -
Page 31: Important Safety Instructions
Important safety instructions DANGER – ELECTRIC SHOCK! Do not charge or use the appliance outdoors . ► Never use the handheld vacuum cleaner if the cable, plug ► or casing are damaged . To avoid risks, arrange to have damaged power cables ►... - Page 32 WARNING! RISK OF INJURY! This appliance is not suitable for use with inflammable and ► explosive substances or chemical and aggressive liquids . Always store the appliance indoors . To prevent accidents, ► keep the appliance in a dry location when not in use . Under extreme conditions, leaks in the battery cells may oc- ►...
-
Page 33: Prior To First Use
CAUTION! PROPERTY DAMAGE! Make sure that the ventilation slits are never obstructed . ► A blocked ventilation circuit can result in overheating and damage to the appliance . The appliance is suitable for vacuuming small amounts of ► water; however, its housing is not splashproof . Therefore, do not immerse the appliance in water and do not expose it to moisture! This product contains rechargeable batteries . -
Page 34: Information About The Batteries
Information about the batteries 1) This handheld vacuum cleaner is powered by rechargeable lithium-ion batteries . 2) For care of the batteries, we recommend the following: Once the batteries have been charged, disconnect the mains adapter 4 from the mains socket . Do not reconnect the mains adapter 4 with the mains socket until the hand- held vacuum cleaner’s suction power has noticeably decreased . -
Page 35: Charging
Charging NOTE ► Check to ensure that the on/off switch 6 has been pushed back (to the position "0 ) before starting the charging process . ■ Place the handheld vacuum cleaner from above into the wall bracket 3 so that the barrel plug 5 slips into the socket on the handheld vacuum cleaner . -
Page 36: Cleaning
1) Remove the handheld vacuum cleaner from the wall bracket 3 or, if you are not using the wall bracket 3 remove the barrel plug 5 from the socket . 2) If required, place the appropriate nozzle in the suction opening: –... -
Page 37: Disposal
7) Replace the dirt container q on the motor unit w again: – Push the plastic tab on the underside of the handheld vacuum cleaner into the recess on the dirt container q . – Press the release button 8 and push the dirt container q onto the motor unit w at the same time . -
Page 38: Kompernass Handels Gmbh Warranty
Kompernass Handels GmbH warranty Dear Customer, This appliance has a 3-year warranty valid from the date of purchase . If this product has any faults, you, the buyer, have certain statutory rights . Your statutory rights are not restricted in any way by the warranty described below . Warranty conditions The validity period of the warranty starts from the date of purchase . -
Page 39: Service
E-Mail: kompernass@lidl .co .uk Service Malta Tel .: 80062230 E-Mail: kompernass@lidl .com .mt IAN 300029 Importer Please note that the following address is not the service address . Please use the service address provided in the operating instructions . KOMPERNASS HANDELS GMBH... - Page 40 Inhaltsverzeichnis Einleitung . . . . . . . . . . . . . . . . . . . . . . . . . . . . . . . . . . . . . . . . . . . . . . . . . . . . 38 Bestimmungsgemäßer Gebrauch .
-
Page 41: Einleitung
Einleitung Herzlichen Glückwunsch zum Kauf Ihres neuen Gerätes . Sie haben sich damit für ein hochwertiges Produkt entschieden . Die Bedienungsan- leitung ist Bestandteil dieses Produkts . Sie enthält wichtige Hinweise für Sicherheit, Gebrauch und Entsorgung . Machen Sie sich vor der Benutzung des Produkts mit allen Bedien- und Sicherheitshinweisen vertraut . -
Page 42: Gerätebeschreibung
Gerätebeschreibung Abbildung A: 1 Nasssaugdüse 2 Fugendüse 3 Wandhalter 4 Netzteil 5 Hohlstecker 6 Ein-/Ausschalter 7 Ladekontrollleuchte (rot/grün) 8 Entriegelungstaste 9 Staubfilter-Beutel 0 Staubfilter q Schmutzbehälter w Motorblock Abbildung B: e Schraube r Dübel HINWEIS ► Das Gerät wird mit nicht geladenen Akkus geliefert . Technische Daten Netzteil 4 100 - 240 V ~ (Wechselstrom), 50/60 Hz... -
Page 43: Wichtige Sicherheitshinweise
Wichtige Sicherheitshinweise GEFAHR - ELEKTRISCHER SCHLAG! Laden bzw . verwenden Sie dieses Gerät nicht im Freien . ► Den Handstaubsauger niemals gebrauchen, wenn Kabel, ► Stecker oder Gehäuse beschädigt sind . Lassen Sie beschädigte Netzstecker oder Netzkabel sofort ► von autorisiertem Fachpersonal austauschen, um Gefährdun- gen zu vermeiden . - Page 44 WARNUNG! VERLETZUNGSGEFAHR! Das Gerät ist nicht für entflammbare und explosive Stoffe ► oder chemische und aggressive Flüssigkeiten geeignet . Lagern Sie das Gerät immer in geschlossenen Räumen . Um ► Unfälle zu verhindern, bewahren Sie das Gerät nach Gebrauch an einem trockenen Ort auf . Unter extremen Bedingungen können Leckagen an den Akku- ►...
-
Page 45: Vor Der Ersten Inbetriebnahme
ACHTUNG! SACHSCHADEN! Achten Sie immer darauf, dass die Lüftungsschlitze frei sind . ► Ein blockierter Luftkreislauf kann zur Überhitzung und Be- schädigung des Gerätes führen . Das Gerät ist zwar auch zum Aufsaugen geringer Wasser- ► mengen vorgesehen, sein Gehäuse ist jedoch nicht spitzwas- sergeschützt . -
Page 46: Informationen Zu Den Akkus
Informationen zu den Akkus 1) Der Handstaubsauger wird mit wiederaufladbaren Lithium-Ionen-Akkus betrieben . 2) Zur Pflege der Akkus empfehlen wir folgendes: Ziehen Sie, nachdem die Akkus geladen sind, das Netzteil 4 aus der Netzsteckdose . Verbinden Sie das Netzteil 4 erst wieder mit der Netzsteckdose, wenn die Saugleistung des Handstaubsaugers spürbar schwächer wird . -
Page 47: Aufladen
Aufladen HINWEIS ► Vergewissern Sie sich, dass der Ein-/Ausschalter 6 nach hinten geschoben ist (Position „0”), bevor Sie mit dem Laden beginnen . ■ Setzen Sie den Handstaubsauger von oben in den Wandhalter 3, so dass der Hohlstecker 5 in die Buchse am Handstaubsauger rutscht . Die Ladekont- rollleuchte 7 blinkt rot auf und der Ladevorgang beginnt . -
Page 48: Reinigen
1) Nehmen Sie den Handstaubsauger von dem Wandhalter 3 herunter, oder, wenn Sie den Wandhalter 3 nicht benutzen, ziehen Sie den Hohlstecker 5 aus der Buchse . 2) Setzen Sie, wenn gewünscht, die passende Düse in die Saugöffnung: – die Fugendüse 2, um enge, schwer zu erreichende Stellen zu reinigen . –... -
Page 49: Entsorgen
7) Setzen Sie den Schmutzbehälter q wieder auf den Motorblock w: – Schieben Sie die Plastik-Nase an der Unterseite des Handstaubsaugers in die Aussparung am Schmutzbehälter q . – Drücken Sie die Entriegelungstaste 8 und schieben Sie gleichzeitig den Schmutzbehälter q auf den Motorblock w . –... -
Page 50: Garantie Der Kompernaß Handels Gmbh
Garantie der Kompernaß Handels GmbH Sehr geehrte Kundin, sehr geehrter Kunde, Sie erhalten auf dieses Gerät 3 Jahre Garantie ab Kaufdatum . Im Falle von Mängeln dieses Produkts stehen Ihnen gegen den Verkäufer des Produkts gesetz- liche Rechte zu . Diese gesetzlichen Rechte werden durch unsere im Folgenden dargestellte Garantie nicht eingeschränkt . -
Page 51: Service
Service Schweiz Tel .: 0842 665566 (0,08 CHF/Min ., Mobilfunk max . 0,40 CHF/Min .) E-Mail: kompernass@lidl .ch IAN 300029 Importeur Bitte beachten Sie, dass die folgende Anschrift keine Serviceanschrift ist . Kontak- tieren Sie zunächst die benannte Servicestelle . - Page 52 KOMPERNASS HANDELS GMBH BURGSTRASSE 21 DE - 44867 BOCHUM GERMANY www.kompernass.com Versione delle informazioni · Estado das informações Last Information Update · Stand der Informationen: 02 / 2018 · Ident.-No.: SAS7.4LIB3-122017-2 IAN 300029...
Need help?
Do you have a question about the 300029 and is the answer not in the manual?
Questions and answers