Advertisement
Quick Links
Advertisement

Subscribe to Our Youtube Channel
Related Manuals for RITFIT M1-C


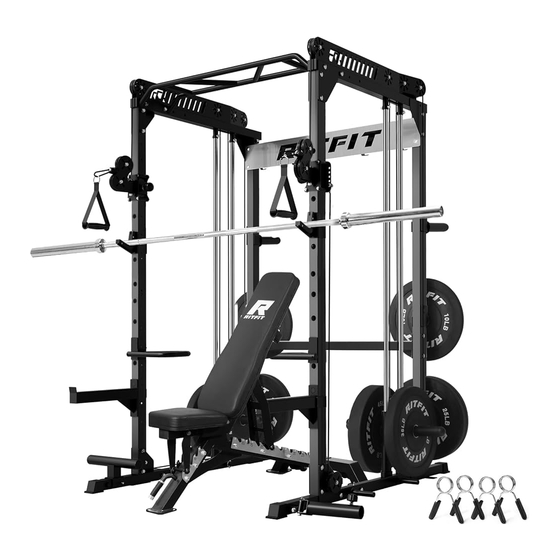
Summary of Contents for RITFIT M1-C
- Page 1 POWER CAGE WITH CABLE CROSSOVER M1-C OWNER’S MANUAL & ASSEMBLY INSTRUCTIONS...
-
Page 3: Safety And Precautions
4. One person at a time should use this equipment incomplete form. Please contact RITFIT for a unless otherwise designed for safety (example: ·... -
Page 4: Warranty
These warranty repairs or adjustments will be made by RitFit at no charge, using new or remanufactured parts. D. When It Begins? The Basic Warranty begins from the date of order. -
Page 5: Before You Begin
BEFORE YOU BEGIN Thank you for selecting the versatile RitFit® Power Cage with Cable Crossover. RitFit® Power Cage with Cable Crossover is designed and manufactured to optimize users’ workout perfor- mance and minimize adjustment or set-up time for users. For your benefit, read this manual carefully before using the Power Cage with Cable Crossover. -
Page 6: Parts List
PARTS LIST ·FASTENER AND TOOLS QUANTITY DESCRIPTION M10x70 Square Neck Bolt M10x80 Hex Bolt M10x45 Hex Bolt M10x25 Hex Bolt M10x20 Hex Bolt M10 Nut M10 Washer Open-ended Wrench 17-19 Open-ended Wrench 14-17 Hex Key 4# M10 Expansion Bolt Lubricating Oil L-pin b M10x80 Hex Bolt M10x70 Square Neck Bolt... - Page 7 PARTS LIST ·ACCESSORIES QUANTITY DESCRIPTION J-Hooks Set Safety Arms Set Dip Handles Set Landmine Bar Plate Holder Low Row Foot Tube Quick Release Landmine Quick Release Band Peg Lat Bar Low Row Bar J-Hooks Set Safety Arms Set Dip Handles Set Landmine Bar Plate Holder Low Row Foot Tube...
- Page 8 Bottom Base Frame (L) Bottom Base Frame (R) Upright Frame (Front) Upright Frame (Back) Upper Cross Frame (Left) Upper Cross Frame (Right) Rear Cross Beam RitFit Nameplate Pull-up Bar Slider (Left) Slider (Right) Bottom Cross Beam Knob Bottom Base Frame (L)
- Page 9 PARTS LIST ·PULLEY SYSTEM QUANTITY DESCRIPTION Rubber Pad Carabiner Plate Carriage-1 Plate Carriage-2 Pulley Handle Guide Rod Cable Rubber Pad Carabiner Plate Carriage-1 Plate Carriage-2 Pulley Handle Guide Rod Cable...
-
Page 10: Assembly And Adjustment
ASSEMBLY AND ADJUSTMENT STEP 1 (Two People Are Required.) QUANTITY DESCRIPTION M10x70 Square Neck Bolt M10 Nut M10 Washer Bottom Base Frame (L) Bottom Base Frame (R) Upright Frame (Back) Bottom Cross Beam... - Page 11 ASSEMBLY AND ADJUSTMENT STEP 2 (Two People Are Required.) QUANTITY DESCRIPTION M10x70 Square Neck Bolt M10 Nut M10 Washer Upright Frame (Front) Slider (Left) Slider (Right) Knob Please note the knob is facing toward each other!
- Page 12 ASSEMBLY AND ADJUSTMENT STEP 3 (Two People Are Required.) QUANTITY DESCRIPTION M10x80 Hex Bolt M10 Nut M10 Washer Rubber Pad Plate Carriage-1 Plate Carriage-2 Guide Rod...
- Page 13 ASSEMBLY AND ADJUSTMENT STEP 4 (Two People Are Required.) QUANTITY DESCRIPTION M10x70 Square Neck Bolt M10 Nut M10 Washer Upper Cross Frame (Left) Upper Cross Frame (Right)
- Page 14 ASSEMBLY AND ADJUSTMENT STEP 5 (Two People Are Required.) QUANTITY DESCRIPTION M10x70 Square Neck Bolt M10x45 Hex Bolt M10 Nut M10 Washer Rear Cross Beam...
- Page 15 ASSEMBLY AND ADJUSTMENT STEP 6 (Two People Are Required.) QUANTITY DESCRIPTION M10x70 Square Neck Bolt M10 Nut M10 Washer RitFit Nameplate...
- Page 16 ASSEMBLY AND ADJUSTMENT STEP 7 (Two People Are Required.) QUANTITY DESCRIPTION M10x70 Square Neck Bolt M10 Nut M10 Washer Pull-up Bar...
- Page 17 ASSEMBLY AND ADJUSTMENT STEP 8 (Two People Are Required.) QUANTITY DESCRIPTION M10x25 Hex Bolt M10 Nut M10 Washer Carabiner Cable...
- Page 18 ASSEMBLY AND ADJUSTMENT STEP 9 (Two People Are Required.) QUANTITY DESCRIPTION M10x20 Hex Bolt M10 Washer Plate Holder...
- Page 19 ASSEMBLY AND ADJUSTMENT STEP 10 (Two People Are Required.) QUANTITY DESCRIPTION Quick Release Band Peg L-pin...
- Page 20 ASSEMBLY AND ADJUSTMENT STEP 11 (Two People Are Required.) QUANTITY DESCRIPTION J-Hooks Set Low Row Foot Tube Quick Release Landmine L-pin 90° 90°...
- Page 21 ASSEMBLY AND ADJUSTMENT STEP 12 (Two People Are Required.) QUANTITY DESCRIPTION Safety Arms Set 90° 90°...
- Page 22 ASSEMBLY AND ADJUSTMENT STEP 13 (Two People Are Required.) QUANTITY DESCRIPTION Dip Handles Set 90° 90°...
- Page 23 ASSEMBLY AND ADJUSTMENT STEP 14 (Two People Are Required.) QUANTITY DESCRIPTION Landmine Bar Lat Bar Low Row Bar Pulley Handle...
- Page 24 ASSEMBLY AND ADJUSTMENT STEP 15 (Two People Are Required.) QUANTITY DESCRIPTION M10 Expansion Bolt...
- Page 25 If you have any questions, please e-mail our customer service team at support@ritfitsports.com Dear RitFit Customers, Thank you so much for choosing RitFit Power Cage with Cable Crossover! Before starting assembling this power cage, please notice that there are THREE important warnings to kindly remind you of the user safeties and product safeties.
- Page 26 Congratulations! You have assembled the Power Cage with Cable Crossover! Now, you can officially start strength training! 85.3 in...
- Page 28 GOT A PROBLEM? GET IN TOUCH www.ritfitsports.com support@ritfitsports.com SUBSCRIBE WEBSITE AND GET GET SOCIAL WITH US Free Exercise Ebook @ritfit sports Lastest Updates...
- Page 29 SMITH ATTACHMENT AT01 OWNER’S MANUAL & ASSEMBLY INSTRUCTIONS...
- Page 31 4. One person at a time should use this equipment an incomplete form. Please contact RITFIT unless otherwise designed for safety (example: for a replacement.
- Page 32 A. What’s Covered Under RitFit LLC’s Basic Warranty? Basic Warranty. B. Who Is Covered? You are covered by the Basic Warranty if you are a purchaser of the RitFit® Smith Attachment AT01. C. What’s Covered? The Basic Warranty covers the cost of all parts and labor needed to repair any item on your Smith Attachment that is defective in material workmanship or factory preparation after leaving the manufacturing plant.
- Page 33 BEFORE YOU BEGIN Thank you for selecting the RitFit® Smith Attachment AT01. RitFit®Smith Attachment AT01 is designed and manufactured to be attached on the RitFit® Power Cage with Cable Crossover to optimize its workout effeciency. For your benefit, read this manual carefully before using the Power Cage with Cable Crossover.
- Page 34 PARTS LIST QUANTITY DESCRIPTION Left Smith Frame Right Smith Frame Smith Barbell M10x70 Square Bolt M10x28 Hex Bolt M10 Nut M10 Washer 1 Left Smith Frame 2 Right Smith Frame 4 M10x70 Square Bolt 3 Smith Barbell M10 Washer 6 M10 Nut M10x28 Hex Bolt...
- Page 35 ASSEMBLY AND ADJUSTMENT STEP 1 QUANTITY DESCRIPTION Left Smith Frame Right Smith Frame...
- Page 36 ASSEMBLY AND ADJUSTMENT STEP 2 QUANTITY DESCRIPTION M10x70 Square Bolt M10 Nut M10 Washer...
- Page 37 ASSEMBLY AND ADJUSTMENT STEP 3 QUANTITY DESCRIPTION Smith Barbell M10x28 Hex Bolt M10 Nut M10 Washer...
- Page 39 Congratulations! You have assembled the Smith Attachment! Now, you can officially start strength training! 80.7 in...
- Page 40 GOT A PROBLEM? GET IN TOUCH www.ritfitsports.com support@ritfitsports.com SUBSCRIBE WEBSITE AND GET GET SOCIAL WITH US Free Exercise Ebook @ritfit sports Lastest Updates...
Need help?
Do you have a question about the M1-C and is the answer not in the manual?
Questions and answers