Advertisement
Advertisement
Table of Contents

Subscribe to Our Youtube Channel
Related Manuals for RITFIT PLC01


Summary of Contents for RITFIT PLC01
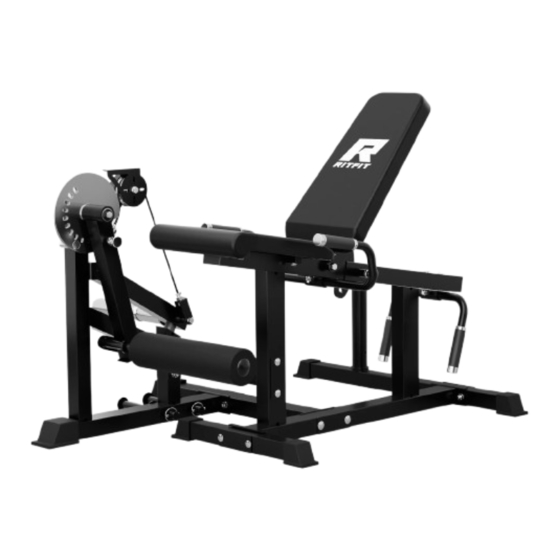
- Page 1 LEG CURL MACHINE PLC01 OWNER’S MANUAL & ASSEMBLY INSTRUCTIONS...
-
Page 3: Safety And Precautions
Additional features on products may be added during seasonal production but may not be featured in line art diagrams at time of production. Changes of such will not affect the performance or assembly of the unit. If you would like further clarification during your assembly process please feel free to contact RITFIT for direction. -
Page 4: Warranty
A. What’s Covered Under RitFit LLC’s Basic Warranty? Basic Warranty. B. Who Is Covered? You are covered by the Basic Warranty if you are a purchaser for use of the RitFit Leg Curl Machine. C. What’s Covered? The Basic Warranty covers the cost of all parts and labor needed to repair any item on your leg curl machine when it left the manufacturing plant that is defective in material, workmanship or factory preparation. -
Page 5: Before You Begin
BEFORE YOU BEGIN Thank you for selecting the versatile RitFit® Leg Curl Machine. RitFit® Leg Curl Machine is designed to be used with weight training system to help you develop your lower muscle group of the body. For your benefit, read this manual carefully before using the Leg Curl Machine.If you have additional questions, please email our Customer Service Department at support@ritfitsports.com. -
Page 6: Parts List
PARTS LIST ·FASTENER AND TOOLS QUANTITY DESCRIPTION M10x90 Square Neck Bolt M10x70 Square Neck Bolt M10x130 Hex Bolt M10x20 Hex Bolt M8x40 Hex Bolt M8x20 Hex Bolt M10 Nut M10 Washer M8 Washer Open-ended Wrench 14-17 M10x90 Square Neck Bolt M10x70 Square Neck Bolt M10x20 Hex Bolt M10x130 Hex Bolt... - Page 7 PARTS LIST ·PACKED IN THE BOX QUANTITY DESCRIPTION Main Frame Bottom Beam (Long) Bottom Beam (Short) Storage Bottom Frame Rotating Arm Frame Sundial Arm Base Frame Weight Plate Rack Cross Frame Foam Cushion Upper Handle Bar Lower Handle Bar Main Frame Bottom Beam (Long) Bottom Beam (Short) Storage Bottom Frame...
- Page 8 PARTS LIST ·PACKED IN THE BOX QUANTITY DESCRIPTION Seat Cushion Back Cushion Plate Holder Cable Collar Quick Release Band Peg Ring Bolt Aluminum Pulley Seat Cushion Back Cushion Plate Holder Cable Quick Release Band Peg Ring Bolt Aluminum Pulley (Pre-installed, inside the Arm Base Frame)...
-
Page 9: Assembly And Adjustment
ASSEMBLY AND ADJUSTMENT STEP 1 QUANTITY DESCRIPTION Storage Bottom Frame Plate Holder NOTE: If you find the bottom tube of Plate Holder is not long enough, you can use an allen wrench to loosen the set screw to adjust the length of it. NOTE: Pre-installed, inside the Plate Holder. - Page 10 ASSEMBLY AND ADJUSTMENT STEP 2 QUANTITY DESCRIPTION Main Frame Bottom Beam (Long) Bottom Beam (Short) M10x90 Square Neck Bolt M10x70 Square Neck Bolt M10 Nut M10 Washer...
- Page 11 ASSEMBLY AND ADJUSTMENT STEP 3 QUANTITY DESCRIPTION Arm Base Frame M10x90 Square Neck Bolt M10 Nut M10 Washer...
- Page 12 ASSEMBLY AND ADJUSTMENT STEP 4 QUANTITY DESCRIPTION Cross Frame M10x70 Square Neck Bolt M10 Nut M10 Washer...
- Page 13 ASSEMBLY AND ADJUSTMENT STEP 5 QUANTITY DESCRIPTION Rotating Arm Frame Sundial NOTE: Pre-installed, inside the Rotating Arm Frame.
- Page 14 ASSEMBLY AND ADJUSTMENT STEP 6 QUANTITY DESCRIPTION Weight Plate Rack M10x20 Hex Bolt M10 Washer NOTE: Pre-installed, inside the Weight Plate Rack. NOTE: Pre-installed, inside the Cable.
- Page 15 ASSEMBLY AND ADJUSTMENT STEP 7 QUANTITY DESCRIPTION Cable NOTE: Pre-installed, inside the Cable.
- Page 16 ASSEMBLY AND ADJUSTMENT STEP 8 QUANTITY DESCRIPTION Foam Cushion M10x130 Hex Bolt M10 Nut M10 Washer...
- Page 17 ASSEMBLY AND ADJUSTMENT STEP 9 QUANTITY DESCRIPTION Upper Handle Bar M10x70 Square Neck Bolt M10 Nut M10 Washer...
- Page 18 ASSEMBLY AND ADJUSTMENT STEP 10 QUANTITY DESCRIPTION Lower Handle Bar M10x70 Square Neck Bolt M10 Nut M10 Washer...
- Page 19 ASSEMBLY AND ADJUSTMENT STEP 11 QUANTITY DESCRIPTION Seat Cushion M8x40 Hex Bolt M8 Washer...
- Page 20 ASSEMBLY AND ADJUSTMENT STEP 12 QUANTITY DESCRIPTION Back Cushion M8x20 Hex Bolt M8 Washer...
- Page 21 ASSEMBLY AND ADJUSTMENT STEP 13 QUANTITY DESCRIPTION Collar Quick Release Band Peg Ring Bolt When you are doing the Lying Leg Curl, it is suggested to put the foam NOTE: cushion inside the Rotating Arm Frame (as the picture shows).
- Page 22 Congratulations! You have assembled the Leg Curl Machine! Now, you can officially start strength training! 42.7 in...
- Page 24 GOT A PROBLEM? GET IN TOUCH www.ritfitsports.com support@ritfitsports.com SUBSCRIBE WEBSITE AND GET GET SOCIAL WITH US Free Exercise Ebook @ritfit sports Lastest Updates...
Need help?
Do you have a question about the PLC01 and is the answer not in the manual?
Questions and answers