Advertisement
Quick Links
Advertisement

Related Manuals for RITFIT PPC03A


Summary of Contents for RITFIT PPC03A
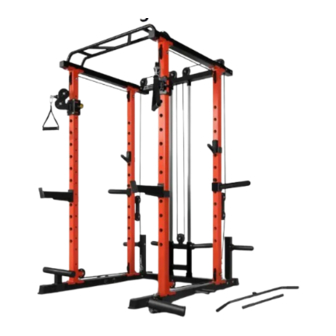
- Page 1 POWER CAGE WITH CABLE CROSSOVER PPC03A OWNER’S MANUAL & ASSEMBLY INSTRUCTIONS...
-
Page 3: Safety And Precautions
4. One person at a time should use this equipment incomplete form. Please contact RITFIT for a unless otherwise designed for safety (example: ·... -
Page 4: Warranty
These warranty repairs or adjustments will be made by RitFit at no charge, using new or remanufactured parts. D. When It Begins? The Basic Warranty begins on the day of order. -
Page 5: Before You Begin
BEFORE YOU BEGIN Thank you for selecting the versatile RitFit® Power Cage. RitFit® Power Cage is designed and manufactured to optimize users’ workout performance and minimize adjustment or set-up time for users. For your benefit, read this manual carefully before using the Power cage. If you have additional questions, please call our Customer Service Department at +1315 636 0959, 9:00 am - 5:00 pm PST (Mon.-Fri.). -
Page 6: Parts List
PARTS LIST FASTENER AND TOOLS QUANTITY DESCRIPTION M10x70 Square Neck Bolt M10x70 Hex Bolt M10x50 Hex Bolt M8x45 Hex Bolt M10x25 Hex Bolt M10 Nut M8 Nut M10 Washer M8 Expansion Bolt Hex Key Open-ended Wrench b M10x70 Hex Bolt M10x70 Square Neck Bolt M10x50 Hex Bolt d M8x45 Hex Bolt... - Page 7 PARTS LIST ACCESSORIES QUANTITY DESCRIPTION J-Hooks Set Quick Release Plates Storage Tubes Set Safety Bars Set Low Row Foot Tube A J-Hooks Set B Quick Release Plates C Safety Bars Set D Low Row Foot Tube Storage Tubes Set MAIN FRAME QUANTITY DESCRIPTION Left Upright Frame (front)
- Page 8 PARTS LIST 3 Upright Frame (back) 4 Bottom Base Frame 5 Upper Cross Frame Chrome Pull-Up Bar Rear Cross Beam Bottom Cross Beam Band Peg Landmine Plate Holder Frame Bolt Plates Bolt-down Floor Bracket...
- Page 9 PARTS LIST PULLEY SYSTEM QUANTITY DESCRIPTION Rubber Pad Carabiner Pulley Pulley Peg Plate Carriage Pulley Block Low Row Bar Pulley Handle Lat Pull Shaft Cable A Cable B Pulley Peg 16 Pulley 14 Rubber Pad 15 Carabiner Pulley Handle 18 Plate Carriage 19 Pulley Block 20 Low Row Bar Lat Pull Shaft...
- Page 10 ASSEMBLY STEP 1 DESCRIPTION QUANTITY Bottom Base Frame Bottom Cross Beam Bolt Plates M10x70 Square Neck Bolt M10 Nut M10 Washer...
- Page 11 ASSEMBLY STEP 2 DESCRIPTION QUANTITY Plate Holder Frame M10x70 Square Neck Bolt M10 Nut M10 Washer...
- Page 12 ASSEMBLY STEP 3 (Two People Are Required.) DESCRIPTION QUANTITY Left Upright Frame (front) Right Upright Frame (front) Upright Frame (back) Bolt-down Floor Bracket M10x70 Square Neck Bolt M10 Nut M10 Washer knob *Please note the knob is facing toward each other!
- Page 13 ASSEMBLY STEP 4 (Two People Are Required.) DESCRIPTION QUANTITY Rubber Pad Plate Carriage Guide Rod...
- Page 14 ASSEMBLY STEP 5 (Two People Are Required.) DESCRIPTION QUANTITY Upper Cross Frame Rear Cross Beam Bolt Plates M10x70 Square Neck Bolt M8x45 Hex Bolt M10 Nut M8 Nut M10 Washer Ste p 1 Step 2 Step 3...
- Page 15 ASSEMBLY STEP 6 (Two People Are Required.) DESCRIPTION QUANTITY Upper Cross Frame Bolt Plates M10x70 Square Neck Bolt M10 Nut M10 Washer Step 1 Step 2...
- Page 16 ASSEMBLY STEP 7 (Two People Are Required.) DESCRIPTION QUANTITY Chrome Pull-Up Bar M10x70 Square Neck Bolt M10 Nut M10 Washer...
- Page 17 ASSEMBLY STEP 8 DESCRIPTION QUANTITY Pulley Pulley Peg M10x70 Hex Bolt M10x50 Hex Bolt M10 Nut M10 Washer...
- Page 18 ASSEMBLY STEP 9 DESCRIPT ION QUANTITY Carabiner Pulley Block Pulley Handle Cable A Cable B M10x25 Hex Bolt M10 Nut M10 Washer If this part is too tight, adjust it by the bolt as the diagram shows. start *Disassemble only one side of Cable A first, then follow the step above to run through the power cage.
- Page 19 ASSEMBLY STEP 10 DESCRIPTION QUANTITY Band Peg Landmine...
- Page 20 ASSEMBLY STEP 11 DESCRIPTION QUANTITY J-Hooks Set Quick Release Plates Storage Tubes Set Safety Bars Set Low Row Foot Tube 90° 90° 90° 90° 90° 90°...
- Page 21 If you have any questions, please e-mail our customer service team at support@ritfitsports.com Dear RitFit Customers, Thank you so much for choosing RitFit Power Cage with Safety Bar and Plate Holder! Before starting assembling this power cage, please notice that there are THREE important warnings to kindly remind you of the user safeties and product safeties.
- Page 22 Congratulations! You have assembled the Power Cage! Now, you can officially start strength training! 81 in 85 in...
- Page 24 GOT A PROBLEM? GET IN TOUCH www.ritfitsports.com support@ritfitsports.com SUBSCRIBE WEBSITE AND GET GET SOCIAL WITH US Free Exercise Ebook @ritfit. sports Lastest Updates...
Need help?
Do you have a question about the PPC03A and is the answer not in the manual?
Questions and answers