Kramer KDS-17EN User Manual
4k60 4:4:4 avoip encoder / decoder
Hide thumbs
Also See for KDS-17EN:
- Quick start manual (4 pages) ,
- User manual (98 pages) ,
- User manual (106 pages)

Related Manuals for Kramer KDS-17EN


Summary of Contents for Kramer KDS-17EN
- Page 1 USER MANUAL MODELS: KDS-17EN KDS-17DEC 4K60 4:4:4 AVoIP Encoder / Decoder P/N: 2900-301718 Rev 1 www.kramerav.com...
-
Page 2: Table Of Contents
Gateway: CEC, RS-232 and IR definitions Diagnostics: Status, Connections and Logging About Upgrading Firmware Defining Dante Audio as an Audio Source or Destination Defining Dante input to the KDS-17EN encoder Defining Dante output from the KDS-17DEC decoder Using Dante Software Technical Specifications KDS-17EN Specifications... -
Page 3: Introduction
Kramer Electronics Ltd. Introduction Welcome to Kramer Electronics! Since 1981, Kramer Electronics has been providing a world of unique, creative, and affordable solutions to the vast range of problems that confront the video, audio, presentation, and broadcasting professional on a daily basis. In recent years, we... -
Page 4: Overview
European Advanced Recycling Network (EARN) and will cover any costs of treatment, recycling and recovery of waste Kramer Electronics branded equipment on arrival at the EARN facility. For details of Kramer’s recycling arrangements in your particular country go to our recycling pages at www.kramerav.com/quality/environment. -
Page 5: Typical Applications
Kramer Electronics Ltd. Typical Applications KDS-17EN / KDS-17DEC are ideal for the following typical applications: • Real-time essential installations such as command and control rooms. • Large scale AV content sharing installations using existing wires and infrastructure in corporate offices and government applications. -
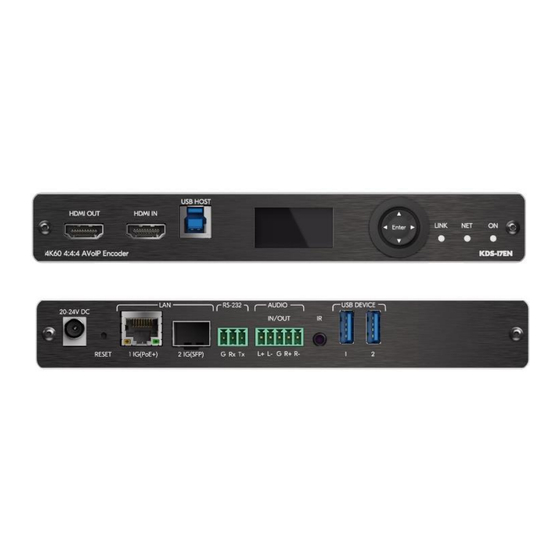
Page 6: Defining Kds-17En
Kramer Electronics Ltd. Defining KDS-17EN Figure 1: KDS-17EN 4K60 4:4:4 AVoIP Encoder Feature Function HDMI OUT Connector Connect to loop the signal. HDMI IN Connector Connect to an HDMI source. HOST USB Type B Port Connect to a USB host, for example, a PC for KVM/USB support. - Page 7 Connect to an IR sensor or emitter for bi-directional signal extension (even when no AV signal is extended). Expected voltage for IR receiver - (3.3V). USB Type A Charging Ports Connect to USB devices, for example, to a speakerphone and webcam. (1 and 2) KDS-17EN / KDS-17DEC – Defining KDS-17EN...
-
Page 8: Defining Kds-17Dec
22 20-24V DC Connector Connect to the optional 20-24V DC power adapter (purchased separately). 23 RESET Recessed Button Press and hold for 10 seconds to reset the device to its factory default values. All LEDs flash. KDS-17EN / KDS-17DEC – Defining KDS-17DEC... - Page 9 USB Type A Charging Ports Connect to USB devices, for example, to a speakerphone and webcam. (1 and 2) 30 HDMI IN Connector Connect to an HDMI source. 31 HDMI OUT Connector Connect to an HDMI acceptor. KDS-17EN / KDS-17DEC – Defining KDS-17DEC...
-
Page 10: Mounting The Kds-17 Devices
1. Unfasten the knobs to remove the open panel. 2. Slide the device into the panel opening. 3. Attach the device to the panel using 4 screws (2 on each side to secure the device to the panel). KDS-17EN / KDS-17DEC – Mounting the KDS-17 Devices... - Page 11 Attach the rubber feet and place the unit on a flat surface. • Fasten a bracket (included) on each side of the unit and attach it to a flat surface. For more information go to www.kramerav.com/downloads/KDS-17EN http://www.kramerav.com/downloads/KDS-17DEC KDS-17EN / KDS-17DEC – Mounting the KDS-17 Devices...
-
Page 12: Connecting The Kds-17 Devices
Always switch off the power to a device before connecting it to your KDS-17EN or KDS-17DEC. After connecting your devices, connect their power and then switch on the power to each device. Figure 3: Connecting the KDS-17EN to a KDS-17DEC KDS-17EN / KDS-17DEC – Connecting the KDS-17 Devices... -
Page 13: Configuring The Network Switch
(for example, an audio amplifier). 6. Connect the USB ports: ▪ On KDS-17EN, connect a laptop or media center to the USB HOST port ▪ On KDS-17DEC, connect a mouse and a keyboard to the two USB type A ports 7. -
Page 14: Installing The Kramer Recommended Sfp Transceiver
Avoid placing optical devices in the emitted beam that could cause the concentration of the laser radiation to be increased. To achieve specified extension distances, use the recommended Kramer cables available at http://www.kramerav.com/product/kds-17en or http://www.kramerav.com/product/kds-17dec. Using third-party cables may cause damage! -
Page 15: Connecting To A Kds-17 Device With
Pin 2 to the TX pin on the KDS-17 RS-232 terminal block • Pin 3 to the RX pin on the KDS-17 RS-232 terminal block • Pin 5 to the G pin on the KDS-17 RS-232 terminal block KDS-17EN / KDS-17DEC – Connecting the KDS-17 Devices... -
Page 16: Operating And Controlling Kds-17 Devices
The Main Menu has 3 sub-menus (listed below): ▪ An asterisk (*) indicates the active option. ▪ Changes are made in MAIN MENU > DEV SETTINGS. Press Enter on an option to make it active. KDS-17EN / KDS-17DEC – Operating and Controlling KDS-17 Devices... - Page 17 3. DEV RESOLUTION SETTINGS 3840x2160P60 Channel ID of the input stream. CH SELECT To change the channel use the up/down arrows to change each digit, press Enter to confirm the final number. KDS-17EN / KDS-17DEC – Operating and Controlling KDS-17 Devices...
-
Page 18: Operating Via Ethernet
Press Enter to save your selection. 5. The channel ID must be the same on both devices. KDS-17EN / KDS-17DEC – Operating and Controlling KDS-17 Devices... - Page 19 2. If you don’t know the device’s IP address, see Allocating an IP Address to the Device on page 18. 3. If security is enabled, enter the Password (default admin). Figure 8: Login Window KDS-17EN / KDS-17DEC – Operating and Controlling KDS-17 Devices...
- Page 20 4. Highlight either Internet Protocol Version 6 (TCP/IPv6) or Internet Protocol Version 4 (TCP/IPv4) depending on the requirements of your IT system. 5. Click Properties. The Internet Protocol Properties window relevant to your IT system appears as shown in Figure 10 Figure KDS-17EN / KDS-17DEC – Operating and Controlling KDS-17 Devices...
- Page 21 6. Select Use the following IP Address for static IP addressing and fill in the details as shown in Figure For TCP/IPv4 you can use any IP address in the range 192.168.1.1 to 192.168.1.255 (excluding 192.168.1.39 and 192.168.1.40) that is provided by your IT department. KDS-17EN / KDS-17DEC – Operating and Controlling KDS-17 Devices...
- Page 22 RJ-45 connectors. Configuring the Ethernet Port You can set the Ethernet parameters via the embedded web pages (requires a network hub or switch connection). KDS-17EN / KDS-17DEC – Operating and Controlling KDS-17 Devices...
-
Page 23: Using Kds-17En Embedded Web Pages
3. Enter the Password (admin, by default). KDS-17EN page appears. Figure 14: Embedded Web Page with Navigation List on Left 4. Click the tabs on the left side of the screen to access the relevant web page. KDS-17EN / KDS-17DEC – Using KDS-17EN Embedded Web Pages... -
Page 24: Dashboard: Overview Of Streaming
Audio Sample Rate – Input audio signal’s sample frequency (number of samples per second). • Audio Format – LPCM (uncompressed audio), Dolby (compressed), HBR (compressed high bit rate, such as Dolby TrueHD). 4. Click the green check to confirm any changes. KDS-17EN / KDS-17DEC – Using KDS-17EN Embedded Web Pages... - Page 25 Click ROLLBACK to update to the previous FW version. If the device firmware version is lower than 0.6.3, contact Kramer tech support team at support@kramerav.com or go to our Web site at http://www.kramerav.com/downloads/kds-17dec...
- Page 26 4. Once completed, refresh the web page and log-in. Firmware upgrade is complete. Defining Dante Audio as an Audio Source or Destination in page 80. Additional audio settings can be configured in AV Settings > Audio. KDS-17EN / KDS-17DEC – Using KDS-17EN Embedded Web Pages...
-
Page 27: Av Settings: Define Video And Audio Output
TTL - Time To Live (TTL) restricts the number of times a packet/data can be forwarded by network routers before it is discarded. It stops the stream data from circulating endlessly in the network. Select a value between 1 and 65535. KDS-17EN / KDS-17DEC – Using KDS-17EN Embedded Web Pages... - Page 28 Width – 1 to 1280 (default 960). Height – 1 to 720 (default 540). FPS- 1 to 60 (default 15). Bandwidth – 1 to 50,000 (default 8000). 3. Click SAVE. KDS-17EN / KDS-17DEC – Using KDS-17EN Embedded Web Pages...
- Page 29 5-pin terminal block connector (14 in Defining KDS-17EN on page 6). It can only be in one direction (in or out), which must be specified. Click SAVE after changing settings. KDS-17EN / KDS-17DEC – Using KDS-17EN Embedded Web Pages...
-
Page 30: Edid: Setting Display Metadata
Click the download icon to store it on your computer. ▪ Default – A default EDID is supplied with the KDS-17EN. Click the bottom right corner to view the EDID bitmap. Click the download icon to store it on your computer. -
Page 31: Device Settings: General, Network, Time & Date
Import Device Settings – Imports a settings file in the same format as the output file (tar.gz). The device will be reset to the uploaded settings. Click Save to store changes or update settings. KDS-17EN / KDS-17DEC – Using KDS-17EN Embedded Web Pages... - Page 32 Requires 802.1Q to be set to • DHCP – If set to On, the service’s IP address is generated automatically. If set Off, you may need to define a static IP address for the service. KDS-17EN / KDS-17DEC – Using KDS-17EN Embedded Web Pages...
- Page 33 If no DHCP server exists in the system, the device will look for a random unique IP in the range of 169.254.X.Y. The allocated IP address is shown in the IP address field. KDS-17EN / KDS-17DEC – Using KDS-17EN Embedded Web Pages...
- Page 34 Defining Dante Audio as an Audio Source or Destination on page 80. 1. To export Dante audio from the encoder, you must first go to the KDS-17EN Dashboard pane and set at least one of the Device Audio Routing INPUTS to...
- Page 35 3. To use a static IP for LAN 2, set DHCP to Off and enter a subnet mask and gateway address. If no static IP is defined, the DHCP server will allocate the IP. Dante audio output is now defined. KDS-17EN / KDS-17DEC – Using KDS-17EN Embedded Web Pages...
- Page 36 5. Click the green arrows to check that the server is available. 6. Click SAVE. The devices date and time are synchronized to the server address entered. Figure 21: Device Settings – Time & Date KDS-17EN / KDS-17DEC – Using KDS-17EN Embedded Web Pages...
-
Page 37: Security: Passwords, Https, 802.1X And Aes256
When security is enabled, access to the web pages requires entry of a password. Changes to the security status require entry of the device’s current password (default: “admin”). Figure 23: Security pane – pop-up KDS-17EN / KDS-17DEC – Using KDS-17EN Embedded Web Pages... - Page 38 Server Certificate – Upload an authentication certificate from the server (assigned by your network administrator). Click to upload the certificate. Enter the private key password. Figure 25: Security Tab – Server Certificate 4. Click SAVE. HTTPS is configured. KDS-17EN / KDS-17DEC – Using KDS-17EN Embedded Web Pages...
- Page 39 5. Server Certificate – (optional) Use a CA (certification authority) issued certificate to authenticate the RADIUS server. Enable and click to upload the CA certificate. Figure 26: EAP-TLS – Certificates and Password KDS-17EN / KDS-17DEC – Using KDS-17EN Embedded Web Pages...
- Page 40 Customized requires you to enter a 32 byte hexadecimal string (64 characters using only the characters 0 – 9 and A to F). No hex code identifier is required before the string. KDS-17EN / KDS-17DEC – Using KDS-17EN Embedded Web Pages...
-
Page 41: Gateway: Cec, Rs-232 And Ir Definitions
, to see the address of the CEC device attached to the HDMI port. 6. Enter the CEC command in hexadecimal format. 7. Click SEND. 8. View the CEC-enabled device response in the CEC Notifications field. KDS-17EN / KDS-17DEC – Using KDS-17EN Embedded Web Pages... - Page 42 RS-232 tab KDS-17EN can receive RS-232 commands over LAN, that were sent to a connected decoder’s RS-232 port. These commands can be used to remotely control KDS-17EN. To set RS-232 Gateway: 1. In the Gateway pane, click the RS-232 tab.
- Page 43 IN – Configure the IR port as an input port that is connected to an IR receiver cable. ▪ OUT – Configure the IR port as an output port that is connected to an IR emitter cable. 3. Click Save. IR Gateway is configured. KDS-17EN / KDS-17DEC – Using KDS-17EN Embedded Web Pages...
-
Page 44: Diagnostics: Status, Connections And Logging
4. View the status of the outputs: ▪ HDMI OUT - On, the output channel is transmitting an active signal. ▪ LAN – On, a signal is being transmitted. Device status is viewed. KDS-17EN / KDS-17DEC – Using KDS-17EN Embedded Web Pages... - Page 45 2. Select the Connections tab. Figure 32: Diagnostics – Connection Tab 3. UCP devices that end the connection will be displayed for 10 minutes after the connection ends. Connections’ status is viewed. KDS-17EN / KDS-17DEC – Using KDS-17EN Embedded Web Pages...
- Page 46 4. Click VIEW to view the system log (must be active). 5. Click EXPORT to export the system log (in .txt format) to the local PC. 6. Click Save to confirm any changes. System log and counters are viewed. KDS-17EN / KDS-17DEC – Using KDS-17EN Embedded Web Pages...
-
Page 47: About
Kramer Electronics Ltd. About View the device model, hardware release, firmware version and Kramer Electronics Ltd details. Figure 34: About Page KDS-17EN / KDS-17DEC – Using KDS-17EN Embedded Web Pages... -
Page 48: Upgrading Firmware
Upgrade the firmware, view the date of the last upgrade, or rollback to the previous firmware revision in case of a problem. Click ROLLBACK to update to the previous FW version. If the device firmware version is lower than 0.6.3, contact Kramer tech support team at support@kramerav.com or go to our Web site at http://www.kramerav.com/downloads/KDS-17EN... -
Page 49: Using Kds-17Dec Embedded Web Pages
3. If required, enter the login password (“admin”, by default). KDS-17DEC page appears. Figure 37: Embedded Web Page with Navigation List on Left 4. Click the tabs on the left side of the screen to access the relevant web page. KDS-17EN / KDS-17DEC – Using KDS-17DEC Embedded Web Pages... -
Page 50: Dashboard: Overview Of Streaming
Audio Channels – Number of channels in audio input. • Audio Sample Rate – Input audio signal’s sample frequency (number of samples per second). • Audio Format – LPCM is uncompressed, other types of digital format are usually compressed. KDS-17EN / KDS-17DEC – Using KDS-17DEC Embedded Web Pages... - Page 51 Click ROLLBACK to update to the previous FW version. If the device firmware version is lower than 0.6.3, contact Kramer tech support team at support@kramerav.com or go to our Web site at http://www.kramerav.com/downloads/kds-17dec...
-
Page 52: Av Settings: Video, Osd, Kvm, Video Wall & Overlay
KVM / USB tab – External Keyboard, Video and Monitor. Video Wall tab – Grid Video Wall / Mosaic Video Wall. Overlay tab – Overlay an image, text or KVM. KDS-17EN / KDS-17DEC – Using KDS-17DEC Embedded Web Pages... - Page 53 Use the slider to set the transparency of the OSD & Overlay texts, KVM Overlay and Overlay image. Default setting: 50% Figure 43: AV Settings > Video – OSD & Overlay Transparency KDS-17EN / KDS-17DEC – Using KDS-17DEC Embedded Web Pages...
- Page 54 Priority - Dynamically switch according to the defined priority (manually drag the sources to set the priority). If no audio input is detected on the top priority, the system will switch to the next priority. KDS-17EN / KDS-17DEC – Using KDS-17DEC Embedded Web Pages...
- Page 55 Before switching, the device waits for an audio signal to be detected. The amount of time it waits is set in the signal loss/detection and cable plug/unplug parameters (to allow time to detect video input). Figure 46: Video output switching mode 9. Click SAVE. KDS-17EN / KDS-17DEC – Using KDS-17DEC Embedded Web Pages...
- Page 56 Input any word in the Filter textbox: Access to the desired option quickly. • Enter: Make the selection. After Enter is typed, the OSD menu closes. • ESC: Exit the OSD menu. KDS-17EN / KDS-17DEC – Using KDS-17DEC Embedded Web Pages...
- Page 57 Type a menu feature next to Filter (in the OSD) to access a function quickly. ▪ Press Enter to accept a selection and exit the OSD menu. ▪ Pres Esc to exit the menu. OSD menu is accessed. KDS-17EN / KDS-17DEC – Using KDS-17DEC Embedded Web Pages...
- Page 58 KVM services must be provided. If the KVM is not active within this time, the encoder will try a different decoder. Default setting is 10 seconds. ▪ Roaming Master – Only available in Multicast mode (set in Av Settings > Video) KDS-17EN / KDS-17DEC – Using KDS-17DEC Embedded Web Pages...
- Page 59 AV Settings > KVM / USB page. Figure 54: Defining the Master Decoder for KVM Roaming 5. Set the Decoder as “Master”. The decoder configuration setup appears. KDS-17EN / KDS-17DEC – Using KDS-17DEC Embedded Web Pages...
- Page 60 7. Check the physical location of the Master decoder (lower left size in this example). The MAC address is automatically entered. 8. Manually enter the other (slave) decoder MAC addresses according to the physical setup. 9. Click Save. KVM Roaming is configured. KDS-17EN / KDS-17DEC – Using KDS-17DEC Embedded Web Pages...
- Page 61 Grids are evenly arranged video walls. Mosaic video walls allow displays to be set at different angles. This type of video wall requires a connection to Kramer’s KDS-7-MNGR device, for more information on this type of video wall, see the KDS-7MNGR user manual.
- Page 62 Viewable Height = VH Outside Height = OH ▪ Video Wall Test – Enable to output a test image to the display. Figure 57: AV Settings – Video Wall, Bezel Compensation KDS-17EN / KDS-17DEC – Using KDS-17DEC Embedded Web Pages...
- Page 63 ▪ Size - Small, medium or large. ▪ Align – Set the image position on the screen. ▪ Text Color – Set the text color. Figure 58: Av Settings - Overlay KDS-17EN / KDS-17DEC – Using KDS-17DEC Embedded Web Pages...
-
Page 64: Device Settings: General, Network And Time Settings
(confirmation is requested). • Find Me – The LEDs will flash fast for 60 seconds to identify the decoder. When an HDMI OUT screen is connected, the screen shows the device’s IP. KDS-17EN / KDS-17DEC – Using KDS-17DEC Embedded Web Pages... - Page 65 Requires 802.1Q to be set to • DHCP – If set to On, the service’s IP address is generated automatically. If set Off, you may need to define a static IP address for the service. KDS-17EN / KDS-17DEC – Using KDS-17DEC Embedded Web Pages...
- Page 66 If no DHCP server exists in the system, the device will look for a random unique IP in the range of 169.254.X.Y. The allocated IP address is shown in the IP address field. KDS-17EN / KDS-17DEC – Using KDS-17DEC Embedded Web Pages...
- Page 67 Click ROLLBACK to update to the previous FW version. If the device firmware version is lower than 0.6.3, contact Kramer tech support tea support@kramerav.com or go to our Web site at http://www.kramerav.com/downloads/kds-17dec...
- Page 68 4. Enter the Time Server Address IP. 5. Click SAVE. The devices date and time are synchronized to the server address entered. Figure 61: Device Settings pane – Time & Date tab KDS-17EN / KDS-17DEC – Using KDS-17DEC Embedded Web Pages...
-
Page 69: Security: Passwords, Https And 802.1X
Password and then click Change. The new password must include a number, a special character and both upper and lower case letters (no commas Figure 64: Security pane – Change password or spaces). KDS-17EN / KDS-17DEC – Using KDS-17DEC Embedded Web Pages... - Page 70 Server Certificate – Submit a certificate from the server for authentication (assigned by your network administrator). Click to upload the certificate. Enter the private key password. Figure 65: Security Tab – Server Certificate 4. Click SAVE. HTTPS is configured. KDS-17EN / KDS-17DEC – Using KDS-17DEC Embedded Web Pages...
- Page 71 5. Server Certificate – (optional) Use a CA (certification authority) issued certificate to authenticate the RADIUS server. Enable and click to upload the CA certificate. Figure 66: EAP-TLS – Certificates and Password KDS-17EN / KDS-17DEC – Using KDS-17DEC Embedded Web Pages...
- Page 72 Customized requires you to enter a 32 byte hexadecimal string (64 characters using only the characters 0 – 9 and A to F). No hex code identifier is required before the string. KDS-17EN / KDS-17DEC – Using KDS-17DEC Embedded Web Pages...
-
Page 73: Gateway: Cec, Rs-232 And Ir Definitions
, to see the address of the CEC device that is attached to the HDMI port. 5. Enter the CEC command in hexadecimal format. 6. Click SEND. 7. View the CEC-enabled device response in the CEC Notifications field. CEC Gateway is configured. KDS-17EN / KDS-17DEC – Using KDS-17DEC Embedded Web Pages... - Page 74 5. Enter the Data Bits: 5, 6, 7 or 8 (default). 6. Enter Parity: None (default), Odd or Even. 7. Enter Stop Bits: 1 (default) or 2. 8. Click SAVE. RS-232 Gateway is configured. KDS-17EN / KDS-17DEC – Using KDS-17DEC Embedded Web Pages...
- Page 75 IN – Configure the IR port as an input port that is connected to an IR receiver cable. ▪ OUT – Configure the IR port as an output port that is connected to an IR emitter cable. IR Gateway is configured. KDS-17EN / KDS-17DEC – Using KDS-17DEC Embedded Web Pages...
-
Page 76: Diagnostics: Status, Connections And Logging
▪ Overheat, for temperatures higher than 60°C. 4. View the status of the outputs: ▪ HDMI OUT - On, the output channel is transmitting an active signal. Device status is viewed. KDS-17EN / KDS-17DEC – Using KDS-17DEC Embedded Web Pages... - Page 77 2. Select the Connections tab. Figure 72: Diagnostics – Connection Tab 3. UCP devices that end the connection will be displayed for 10 minutes after the connection ends. Connections’ status is viewed. KDS-17EN / KDS-17DEC – Using KDS-17DEC Embedded Web Pages...
- Page 78 4. Click VIEW to view the system log (must be active). 5. Click EXPORT to export the system log (in .txt format) to the local PC. 6. Click Save to confirm any changes. System log and counters are viewed. KDS-17EN / KDS-17DEC – Using KDS-17DEC Embedded Web Pages...
-
Page 79: About
Kramer Electronics Ltd. About View the device model, hardware release, firmware version and Kramer Electronics Ltd details. Figure 74: About Page KDS-17EN / KDS-17DEC – Using KDS-17DEC Embedded Web Pages... -
Page 80: Upgrading Firmware
Upgrade the firmware, view the date of the last upgrade, or rollback to the previous firmware revision in case of a problem. Click ROLLBACK to update to the previous FW version. If the device firmware version is lower than 0.6.3, contact Kramer tech support team at support@kramerav.com or go to our Web site at http://www.kramerav.com/downloads/kds-17dec... -
Page 81: Defining Dante Audio As An Audio Source Or Destination
Defining Dante input to the KDS-17EN encoder KDS-17EN can import a Dante audio stream and output it to the decoder. 1. In the KDS-17EN webpages, open the KDS-17EN Dashboard pane. - Page 82 Click ROLLBACK to update to the previous FW version. If the device firmware version is lower than 0.6.3, contact Kramer tech support tea support@kramerav.com or go to our Web site at http://www.kramerav.com/downloads/kds-17dec...
- Page 83 8. To use a static IP for LAN 2, set DHCP to Off and enter a subnet mask and gateway address. If no static IP is defined, the DHCP server will allocate the IP. 4. Dante audio output is now defined. on page 67). KDS-17EN / KDS-17DEC – Defining Dante Audio as an Audio Source or Destination...
-
Page 84: Using Dante Software
(restart) Dante Controller (repeat steps a and b after restarting). Figure 77: Device View screen - AES67 Config tab d. Select the Receive tab and click the Flow icon to create an audio flow (stream). KDS-17EN / KDS-17DEC – Defining Dante Audio as an Audio Source or Destination... - Page 85 Figure 80: Device View screen – RTP Multicast Flow in the Transmit tab g. Use the Dante Controller software to route the audio between the encoder/decoder and the Dante source or destination. Dante has been defined. KDS-17EN / KDS-17DEC – Defining Dante Audio as an Audio Source or Destination...
-
Page 86: Technical Specifications
Shipping Dimensions (W, D, H) 31.2cm x 17.9cm x 7.6cm (12.28" x 7.05" x 2.99") Weight Net Weight 0.7kg (1.54lbs) approx. Shipping Weight 0.9kg (2lbs) approx. Specifications are subject to change without notice at www.kramerav.com KDS-17EN / KDS-17DEC – Technical Specifications... -
Page 87: Kds-17Dec Specifications
Shipping Dimensions (W, D, H) 31.2cm x 17.9cm x 7.6cm (12.28" x 7.05" x 2.99") Weight Net Weight 0.7kg (1.54lbs) approx. Shipping Weight 0.9kg (2lbs) approx. Specifications are subject to change without notice at www.kramerav.com KDS-17EN / KDS-17DEC – Technical Specifications... -
Page 88: Default Communication Parameters
Default username: admin admin Default password: admin admin Full Factory Reset Embedded web pages Device Settings > General > RESET Front panel buttons Press the RESET button on the rear panel for 10 seconds KDS-17EN / KDS-17DEC – Technical Specifications... -
Page 89: Protocol 3000
Kramer Electronics Ltd. Protocol 3000 Kramer devices can be operated using Kramer Protocol 3000 commands sent via serial or Ethernet ports. Understanding Protocol 3000 Protocol 3000 commands are a sequence of ASCII letters, structured according to the following. • Command format:... -
Page 90: Protocol 3000 Commands
Input. 2 – CEC Gateway mode – command to be sent to HDMI Output. (KDS-DEC7 & WP-DEC7) 3 – CEC Gateway mode – command to be sent to HDMI Loop Through (KDS-EN7, KDS-SW2- EN7) KDS-17EN / KDS-17DEC – Protocol 3000... - Page 91 1; If not in CUSTOM Index - Index in EDID List ACTIVE Input_id,Index<CR> ACTIVE Input_id,Index< NOTE: only valid in mode, return ERROR CR><LF> custom mode. in other modes will return error. #EDID-ACTIVE 1,1<CR> KDS-17EN KDS-17EN / KDS-17DEC – Protocol 3000...
- Page 92 #GET-MGR-IP?<CR> ~nn@GET-MGR-IP mgrip: AVoIP Manager IP Get MGR-IP: Get AVoIP Manager IP GET-MGR- mgrip<CR><LF> 0.0.0.0 - means AVoIP #GET-MGR-IP?<CR> Manager not IP enabled. KDS-17EN / KDS-17DEC – Protocol 3000...
- Page 93 Set Inactivity auto-logout time time<CR><LF> auto-logout time. LOGOUT- to 10 0~60 TIMEOUT #LOGOUT-TIMEOUT 10<CR> #LOGOUT-TIMEOUT?<CR> ~nn@LOGOUT-TIMEOUT time – minutes of logout Get HTTP inactivity HTTP- Get Inactivity auto-logout time<CR><LF> time auto-logout time. LOGOUT- time 0~60 TIMEOUT? #LOGOUT-TIMEOUT?<CR> KDS-17EN / KDS-17DEC – Protocol 3000...
- Page 94 Set action to perform by kds_mode – Action (state) for KDS-ACTION Stop the encoder/decoder: #KDS-ACTION kds_mode<CR> ~nn@KDS-ACTION kds_mod encoder/decoder. encoder/decoder #KDS-ACTION 0<CR> e<CR><LF> 0 – Stop 1 – Play 2 – Save config KDS-17EN / KDS-17DEC – Protocol 3000...
- Page 95 KDS-ETH- Set bridge mode to LAN2 mode,idx,vlanid<CR> mode,idx,vlanid<CR><LF> bridge mode BRIDGE 0 - Disable #KDS-ETH-BRIDGE 1,2,1 1 - Enable <CR> idx: interface inde 0 - LAN 1 1 - LAN 2 vlanid: 0~4000 KDS-17EN / KDS-17DEC – Protocol 3000...
- Page 96 0 - Do not need keep ratio 1 - Keep ratio mq: 60~100 #KDS-RATIO?<CR> ~nn@KDS- Get aspect ratio. value – Streamer Decoder Aspect KDS-RATIO? Get Aspect Ratio: Ratio #KDS-RATIO?<CR> RATIO value<CR><LF> width: height, for example “16:9” KDS-17EN / KDS-17DEC – Protocol 3000...
- Page 97 Set Dante vlan tag: port. #KDS-VLAN- gw_type,tag_id<CR> gw_type,tag_id<CR> 0 - Control 1 - Dante – Only available on KDS- <LF> 1,33<CR> SW3-EN7 tag_id – vlan tag (1 to 4093) 1 - No VLAN tag KDS-17EN / KDS-17DEC – Protocol 3000...
- Page 98 3 - Resume, resume the logging 4 - Reset, clear all current logs, keep logging period – Relevant for "start"(be ignored by KDS7 Devices) 1 - Keep current 2 - Daily 3 - Weekly (default) KDS-17EN / KDS-17DEC – Protocol 3000...
- Page 99 Set API mode. MODE 0 - unsolicited solicited mode 1 - solicited #MODE 1<CR> #MODE? <CR> ~nn@MODE api_mode<CR> Get API mode. api_mode Get API mode to MODE? 0 - unsolicited solicited mode 1 - solicited #MODE?<CR> KDS-17EN / KDS-17DEC – Protocol 3000...
- Page 100 For proper settings consult your network administrator. NOTE: For Backward compatibility, the id parameter can be omitted. In this case, the Network ID, by default, is 0, which is the Ethernet control port. KDS-17EN / KDS-17DEC – Protocol 3000...
- Page 101 ANALOG_AUDIO <port_index> – The port number as printed on the front or rear panel <signal_type> – Signal ID attribute: AUDIO <direction> – Direction of the port: IN – Input OUT – Output KDS-17EN / KDS-17DEC – Protocol 3000...
- Page 102 YYYY = Year Time format - 24 hours. MM = Month Date format - Day, DD = Day Month, Year. data – Format: hh:mm:ss where hh = hours mm = minutes ss = seconds KDS-17EN / KDS-17DEC – Protocol 3000...
- Page 103 TIME-ZONE- Get a list of available time list<CR><LF> zones. LIST? zones: one per line. Example: #TIME-ZONE-LIST?<CR> Africa/Abidjan,Africa/Accra,Africa/Ba Entries from the list mako,... can be set as the device time zone with the TIME-ZONE command. KDS-17EN / KDS-17DEC – Protocol 3000...
- Page 104 16 (x2, y2) - will be the virtual coordinates of bottom right position, only required when mode is 16 the range for x1, y1, x2, y2 is: 0 ~ 10000. KDS-17EN / KDS-17DEC – Protocol 3000...
- Page 105 <signal_type> – Signal ID attribute: AUDIO <index> – Indicates a specific channel number when there are multiple channels of the same type audio_level – Audio level (range between 0 to 100) KDS-17EN / KDS-17DEC – Protocol 3000...
- Page 106 <signal_type> – Signal ID attribute: AUDIO <index> – Indicates a specific channel number when there are multiple channels of the same type state – OFF/ON (not case sensitive) KDS-17EN / KDS-17DEC – Protocol 3000...
- Page 107 Brackets ‘[‘ and VIDEO ‘]’ are reserved AUDIO Protocol 3000 <index> – Indicates a specific characters that channel number when there are define a list of multiple channels of the same type parameters as in [a,b,c,d]. KDS-17EN / KDS-17DEC – Protocol 3000...
- Page 108 This is an Extended <signal_type> – Signal ID Protocol 3000 command. attribute: VIDEO AUDIO <index> – Indicates a specific channel number when there are multiple channels of the same type KDS-17EN / KDS-17DEC – Protocol 3000...
-
Page 109: Result And Error Codes
(Reserved) ERR_RESERVED_9 (Reserved) ERR_RESERVED_10 (Reserved) ERR_RESERVED_11 (Reserved) ERR_RESERVED_12 (Reserved) ERR_EDID_CORRUPTED EDID corrupted ERR_NON_LISTED Device specific errors File has the same CRC – not changed ERR_SAME_CRC ERR_WRONG_MODE Wrong operation mode ERR_NOT_CONFIGURED Device/chip was not initialized KDS-17EN / KDS-17DEC – Protocol 3000... - Page 110 KDS-17EN / KDS-17DEC – Protocol 3000...
-
Page 111: Warranty
This limited warranty gives you specific legal rights, and you may have other rights which vary from country to country or state to state. This limited warranty is void if (i) the label bearing the serial number of this product has been removed or defaced, (ii) the product is not distributed by Kramer Electronics or (iii) this product is not purchased from an authorized Kramer Electronics reseller. - Page 112 SAFETY WARNING Disconnect the unit from the power supply before opening and servicing For the latest information on our products and a list of Kramer distributors, visit our website where updates to this user manual may be found. We welcome your questions, comments, and feedback.
Need help?
Do you have a question about the KDS-17EN and is the answer not in the manual?
Questions and answers