
Subscribe to Our Youtube Channel
Related Manuals for Kramer KDS-100EN


Summary of Contents for Kramer KDS-100EN
- Page 1 USER MANUAL MODEL: KDS-100EN KDS-100DEC 4K AVoIP H.264 / H.265 Encoder / Decoder P/N: 2900-301659 Rev 1 www.kramerav.com...
-
Page 2: Table Of Contents
Configuring the Network Switch Using the Channel Selection Buttons Operating via Ethernet KDS-100EN: Using the Embedded Web Pages Dashboard: Set channel and audio, view input signal Streaming: Multicast settings and time to live Encoding: Method, protocol, scaling, bitrate and more... -
Page 3: Introduction
Kramer Electronics Ltd. Introduction Welcome to Kramer Electronics! Since 1981, Kramer Electronics has been providing a world of unique, creative, and affordable solutions to the vast range of problems that confront the video, audio, presentation, and broadcasting professional on a daily basis. In recent years, we... -
Page 4: Overview
European Advanced Recycling Network (EARN) and will cover any costs of treatment, recycling and recovery of waste Kramer Electronics branded equipment on arrival at the EARN facility. For details of Kramer’s recycling arrangements in your particular country go to our recycling pages at www.kramerav.com/quality/environment. -
Page 5: Typical Applications
Kramer Electronics Ltd. Exceptional Quality • Robust Solution for Large–Scale Installations — The KDS-100 line provides an optimized solution for large education and enterprise campuses, and for defense and homeland security facilities, with support for numerous simultaneous video flows and built–in advanced management capabilities. -
Page 6: Controlling Your Kds-100 Device
Kramer Electronics Ltd. Controlling your KDS-100 device Control your KDS-100 device via: The Ethernet using built-in user-friendly web pages: See Operating via Ethernet • on page 16. Protocol 3000 (API) commands: See Protocol 3000 on page 52. • Use the channel selection button to set the broadcast channel: See Using the •... -
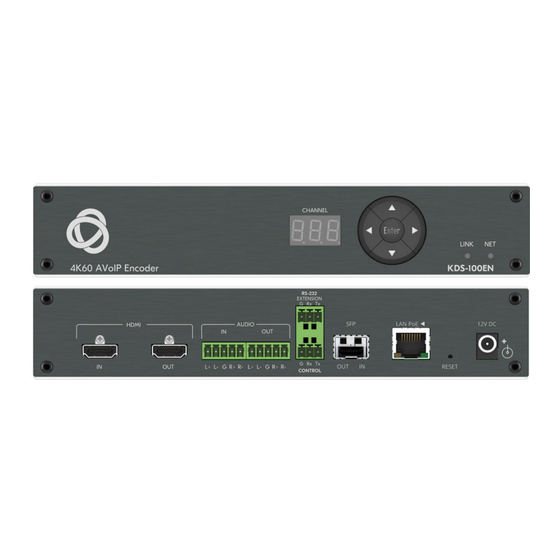
Page 7: Defining The Kds-100
Press to decrement the channel ID number by steps of 10. Enter Press to accept the new channel ID number (within 10 seconds). No HDMI input is detected, or AV streaming mode is OFF for KDS-100EN. Lights green KDS-100EN is linked to a decoder and streaming is active. - Page 8 Kramer Electronics Ltd. Feature Function AUDIO OUT Connect to a balanced, stereo audio acceptor (for example, active speakers). 5-pin terminal block RS-232 EXTENSION 3-pin Connect to a serial data source or acceptor to extend RS-232 control from terminal block connector KDS-100EN to a KDS-100DEC.
-
Page 9: Defining Kds-100Dec
Kramer Electronics Ltd. Defining KDS-100DEC Figure 2: KDS-100DEC 4K60 AVoIP Decoder Feature Function ON LED (behind the logo) On when power is supplied to the unit by PoE+ or by the (optional) power adapter. Use to set the stream’s channel (channels must match on encoder and CHANNEL 7-segment display decoder). - Page 10 Kramer Electronics Ltd. Feature Function SFP OUT IN transceiver Insert an SFP transceiver (optical SM/MM or copper) and plug in an optical / connector CAT-5e cable for Ethernet traffic over IP. Connect to the LAN (Ethernet traffic or PC controller).
-
Page 11: Mounting Kds-100
Kramer Electronics Ltd. Mounting KDS-100 This section provides instructions for mounting devices. Before installing, verify that the environment is within the recommended range: • Operation temperature – 0° to 40°C (32 to 104°F). • Storage temperature – -40° to +70°C (-40 to +158°F). -
Page 12: Connecting Kds-100
By default, KDS-100 devices use PoE+ for power. An optional power adapter can be purchased separately to connect the product to the mains electricity. Always switch off the power to a device before connecting it to your KDS-100 device. Connecting KDS-100EN to KDS-100DEC Figure 3: Connecting KDS-100EN KDS-100DEC KDS-100 Series – Connecting KDS-100... -
Page 13: Connecting Rs-232
KDS-100DEC to a balanced stereo audio acceptor (for example, an audio amplifier). 7. Connect RS-232 3-pin terminal block connectors: On the KDS-100EN, connect the RS-232 port to a control device such as the SL- 240C. On the KDS-100DEC, connect RS-232 to a device that can be controlled by RS- ... -
Page 14: Connecting The Audio/Input Output
Kramer Electronics Ltd. Connecting the Audio/Input Output The following are the pinouts for connecting the input/output to a balanced or unbalanced stereo audio acceptor: Figure 4: Connecting to a Figure 5: Connecting to an Figure 6: Connecting an Balanced Stereo Audio... -
Page 15: Operating And Controlling Kds-100 Devices
Set the same channel number defined on the KDS-100EN: Use the UP/DOWN arrows to scroll up or down through the list of automatically detected channels. o If Dual Stream mode is activated on KDS-100EN, both output streams have the same Channel ID. -
Page 16: Operating Via Ethernet
Kramer Electronics Ltd. Operating via Ethernet This section describes the following actions: Accessing the embedded web pages on page 16. • • Connecting the Ethernet Port Directly to a PC on page 17. Connecting Ethernet Port via a Network Hub or Switch on page 18. - Page 17 Kramer Electronics Ltd. Connecting the Ethernet Port Directly to a PC You can connect the encoder/decoder Ethernet port directly to the Ethernet port on your PC using a crossover Ethernet cable with RJ-45 connectors. This type of connection causes KDS-100EN...
- Page 18 Kramer Electronics Ltd. Figure 11: Internet Protocol Version 6 Properties Window 6. Select Use the following IP Address for static IP addressing and fill in the details as shown in Figure For TCP/IPv4 you can use any IP address in the range 192.168.1.1 to 192.168.1.255 (excluding 192.168.1.39) that is provided by your IT department.
-
Page 19: Kds-100En: Using The Embedded Web Pages
Figure 13: Login Window 3. Enter the Username and Password (default Admin / Admin). page KDS-100EN appears. . Click the tabs on the left to select a relevant web page. Figure 14: Dashboard Window KDS-100 Series – KDS-100EN: Using the Embedded Web Pages... -
Page 20: Dashboard: Set Channel And Audio, View Input Signal
• Mute: Mute/unmute all audio outputs (HDMI OUT, AUDIO OUT, and MEDIA ports). To set the audio output’s source: • In the INPUTS dropdown, select from HDMI IN, Analog Audio Input and None. KDS-100 Series – KDS-100EN: Using the Embedded Web Pages... -
Page 21: Streaming: Multicast Settings And Time To Live
It is set in Encoding > Advanced preferences. Network configurations need to be properly set up to enable multicast communication. Click Save after setting a Multicast Prefix or Time to Live limit. Figure 15: The Streaming pane KDS-100 Series – KDS-100EN: Using the Embedded Web Pages... -
Page 22: Encoding: Method, Protocol, Scaling, Bitrate And More
1920x1080-p60. P30 / P60 = frames per second, 3840 x 2160 = 4K resolution, 1920x1080 = 1080p. Higher resolution images require appropriate cables. 4. If necessary, make changes to the advanced settings (field descriptions below). 5. Click Save. KDS-100 Series – KDS-100EN: Using the Embedded Web Pages... - Page 23 (slices) which are encoded in parallel. IDR frequency – Minimum (-1). IDR (instantaneous decoder refresh) frames are frames • that clear all saved reference frames. KDS-100 Series – KDS-100EN: Using the Embedded Web Pages...
-
Page 24: Edid: Set Display Metadata
square to use this EDID. Click the bottom right corner to view the EDID bitmap. Default – A default EDID is supplied with the KDS-100EN. Click the bottom right corner to view the EDID bitmap. Custom EDID - Upload a stored EDID file from your computer. -
Page 25: Gateway: Rs-232 Settings
3. Enter the Data Bits: 5, 6, 7 or 8 (default). 4. Enter Parity: None (default), Odd, Even, Mark or Space. 5. Enter Stop Bits: 1 (default) or 2. 6. Click SAVE. RS-232 Gateway is configured. Figure 18: Gateway pane KDS-100 Series – KDS-100EN: Using the Embedded Web Pages... -
Page 26: Device: General Device, Network And Time Settings
Factory Reset - Click to reset the device's operation mode and restart the device • (confirmation is requested). Flag Me – The LEDs will flash fast for 10 seconds to identify the device. • KDS-100 Series – KDS-100EN: Using the Embedded Web Pages... - Page 27 MAC Address – MAC of the KDS-100EN. • Static IP definition fields: IP Address, Mask Address, DNS (primary and secondary) • and Gateway Address. Not relevant if DHCP is enabled. TCP Port (default is 5000). • KDS-100 Series – KDS-100EN: Using the Embedded Web Pages...
- Page 28 4. Enter the Time Server Address IP (or the IP of a KDS-100 Series device that you are using as an alternative to a Time Server). 5. Click SAVE. The devices date and time are synchronized to the server address entered. KDS-100 Series – KDS-100EN: Using the Embedded Web Pages...
-
Page 29: Security: Passwords, Https And 802.1X
To change the password Password protection is only available if the Security Status is On. To change the password, enter the Current Password and then click Change. Figure 24: Security pane – Change password KDS-100 Series – KDS-100EN: Using the Embedded Web Pages... - Page 30 Click to upload the certificate. Enter the private key password and click APPLY & REBOOT. Figure 25: Security Tab – Server Certificate 4. Click APPLY & REBOOT. HTTPS is configured. KDS-100 Series – KDS-100EN: Using the Embedded Web Pages...
- Page 31 (assigned by your network administrator). Set Server Certificate to On. Figure 26: EAP-TLS – Certificates and Password 4. Click APPLY. Security is configured. KDS-100 Series – KDS-100EN: Using the Embedded Web Pages...
-
Page 32: About: Web Version And Contact Details
Kramer Electronics Ltd. Web version and contact details About: View the web page release version and Kramer Electronics Ltd details. Figure 27: About Page KDS-100 Series – KDS-100EN: Using the Embedded Web Pages... -
Page 33: Kds-100Dec: Using The Embedded Web Pages
Kramer Electronics Ltd. KDS-100DEC: Using the Embedded Web Pages KDS-100DEC enables you to configure settings via Ethernet using built-in, user-friendly web pages. The Web pages are accessed using a Web browser and an Ethernet connection. You can also configure KDS-100DEC... -
Page 34: Dashboard: Set Channel And Audio, View Input Signal
Kramer Electronics Ltd. Set channel and audio, view input signal Dashboard: KDS-100DEC Dashboard shows an overview of AV streaming and Audio information. Use the dashboard to set the input source: Network stream or connected HDMI device. To set the streaming channel: Figure 30: Dashboard Window, AV streaming fields 1. - Page 35 Kramer Electronics Ltd. To set the audio output: Figure 31: Dashboard Window, Audio output fields Routing: Set the destination of the audio stream, choose from HDMI, Analog, HDMI + analog or None. Analog: Use the slider to adjust the analog audio output volume (0 to 100%). Default ...
-
Page 36: Video: Decoding Method And Output Resolution
Set the KDS-100DEC video decoding method. The decoding method must be the same as the encoding method used by KDS-100EN. Figure 32: Dashboard Window To define decoding and output: 1. In the Decoding method, select the method that was used to encode the stream from H.264, HEVC (H.265) and HEVC (H.265) Low Latency. -
Page 37: External Devices: Connecting External Rtsp Streams
Kramer Electronics Ltd. Connecting External RTSP Streams External Devices: Use the External Devices tab to connect KDS-100DEC to devices creating RTSP streams, such as IP (live streaming) cameras. Adding a Device KDS-100DEC detects streams manually added to the DEVICE LIST. When a device is selected in the Device List, its properties can be edited in the Device Properties. - Page 38 Kramer Electronics Ltd. 3. Enter the (user friendly) Device Name and the URI of the device. The URI is in the format RTSP://<IP Address>: <Port> 4. If the stream requires a password, enable Security Mode and enter the login and password.
-
Page 39: Edid: Set Display Metadata
Kramer Electronics Ltd. Set display metadata EDID: EDIDs (Extended Display Identification Data) contain metadata describing HDMI display device formatting and capabilities so that the output can be adjusted to match the display’s requirements. EDIDs can be retrieved from the display, or a preset EDID can be used. -
Page 40: Gateway: Rs-232 Settings
Kramer Electronics Ltd. RS-232 settings Gateway: To set the RS-232 Gateway: 1. Enable RS-232 (move the RS-232 Gateway slider to the right). 2. Choose between Gateway and Remote Tunneling. Use Gateway for a connected controller and Remote Tunneling if you are connecting an RS-232 extension delivering commands from a distance. -
Page 41: Device: General Device, Network And Time Settings
Kramer Electronics Ltd. General device, network and time settings Device: The Device, Security and About page’s are the same in both KDS-100EN KDS-100DEC. The Device pane has three tabs: General – Sets the channel name, update firmware and reset or locate the device. - Page 42 Kramer Electronics Ltd. Network tab Use the KDS-100DEC Device pane’s Network tab to enable DHCP or, if you prefer, to define a static IP address. Figure 39: Device pane – Network tab DHCP – Set the slider to On, to have the DHCP server automatically define an IP •...
- Page 43 Kramer Electronics Ltd. Date & Time tab An NTP (Network Time Protocol) server should be used for KDS-100 series deployments. The NTP is essential for encoder and decoder synchronization, time stamping, and reliability in applications where coordination is critical. It helps prevent drift, jitter, out-of- sync data and contributes to reliable and efficient system operation.
-
Page 44: Security: Passwords, Https And 802.1X
Kramer Electronics Ltd. Passwords, HTTPS and 802.1X Security: Password protection is only active when the Security Status is On (default). The default password is (username) Admin, (password) Admin. KDS-100DEC Security tab has three tabs: Security – Enable/disable security and change the device password. - Page 45 Kramer Electronics Ltd. HTTPS tab To configure HTTPS: 1. In the Security pane’s Security tab, Security Status must be enabled. 2. Select the HTTPS tab. 3. Select one of the following authentication methods: Internal Certificate – Use the factory default certificate for authentication.
- Page 46 Kramer Electronics Ltd. 802.1X tab To configure IEEE 802.1X Authentication: 1. In the Security pane, select the 802.1X tab. 2. Set 802.1x authentication ON. 3. When set to ON check one of the following settings: EAP-MSCHAP V2 – This authentication method requires that you enter the ...
-
Page 47: About: Web Version And Contact Details
Kramer Electronics Ltd. Web version and contact details About: View the web page release version and Kramer Electronics Ltd details. Figure 46: About Page KDS-100 Series – KDS-100DEC: Using the Embedded Web Pages... -
Page 48: Upgrading Firmware
Upgrade the firmware, view the date of the last upgrade, or rollback to the previous firmware revision in case of a problem. For support, contact the Kramer tech support team at support@kramerav.com. To upgrade the firmware: 1. Download the latest firmware from the Kramer website at: KDS-100EN https://www.kramerav.com/downloads/kds-100en... -
Page 49: Technical Specifications
Kramer Electronics Ltd. Technical Specifications KDS-100EN Specifications 1 HDMI On a female HDMI connector Inputs 1 Balanced Audio On a 5-pin terminal block connector 1 HDMI On a female HDMI connector Outputs 1 Balanced Audio On a 5-pin terminal block connector... -
Page 50: Kds-100Dec Specifications
Kramer Electronics Ltd. KDS-100DEC Specifications Inputs 1 HDMI On a female HDMI connector Outputs 1 HDMI On a female HDMI connector 1 Balanced Audio On a 5-pin terminal block connector Ports 1 Ethernet On an RJ-45 female connector 1 RS-232... -
Page 51: Default Communication Parameters
Kramer Electronics Ltd. Default Communication Parameters Example (stop encoder decoder activity) #KDS-ACTION 0<CR> Ethernet To reset the IP settings to the factory reset values go to: Menu->Setup -> Factory Reset-> press Enter to confirm KDS-100EN KDS-100DEC DHCP Default Default IP Address: 192.168.1.39... -
Page 52: Protocol 3000
Kramer Electronics Ltd. Protocol 3000 Kramer devices can be operated using Kramer Protocol 3000 commands sent via serial or Ethernet ports. Understanding Protocol 3000 Protocol 3000 commands are a sequence of ASCII letters, structured according to the following. Command format: •... -
Page 53: Protocol 3000 Commands
Kramer Electronics Ltd. Protocol 3000 Commands Functio Description Syntax Response Parameters/Attribute Example Protocol handshaking. #<CR> ~nn@ ok<CR><LF> #<CR> Validates the Protocol 3000 connection and gets the machine number. Step-in master products use this command to identify the availability of a device. - Page 54 Kramer Electronics Ltd. Functio Description Syntax Response Parameters/Attribute Example CPEDID- Load EDID from remote #CPEDID-REMOTE ~nn@CPEDID-REMOTE Decoder output number - 1 Copy EDID from Decoder REMOTE device. Decoder output number,Decoder Decoder output number,Decoder Decoder ID -1 output to Encoder input...
- Page 55 Kramer Electronics Ltd. Functio Description Syntax Response Parameters/Attribute Example HDCP-MOD Set HDCP mode. #HDCP-MOD ~nn@HDCP-MOD in_index – Number that indicates the Set the input HDCP- HDCP supported - in_index,mode<CR> in_index,mode<CR><LF> specific input: MODE of IN 1 to Off: HDCP_ON [default].
- Page 56 Kramer Electronics Ltd. Functio Description Syntax Response Parameters/Attribute Example KDS-AUD? Get audio #KDS-AUD?<CR> ~nn@KDS-AUD mode – Encoder/decoder audio mode Get audio source/destination. mode<CR><LF> If set as encoder: source/destination: 0 – HDMI input #KDS-AUD?<CR> 1 – Analog input 2 – None 4 –...
- Page 57 Kramer Electronics Ltd. Functio Description Syntax Response Parameters/Attribute Example KDS- Set multicast group #KDS-MULTICAST ~nn@KDS-MULTICAST group-ip - Multicast group IP used for Set multicast group MULTICAST address and TTL value group_ip,ttl<CR> group_ip,ttl<CR><LF> streaming packets in Multicast address and TTL value (encoder mode only).
- Page 58 Kramer Electronics Ltd. Functio Description Syntax Response Parameters/Attribute Example KDS-SCALE- Return list of supported #KDS-SCALE-LIST? stream_id ~nn@KDS-SCALE- stream_id: stream id number 1 - 2 Get decoder scaling list LIST? video resolutions. <CR> LIST<CR><LF> from stream_id 1 #KDS-SCALE-LIST? 1<CR> KVM- Set KVM Master Name.
- Page 59 Kramer Electronics Ltd. Functio Description Syntax Response Parameters/Attribute Example NET-DHCP Set DHCP mode. #NET-DHCP ~nn@NET-DHCP netw_id – Network ID–the device Enable DHCP mode for Only 1 is relevant for the netw_id,dhcp_state<CR> netw_id,dhcp_state<CR><LF> network interface (if there are more port 1, if available: mode value.
- Page 60 Kramer Electronics Ltd. Functio Description Syntax Response Parameters/Attribute Example RESET Reset device. #RESET<CR> ~nn@RESET ok<CR><LF> Reset the device: To avoid locking the port #RESET<CR> due to a USB bug in Windows, disconnect USB connections immediately after running this command. If...
- Page 61 Kramer Electronics Ltd. Functio Description Syntax Response Parameters/Attribute Example TIME-ZONE- Get a list of time zones. #TIME-ZONE-LIST? <CR> ~nn@TIME-ZONE-LIST list: List of available time zones, one Get a list of available time LIST? list<CR><LF> per line zones: Entries from the list can...
- Page 62 Kramer Electronics Ltd. Functio Description Syntax Response Parameters/Attribute Example X-AUD-LVL Set audio level of a #X-AUD-LVL ~nn@X-AUD-LVL The following attributes comprise the Set the audio level of a specific signal. <direction_type>.<port_format>. <direction_type>.<port_format>. signal ID: specific signal to 10: This is an Extended <port_index>.<signal_type>.<ind...
- Page 63 Kramer Electronics Ltd. Functio Description Syntax Response Parameters/Attribute Example X-MUTE? Get mute ON/OFF on a #X-MUTE? ~nn@ X-MUTE <direction_type> – Direction of the Get the mute the video on specific signal. <direction_type>.<port_format>. <direction_type>.<port_format>. port: HDMI OUT 1: <port_index>.<signal_type>.<ind <port_index>.<signal_type>.<ind { IN – Input ; OUT – Output;...
-
Page 64: Result And Error Codes
Kramer Electronics Ltd. Result and Error Codes Syntax In case of an error, the device responds with an error message. The error message syntax: ~NN@ERR XXX<CR><LF> – when general error, no specific command • ~NN@CMD ERR XXX<CR><LF> – for specific command •... - Page 65 This limited warranty gives you specific legal rights, and you may have other rights which vary from country to country or state to state. This limited warranty is void if (i) the label bearing the serial number of this product has been removed or defaced, (ii) the product is not distributed by Kramer Electronics or (iii) this product is not purchased from an authorized Kramer Electronics reseller.
- Page 66 SAFETY WARNING Disconnect the unit from the power supply before opening and servicing For the latest information on our products and a list of Kramer distributors, visit our website where updates to this user manual may be found. We welcome your questions, comments, and feedback.
Need help?
Do you have a question about the KDS-100EN and is the answer not in the manual?
Questions and answers