Advertisement
Quick Links
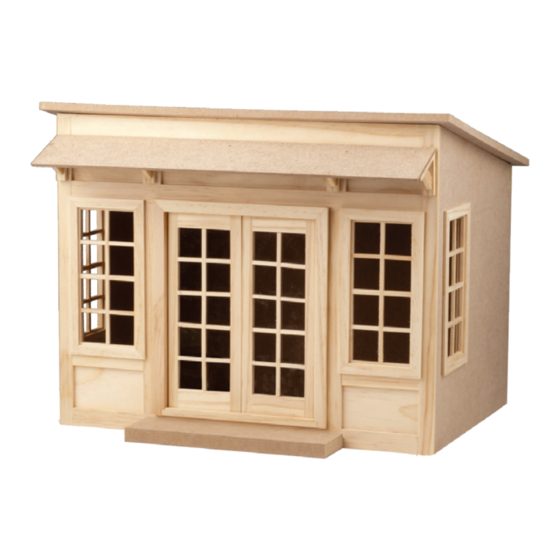
#52019 Serendipity Shed Kit
Available exclusively at miniatures.com
Step-by-step assembly instructions
Copyright miniatures.com 2019, 2023
MDF PARTS:
Floor (no groove)
Back wall
Right wall
Left wall
Roof panel (no groove)
(2) Roof supports
Awning
Porch Step
WHITEWOOD PARTS:
Front wall
Door
(4) Windows
(4) Awning support brackets
(2) Filler blocks
Interior trim for door and windows
(4) Acrylic glazing (windows)
SUPPLIES NEEDED:
Masking tape
White glue ( such as #1249 Weldbond)
Gel formula cyanoacrylate glue
Ruler
Pencil
Assembly Instructions
Tip: Plan the finishes for the interior and exterior at the dry-
fit stage, before final/permanent assembly. It is easier to
finish the panels as flat surfaces. Disassemble and
finish as desired, then reassemble using glue.
The Serendipity Shed is smooth MDF with whitewood
components and trim.
Separate the parts and set the smaller whitewood pieces
aside. The front windows and door may already be in place
in the front wall; remove them and set them aside. Note: keep
this pair of windows separate from the other pair, they are not
quite the same.
Structure Assembly:
1.
Identify the MDF parts. Set the roof aside and position the
wall pieces with the grooves facing up. Fit the floor into
the back wall groove; fit a side wall groove onto the floor
and square the corner. Secure with masking tape, then fit
the second side wall and tape it. Fit the front wall in place
and tape securely.
2388 Pleasantdale Road, Atlanta, GA 30340 • 800-926-6464 • www.miniatures.com • Made in Thailand
GENERAL INSTRUCTIONS
• Identify and inspect all parts using the Parts List and Parts Diagram.
• Read the directions completely before beginning the project.
• If possible, have a dedicated work area so that you are not unpack-
ing, repacking, and moving the project from place to place.
• Choose a work surface that is level, clean, dry, and protected from
glue spills.
• Do a dry fit, using masking tape to hold parts in place, to make sure
everything fits together correctly before assembling permanently.
2. Mark the center point of both long sides of the roof (7")
and draw a line to connect them. Draw a line parallel to
one long edge, ½" from the edge. Note: this dimension
will position the front roof overhang as shown; you may
choose a different measurement for a different look at
the final assembly.
3. Mark the center point of the front wall; it should be at 6
but your wall may vary slightly. The front wall should be
straight but, due to the effects of different climate condi-
tions, may have bowed slightly. This is not a defect. Check
that it is straight by using a straightedge between the
front edges of the side walls. If necessary, use masking
tape stretched across to the back wall to pull the front
wall into position. Do not obscure the center mark. (This
correction is only necessary at this step.)
4. Put the structure upside down on the roof panel, aligning
the center marks and matching the front wall to the line on
the roof. Be sure the sides are straight, and carefully draw
a pencil line on the roof inside the structure, all the way
around. Turn the structure right-side up and set it aside.
WARNING:
CHOKING HAZARD — Small parts
Not for children under 3 yrs.
Adult supervision required.
/
"
1
2
0224
Advertisement

Related Manuals for Miniatures Serendipity 52019


Summary of Contents for Miniatures Serendipity 52019
- Page 1 Turn the structure right-side up and set it aside. 0224 2388 Pleasantdale Road, Atlanta, GA 30340 • 800-926-6464 • www.miniatures.com • Made in Thailand...
- Page 2 The trim can be installed when you finish the interior, but it may be helpful to mark the two thicker windows as “front” 0224 2388 Pleasantdale Road, Atlanta, GA 30340 • 800-926-6464 • www.miniatures.com • Made in Thailand...
Need help?
Do you have a question about the Serendipity 52019 and is the answer not in the manual?
Questions and answers