Advertisement
Quick Links
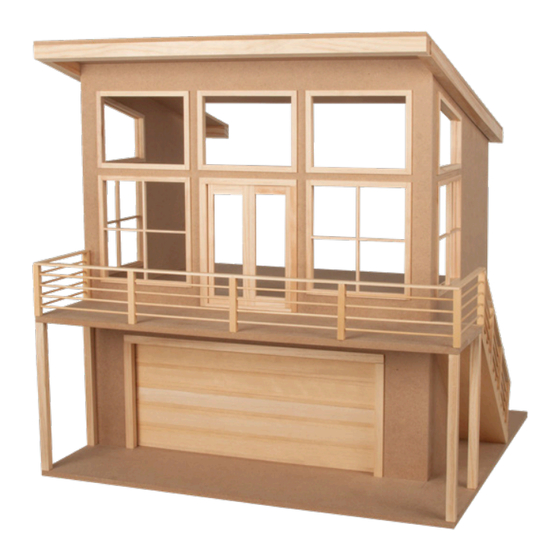
#41048 Contemporary Kit
Available exclusively at miniatures.com
Step-by-step assembly instructions
Copyright miniatures.com 2024
SUPPLIES NEEDED:
Masking tape
White glue ( such as #1249 Weldbond)
Damp clean cloth
Exterior and interior finishes
GENERAL INSTRUCTIONS
• Identify and inspect all parts using the Parts List and
Parts Diagram.
• Read the directions completely before beginning the
project.
• If possible, have a dedicated work area so that you are
not unpacking, repacking, and moving the project from
place to place.
• Choose a work surface that is level, clean, dry, and pro-
tected from spills.
• Do a dry fit, using masking tape to hold parts in place,
to make sure everything fits together correctly before
assembling permanently.
Assembly Instructions
Shell
Parts you will need in this section:
•
Front Panel
•
Right Panel
•
Left Panel
•
Floor
Place the Front flat on the work sur-
1.
face with the interior surface facing up.
2. Glue Right to Front. It fits into the rab-
bet on the Front.
2388 Pleasantdale Road, Atlanta, GA 30340 • 800-926-6464 • www.miniatures.com
Tips: Plan the finishes for the interior and exterior at the
dry-fit stage, before final/permanent assembly. It is easier
to finish the panels as flat surfaces. Disassemble and
finish as desired, then reassemble using glue.
The acrylic door panels are removable for easier finishing.
Gently pull on either the top or bottom frame to remove it.
Then slide out the acrylic
References to the left and right sides of the house are from
the exterior front perspective, unless noted otherwise.
3. Glue Left to Front.
4. Glue Floor into the grooves that are on the
interior surface. Orient Floor so that the two
track cut-outs are facing down.
WARNING:
CHOKING HAZARD — Small parts
Not Suitable for Children
under 14 years old.
0224
Advertisement

Related Manuals for Miniatures Contemporary Kit 41048


Summary of Contents for Miniatures Contemporary Kit 41048
- Page 1 2. Glue Right to Front. It fits into the rab- interior surface. Orient Floor so that the two bet on the Front. track cut-outs are facing down. 0224 2388 Pleasantdale Road, Atlanta, GA 30340 • 800-926-6464 • www.miniatures.com...
- Page 2 Foundation Slab. The panels fit Top in place. They trim the garage in the garage door opening. into the grooves on the Slab. door opening from the outside wrapping into the opening. 0224 2388 Pleasantdale Road, Atlanta, GA 30340 • 800-926-6464 • www.miniatures.com...
- Page 3 Balcony Floor. Use the Front Rail to confirm this width and adjust as needed. 4. Continue by repeat- ing Steps 2-3 two more times. 0224 2388 Pleasantdale Road, Atlanta, GA 30340 • 800-926-6464 • www.miniatures.com...
- Page 4 6. Stand the assembly on the Stair. 7. Glue each Baluster to a step and glue the ends of the Shortest Cables into the holes on the Stair Top Baluster. 8. Let dry. 0224 2388 Pleasantdale Road, Atlanta, GA 30340 • 800-926-6464 • www.miniatures.com...
- Page 5 Single Door Side Trim (2) paper is beneficial. Trim the paper away once the frames are painted and dry. 4. Glue all interior door trim assemblies to their corresponding interior wall surfaces. 0224 2388 Pleasantdale Road, Atlanta, GA 30340 • 800-926-6464 • www.miniatures.com...
-
Page 6: Parts List
"W x 6 "H x "D A22 (4) Short Cable Balcony Window "W x 5 "H x "D A03 Balcony Floor Stair Railing A38 (4) 4-Light Window Stair Bottom Baluster 0224 2388 Pleasantdale Road, Atlanta, GA 30340 • 800-926-6464 • www.miniatures.com... -
Page 7: Parts Diagram
Parts Diagram Floor Front Panel Foundation Slab Right Panel Left Panel Roof Side Jam Top Jam Track Corner Garage Door Upper Track (Right) Lower Track Upper Track (Left) Filler Strip 0224 2388 Pleasantdale Road, Atlanta, GA 30340 • 800-926-6464 • www.miniatures.com... - Page 8 We hope you enjoy your Contemporary Dollhouse kit! For finishing tips and more information, visit miniatures.com. We would love to see how yours turns out; please send pictures to support@miniatures.com. Questions? Contact us at support@minatures.com or call 1-800-926-6464 (Mon-Fri 10:00 AM-5:00 PM ET).
Need help?
Do you have a question about the Contemporary Kit 41048 and is the answer not in the manual?
Questions and answers