Advertisement
Table of Contents
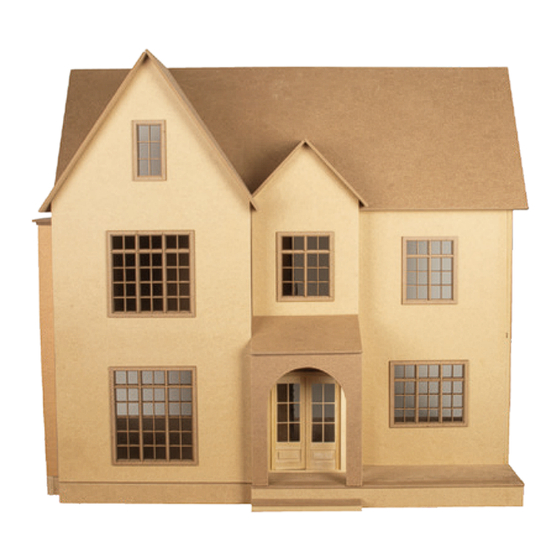
#91041 The Brentwood
from Paper Doll Miniatures
Available exclusively at miniatures.com
Step-by-step assembly instructions
Copyright miniatures.com 2022
SUPPLIES NEEDED:
Masking tape
Double sided 2 mm electronics repair tape*
Glue (such as #1249 Weldbond)
Wood filler
Door hardware
Exterior finishes
*Available at an online retailer of your choosing.
See miniatures.com for finishing ideas
and materials
Assembly Instructions
Foundation
Parts you will need in this section:
Foundation Long (2)
1st Floor
Foundation Middle Brace (4)
Exterior Shell
Parts you will need in this section:
Exterior Right Side Wall
Right Front Wall
Filler Strip Access Panel
Exterior Left Side Wall
Large Gable Front Wall
WARNING:
CHOKING HAZARD — Small parts
Not for children under 3 yrs.
Adult supervision required.
0324
GENERAL INSTRUCTIONS
• Identify and inspect all parts using the Parts List and Parts Diagram.
• Read the directions completely before beginning the project.
• If possible, it is most ideal to have a dedicated work area so that you are
not packing, unpacking, and moving the project from place to place.
• Choose a work surface that is level, flat, clean, dry, and protected
from glue spills.
• Do a dry fit, using masking tape to hold parts in place, to make sure
everything fits together correctly before permanent assembly.
Tip: Plan the finishes for the interior and exterior at the dry-fit stage,
before final/permanent assembly. It is easier to finish the panels as flat
surfaces. Disassemble and finish as desired, then reassemble using glue.
1. Glue and tape house foundation
perimeter. The ends of the Foundation
Middle Braces insert into the grooves in
the Foundation Long pieces.
1. Glue and insert the Exterior Right
Side Wall and the Right Front Wall
into the 1st Floor grooves. Tape
together and allow to dry. An extra
pair of hands would be helpful at
this step.
2. Glue, tape, and weight the 1st Floor
to the foundation. Allow to dry before
moving on to the next step.
2. Glue and insert the
Exterior Left Side Wall and
the Large Gable Front Wall
into the 1st Floor grooves.
An extra pair of hands would
be helpful at this step.
©2022 miniatures.com | 1-800-926-6464 | support@miniatures.com | 1
3. Add the Filler Strip
Access Panel in the
groove within the opening.
Allow everything to dry.
Advertisement
Table of Contents

Related Manuals for Miniatures The Brentwood


Summary of Contents for Miniatures The Brentwood
- Page 1 Allow everything to dry. Not for children under 3 yrs. pair of hands would be helpful at An extra pair of hands would Adult supervision required. this step. be helpful at this step. 0324 ©2022 miniatures.com | 1-800-926-6464 | support@miniatures.com | 1...
- Page 2 3. Use the 3rd Level Filler Strip to correctly place in the 3rd Floor and lightly the 3rd Level Interior Short Wall. The Filler Strip 3rd Level lines up with the back of the 3rd Floor. tap it in place. 0324 2 | ©2022 miniatures.com | 1-800-926-6464 | support@miniatures.com...
- Page 3 Gable roofs. It then overhangs on the right side of the house past the Right Front Wall . The Main Roof sits in front of the Back Roof . Allow to dry. 0324 ©2022 miniatures.com | 1-800-926-6464 | support@miniatures.com | 3...
-
Page 4: Front View
Tread on top of the Front Extension on top of far left of the Foundation Step Base. the Foundation Porch Porch Extension. Extension. It overhangs " towards the front. Allow to dry. 0324 4 | ©2022 miniatures.com | 1-800-926-6464 | support@miniatures.com... -
Page 5: Access Panel
Front Wall. The Portico Right Wall with Archway goes on the right, is flush with the edge of the Entrance Front Wall and opens onto the porch. 0324 ©2022 miniatures.com | 1-800-926-6464 | support@miniatures.com | 5... - Page 6 Wall and 1st Level Interior base. These will assembly meet the stair base Right Stair Wall. interlock. on the right side, just above the 1st Level Interior Right Stair Wall. 0324 6 | ©2022 miniatures.com | 1-800-926-6464 | support@miniatures.com...
- Page 7 2. Glue the doors into the wall gaps or notches in openings. Use the included the kit assembly with trim to mirror the frame on wood filler. the back side of the wall. Assembly is now complete. 0324 ©2022 miniatures.com | 1-800-926-6464 | support@miniatures.com | 7...
-
Page 8: Part List
2nd Level Top Brace (4) 16-Light - 3 7/8 x 4 24-Light - 5 30-Light - 6 x 5 Stair Riser 36-Light - 6 x 7 x (30) Riser - 2 0324 8 | ©2022 miniatures.com | 1-800-926-6464 | support@miniatures.com... -
Page 9: Parts Diagram
Note: Not to scale Exterior Right 1st Floor Side Wall Exterior Left Side Wall 2nd Floor Large Gable Right Front Wall Front Wall 3rd Floor Dormer Roof Access Panel Front Entance Front Wall 0324 ©2022 miniatures.com | 1-800-926-6464 | support@miniatures.com | 9... - Page 10 Eave A Eave B Small Gable Small Gable Left Right Foundation Middle Braces Foundation Spacer Front Step Base Foundation Porch Extension Foundation Floor Extension Front Step Foundation Access Panel Tread Foundation Long 0324 10 | ©2022 miniatures.com | 1-800-926-6464 | support@miniatures.com...
- Page 11 Stair Exterior Stringer Stair Railing 2nd Level 1st Level Stair Interior Left Wall 2nd Level 2nd Level Stair Back Stair Interior Wall 1st Level Stringer Stair Interior Right Wall Stair Railing 0324 ©2022 miniatures.com | 1-800-926-6464 | support@miniatures.com | 11...
- Page 12 We hope you enjoy your Brentwood Dollhouse kit! For finishing tips and more information, visit miniatures.com and Paper Doll Miniatures. We would love to see how yours turns out; please send pictures to support@miniatures.com. Questions? Contact us at support@minatures.com or call 1-800-926-6464 (Mon-Fri 10:00 AM-5:00 PM ET).
Need help?
Do you have a question about the The Brentwood and is the answer not in the manual?
Questions and answers