Table of Contents
Advertisement
Quick Links
SB4-T/L/S Series
1. GENERAL INFORMATION ........................................................................................1
1.1. General description of the safety light curtain ....................................................1
1.2. How to choose the device..................................................................................3
1.3. Typical applications ...........................................................................................6
1.4. Safety information..............................................................................................7
2
INSTALLATION MODE ..............................................................................................8
2.1. Precautions to respect for the choice and installation of the device....................8
2.2. General information on device positioning .........................................................9
2.2.1. Minimum installation distance................................................................9
2.2.2. Minimum distance from reflecting surfaces..........................................10
2.2.3. Installation of several adjacent safety light curtains .............................12
2.2.4. Use of deviating mirrors ......................................................................13
3. MECHANICAL MOUNTING .....................................................................................14
3.1. Mechanical arm mounting................................................................................16
4. ELECTRICAL CONNECTIONS ................................................................................17
4.1. Notes on connections ......................................................................................18
5. ALIGNMENT PROCEDURE.....................................................................................23
5.1. Correct light curtain alignment procedure ........................................................23
5.2. Correct Muting arm alignment procedure.........................................................25
6. FUNCTIONING MODE .............................................................................................26
6.1. Dip-switch selectable functions........................................................................26
6.2. Standard configuration.....................................................................................26
6.3. Restart mode...................................................................................................27
6.4. Test function....................................................................................................29
6.5. Reset function .................................................................................................30
6.6. Muting function ................................................................................................31
6.7. Installation mode of Muting sensors.................................................................34
6.7.1. SB4S model ........................................................................................35
6.7.2. SB4L model ........................................................................................38
6.7.3. SB4T model ........................................................................................39
6.8. Override function .............................................................................................40
6.9. EDM function...................................................................................................43
7. DIAGNOSTIC FUNCTIONS......................................................................................44
7.1. Visualisation of the functions ...........................................................................44
7.2. Alignment mode ..............................................................................................45
7.3
Operating mode...............................................................................................45
7.4. Fault and diagnostic messages .......................................................................46
8. CHECKS AND PERIODICAL MAINTENANCE ........................................................48
8.1. Maintenance....................................................................................................48
8.2. General information and useful data ................................................................49
8.3. Warranty..........................................................................................................49
9. TECHNICAL DATA ..................................................................................................50
10. LIST OF AVAILABLE MODELS...............................................................................51
11. DIMENSIONS ...........................................................................................................51
12. ACCESSORIES........................................................................................................52
INDEX
Instruction manual
Advertisement
Table of Contents

Subscribe to Our Youtube Channel
Related Manuals for CARLO GAVAZZI SB4-T Series


Summary of Contents for CARLO GAVAZZI SB4-T Series
-
Page 1: Table Of Contents
SB4-T/L/S Series Instruction manual INDEX 1. GENERAL INFORMATION ..................1 1.1. General description of the safety light curtain ............1 1.2. How to choose the device..................3 1.3. Typical applications ...................6 1.4. Safety information....................7 INSTALLATION MODE ....................8 2.1. Precautions to respect for the choice and installation of the device....8 2.2. -
Page 3: General Information
Instruction manual SB4-T/L/S Series 1. GENERAL INFORMATION 1.1. General description of the safety light curtain The safety light curtains of the SB4-T/L/S series, are optoelectronic multibeam devices that can be used to protect working area that, in presence of machines, robots, and automatic systems in general, can become dangerous for operators that get in touch, even accidentally, with moving parts. - Page 4 As the required knowledge may not be completely included in this manual, we suggest the customer to contact CARLO GAVAZZI Sales Technical Service for any necessary information relative to the functioning of the SB4-T/L/S series light curtains and the safety rules that regulate the correct installation (see section 8 “Checks and periodical maintenance”).
-
Page 5: How To Choose The Device
Instruction manual SB4-T/L/S Series 1.2. How to choose the device The SB4-T/L/S series light curtains efficiently satisfy all applications that require the Muting function thanks to pre- assembled, pre-cabled and pre-aligned Muting sensors. T-shaped models are available with integrated Muting sensors for bidirectional Muting, L-shaped models for unidirectional Muting and linear models without integrated Muting sensors are available. - Page 6 SB4-T/L/S Series Instruction manual The resolution value is obtained applying the following formula: R = I + d Fig. 1 The following table shows the values of the optic interaxis (I), the resolution (R) and the optic diameter (d), of the safety light curtains.
- Page 7 Instruction manual SB4-T/L/S Series • The height of the protected area It is important to distinguish between “Height of the sensitive area” and “Height of the controlled area” (see Fig.2). - The height of the sensitive area is the distance between the lower and the upper limits respectively of the first and the last lens.
-
Page 8: Typical Applications
- Automatic and semi–automatic assembly lines; - Automatic warehouses; - Robotics. In food industry applications, CARLO GAVAZZI Technical Service has to verify the compatibility of the material of the safety light curtain housing with any chemical agents used in the production process. -
Page 9: Safety Information
Instruction manual SB4-T/L/S Series 1.4. Safety information The following points must be observed for a correct and safe use of the safety light curtains of the SB4-T/L/S series: • The stopping system of the machine must be electrically controlled. • This control system must be able to instantly stop the dangerous movement of the machine during all the phases of the working cycle. -
Page 10: Installation Mode
• Do not place the device, in particular the receiving unit, near intense light sources. • Strong electromagnetic interferences can compromise the correct functioning of the device. CARLO GAVAZZI suggests contacting its own Technical Service when this problem occurs. The operating distance of the device can be reduced by 50% in the presence of smog, fog or airborne dust. -
Page 11: General Information On Device Positioning
Instruction manual SB4-T/L/S Series 2.2. General information on device positioning 2.2.1. Minimum installation distance The safety device must be placed at a specific safety distance (Fig.3). This distance must ensure that the danger zone cannot be reached before the dangerous motion of the machine has been stopped by the ESPE. -
Page 12: Minimum Distance From Reflecting Surfaces
SB4-T/L/S Series Instruction manual Note: The value of K is: 2000 mm/s if the calculated value of S is ≤ 500 mm 1600 mm/s if the calculated value of S is > 500 mm When devices with >40 mm resolution are used, the height of the top beam has to be ≥... - Page 13 Instruction manual SB4-T/L/S Series It is thus important to position the safety light curtain according to the minimum distance from reflecting surfaces. The minimum distance depends on: • Operating distance between emitter (TX) and receiver (RX); • Maximum aperture angle of the light beam emitted by the safety light curtain, depending on the type of the device;...
-
Page 14: Installation Of Several Adjacent Safety Light Curtains
SB4-T/L/S Series Instruction manual 2.2.3. Installation of several adjacent safety light curtains When several safety devices must be installed in adjacent areas, interferences between the emitter of one device and the receiver of the other must be avoided. Fig.6 provides an example of possible interferences between different devices and two pertinent solutions. -
Page 15: Use Of Deviating Mirrors
Instruction manual SB4-T/L/S Series 2.2.4. Use of deviating mirrors The control of any dangerous area, with several but adjacent access sides, is possible using the linear version without integrated Muting sensors and well-positioned deviating mirrors (see section 12 “Accessories”). Fig.7 shows a possible solution to control three different access sides, using two mirrors placed at a 45°... -
Page 16: Mechanical Mounting
SB4-T/L/S Series Instruction manual 3. MECHANICAL MOUNTING The emitting (TX) and receiving (RX) bars must be installed with the relevant sensitive surfaces facing each other. The connectors must be positioned on the same side and the distance must be included within the operating range of the model used (see section 9 “Technical data”). - Page 17 Instruction manual SB4-T/L/S Series Fixing brackets can be used where no large mechanical compensation is required during the alignment operation. The rotating supports for the correction of the bar inclination are available on request (see section 12 “Accessories”). In case of applications with particularly strong vibrations, anti- vibration shock absorbers, together with threaded pins, rigid brackets and/or rotating supports, are recommended to reduce the impact of the vibrations,...
-
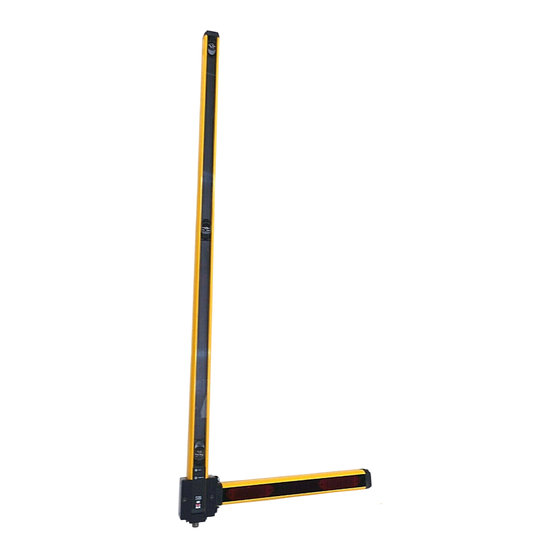
Page 18: Mechanical Arm Mounting
SB4-T/L/S Series Instruction manual 3.1. Mechanical arm mounting To mount the Muting arms on both the “L’ and “T” version, use the fixing bracket shown in Fig. 11a. This accessory guarantees the perfect alignment arms Fig.11a perpendicularity respect to the main unit. -
Page 19: Electrical Connections
Instruction manual SB4-T/L/S Series 4. ELECTRICAL CONNECTIONS All electrical connections to the emitting and receiving units are made through a male M12 connector, located on the lower part of the safety light curtain. A M12 8-pole connector is used for the receiver, a M12 5-pole connector for the Muting sensors and a M12 4-pole connector for the emitter. -
Page 20: Notes On Connections
SB4-T/L/S Series Instruction manual 4.1. Notes on connections For the correct functioning of the safety light curtains of the SB4- T/L/S series, the following precautions regarding the electrical connections have to be respected. • Use only shielded cables for the connection of the two units. •... - Page 21 Instruction manual SB4-T/L/S Series • The TEST/START button must be located in such a way that the operator can check the protected area during any Test, Override and Reset operation. (see section 6 “Functioning mode”). • The EDM wire has to be connected to a 24 Vdc normally closed contact, before powering.
- Page 22 SB4-T/L/S Series Instruction manual • To use the SB*2 series together with the light curtain safety modules NLG02 and NLG13, connect the PNP outputs of the ESPE to the terminals S21 and S12 (NLG02) or S11 and S22 (NLG13). The module, 24 VDC supplied, can be activated at the start and after every intervention of the safety function, in manual mode through the reset button (to be connected in series to the N.C.
- Page 23 Instruction manual SB4-T/L/S Series The ground connection of the two units depends on the electrical protection class to be guaranteed (see section 9 “Technical Data” for more information). This connection carried-out using mechanical part supplied for ground connection (see Fig.13). Insert support plate...
- Page 24 SB4-T/L/S Series Instruction manual • The OSSD1 and OSSD2 safety contacts cannot be connected in series or in parallel, but can be used separately (Fig.14). If one of these configurations is erroneously used, the device enters into the output failure condition (see cap.7 “Diagnostic functions”). •...
-
Page 25: Alignment Procedure
Instruction manual SB4-T/L/S Series 5. ALIGNMENT PROCEDURE The alignment between the emitting and the receiving units is necessary to obtain the correct functioning of the light curtain. The alignment is perfect if the optic axes of the first and the last emitting unit’s beams coincide with the optic axes of the corresponding elements of the receiving unit. - Page 26 SB4-T/L/S Series Instruction manual B Rotate the transmission unit until the upper yellow LED (HIGH ALIGN) is ON: in this condition the upper LED must change from BREAK to SAFE (from red to green). Note: Ensure that the green light of the SAFE LED is ON and steady.
-
Page 27: Correct Muting Arm Alignment Procedure
Instruction manual SB4-T/L/S Series 5.2. Correct Muting arm alignment procedure Once effected the safety light curtain alignment and the mechanical arm mounting and the relative connection, ensure the correct alignment of the arm sensors regulating the fixing bracket. Fig.18 The arm position can be modified vertically and horizontally respect to the main axis. -
Page 28: Functioning Mode
SB4-T/L/S Series Instruction manual 6. FUNCTIONING MODE 6.1. Dip-switch selectable functions A slot situated in the front side of the RX unit (Fig. 19), that can be easily opened using a screwdriver, facilitates the access to the internal dip-switches for the configuration of the following functions: dip-switches Fig. -
Page 29: Restart Mode
Instruction manual SB4-T/L/S Series 6.3. Restart mode An opaque object detected by the beams causes the switching of the OSSD outputs (i.e. the opening of the safety contacts - BREAK condition). The restart of the ESPE (i.e. the closing of the OSSD safety contacts - SAFE condition) can be carried-out in two different ways: •... - Page 30 SB4-T/L/S Series Instruction manual Fig.20 below shows the two functioning modes. BREAK SAFE Automatic start Normal mode OSSD OFF OSSD ON Beams clear Beams Beams clear interrupted TEST/START button SAFE SAFE BREAK BREAK Manual start OSSD ON OSSD OFF OSSD OFF OSSD ON Fig.20 The selection of the manual/automatic Restart mode is made...
-
Page 31: Test Function
Instruction manual SB4-T/L/S Series 6.4. Test function The TEST function can be activated by simply pressing the external push-button for at least 0.5 seconds as shown in the following timing diagram. In the previous versions, no timing requirements were specified. AUTOMATIC VERSION MANUAL VERSION... -
Page 32: Reset Function
SB4-T/L/S Series Instruction manual 6.5. Reset function The light curtain has a Reset function that is activated in presence of an internal failure. The operator has to press the TEST/START button resetting the break condition and thus return to normal functioning. The button has to be kept pressed for at least 5 seconds in one of the following conditions: - output failure;... -
Page 33: Muting Function
Instruction manual SB4-T/L/S Series 6.6. Muting function The Muting sensors must be able to recognise the passing material (pallets, vehicles, …) according to the material’s length and speed. In case of different transport speeds in the Muting area, it is necessary to consider their effect on the total Muting duration. - Page 34 SB4-T/L/S Series Instruction manual • Two Muting sensors activate the Muting1 and Muting 2 inputs. These two sensors should be correctly connected and positioned in order to avoid undesired Muting or potentially dangerous conditions for the operator. • State of Muting is signalled by Muting Lamp integrated on the top of receiver side.
- Page 35 Instruction manual SB4-T/L/S Series Temporal diagram of the Muting function for two-sensor configuration ( “L-shaped” or crossed-beam versions) Temporal diagram of the Muting function for four-sensor configuration (“T-shaped” version)
-
Page 36: Installation Mode Of Muting Sensors
SB4-T/L/S Series Instruction manual 6.7. Installation mode of Muting sensors The safety light curtains of the SB4-T/L/S series have a dip- switch dedicated to the Muting configuration selection. The requested configuration is obtained using the dip-switches n° 2 present on the receiving unit. With Dip 2 in the ON position, the “T”... -
Page 37: Sb4S Model
Instruction manual SB4-T/L/S Series 6.7.1. SB4S model Fig.23 provides an installation example of a linear light curtain mounted on a conveyor, with the relative external Muting sensors. The A1, A2, B1, B2 Muting activation sensors temporarily inhibit the ESPE if a package passes between the sensors. The outputs of these sensors are connected to the Muting1 and Muting2 inputs of the receiving unit of the ESPE. - Page 38 SB4-T/L/S Series Instruction manual Optoelectronic, mechanical, proximity sensors etc, can be used as Muting sensors, with closed contact in the presence of the object to be detected. The following are some configuration examples when using the Muting function: - Application with 4 optoelectronic sensors: parallel-beam configuration The solution is suitable for applications requiring bidirectional movements of objects.
- Page 39 Instruction manual SB4-T/L/S Series - Application with 2 optoelectronic sensors: parallel-beam configuration The solution is suitable for applications requiring unidirectional movements of objects. For correct functioning, position the dip-switch 2 in the OFF position. The reset of normal Muting functioning is obtained at a DMoff distance from sensor A.
-
Page 40: Sb4L Model
SB4-T/L/S Series Instruction manual 6.7.2. SB4L model Muting sensors connector: 24 Vdc M12-4 pole connector SE receiver A contact V=cost. Pin 2 MUTING 1 Pin 4 MUTING 2 Moff B contact The L-configured solution with integrated Muting facilitates sensor installation and suits applications with unidirectional object passage. -
Page 41: Sb4T Model
Instruction manual SB4-T/L/S Series 6.7.3. SB4T model Muting sensors connection: 24 Vdc M12-4 pole connector SE receiver A1 contact V=cost. Pin 2 A2 contact MUTING 1 Pin 4 B1 contact MUTING 2 B2 contact The T-configured solution with integrated Muting facilitates sensor installation and suits applications with bidirectional object passage. -
Page 42: Override Function
SB4-T/L/S Series Instruction manual 6.8. Override function This function allows to force a Muting condition when machine reset is necessary, even if one or more beams are interrupted by passing material. The purpose is to clear the protected area of any material accumulated consequently to a failure in the working cycle. - Page 43 Instruction manual SB4-T/L/S Series While override is actuated, the integrated lamp will be blinking. Override function will automatically terminate when one of the following condition will be given: • all the muting sensors are de-actuated (*); • the pre-determined time limit has expired; •...
- Page 44 SB4-T/L/S Series Instruction manual Temporal diagram of the Override function OVR1 24Vdc OVR2 24Vdc Override function 0 ≤ ΔT < 400ms...
-
Page 45: Edm Function
Instruction manual SB4-T/L/S Series 6.9. EDM function The External devices monitoring (EDM) function controls external devices verifying the OSSD status. To correctly use this function: - select it using the specific dip-switch - connect EDM input to the 24Vdc N.C. contact of the device to control. -
Page 46: Diagnostic Functions
SB4-T/L/S Series Instruction manual 7. DIAGNOSTIC FUNCTIONS 7.1. Visualisation of the functions The operator can verify the operating condition of the light curtains through four LEDs positioned on the receiving unit and two LEDs on the emitting unit (Fig.24). Fig. 24 The meaning of the LEDs positioned on the receiving unit (RX) depends on the light curtain operating mode. -
Page 47: Alignment Mode
Instruction manual SB4-T/L/S Series 7.2. Alignment mode In this condition the outputs are OFF. • SAFE/BREAK LED: SAFE GREEN LED when ON, indicates that no objects have been detected by the device. BREAK RED LED when ON, indicates that the receiving and the emitting units are not aligned, or that an object has been detected. -
Page 48: Fault And Diagnostic Messages
- Check the correct positioning of the configuration dip-switches. Yellow blinking - Switch OFF and switch ON the device; if the failure continues Yellow blinking contact CARLO GAVAZZI Green ON Red ON - The signalling is NOT a failure. Yellow blinking It’is possible to... - Page 49 Check and repair Emitter side generic - Check the power supply; if the failure failure continues contact Yellow blinking CARLO GAVAZZI and replace both units Green ON Power supply failure - Check the power supply; if the failure continues contact CARLO GAVAZZI.
-
Page 50: Checks And Periodical Maintenance
SB4-T/L/S Series Instruction manual 8. CHECKS AND PERIODICAL MAINTENANCE The following is a list of recommended check and maintenance operations that should be periodically carried-out by qualified personnel. Check that: • The ESPE stays locked during beam interruption along the entire protected area, using the suitable “Test Piece”. -
Page 51: General Information And Useful Data
8.3. Warranty All appliances are under a 24 months warranty from the manufacturing date. CARLO GAVAZZI will not be liable for any damages to persons and things caused by the non-observance of the correct installation modes and device use. The warranty will not cover damages caused by incorrect installation, incorrect use and accidental causes such as bumps or falls. -
Page 52: Technical Data
SB4-T/L/S Series Instruction manual 9. TECHNICAL DATA Power supply = Vdd: 24 Vdc ± 20% (SELV/PELV) Internal capacitance: 23 nF (Tx) /120 nF (Rx) Emitter consumption (TX) S model: 30 mA max / 0.9W Receiver consumption (RX) S model: 75 mA max (without load) / 2.2W Muting sensor arm consumption: 35 mA max / 1W (with sensors off) -
Page 53: List Of Available Models
Instruction manual SB4-T/L/S Series 10. LIST OF AVAILABLE MODELS Resolution Length of the Operating N°. Response time Interaxis Model sensitive area distance (m) Beams (mm) (ms) SB4T-515/515-D3 0.5…3 m SB4T-415/815-D3 0.5…3 m SB4L-515/515-D3 0.5…3 m SB4L-415/815-D3 0.5…3 m SB4S-515/515-D25 0.5…25 m SB4S-415/815-D25 0.5…25 m 11. -
Page 54: Accessories
SB4-T/L/S Series Instruction manual 12. ACCESSORIES Fixing brackets A MOUNTING B MOUNTING Angled fixing bracket Angled fixing bracket + Orientable support 2 1 . Ø Ø Angled fixing bracket + Antivibration support Ø 5 Ø Angled fixing bracket + Orientable support + Antivibration support MODEL DESCRIPTION MBR-ST... - Page 55 Instruction manual SB4-T/L/S Series Deviating mirrors MODEL DESCRIPTION (mm) (mm) SRN-500 Deviating mirror H= 550 mm SRN-600 Deviating mirror H= 700 mm SRN-800 Deviating mirror H= 900 mm SRN-900 Deviating mirror H= 1000 mm 1004...
- Page 56 SB4-T/L/S Series Instruction manual Columns and floor stands L (mm) X (mm) MODEL DESCRIPTION SPT-800 Column and floor stand H= 800 mm 30x30 SPT-1000 Column and floor stand H= 1000 mm 1000 30x30 SPT-1200 Column and floor stand H= 1200 mm 1200 30x30 SPT-1500...
- Page 57 Instruction manual SB4-T/L/S Series Protective stands sp.2 sm.50x45° N°4 Ø6.6 N°2 MODEL DESCRIPTION L (mm) CPZ-150 Protective stand H= 273 mm CPZ-300 Protective stand H= 420 mm CPZ-450 Protective stand H= 567 mm CPZ-600 Protective stand H= 714 mm CPZ-750 Protective stand H= 861 mm CPZ-800 Protective stand H= 969 mm...
- Page 58 SB4-T/L/S Series Instruction manual Connection cables MODEL DESCRIPTION CFB-1A4/3MT Axial shielded 4-pin 3 m cable CFB-1A4/5MT Axial shielded 4-pin 5 m cable CFB-1A4/10MT Axial shielded 4-pin 10 m cable CFB-1A8/3MT Axial shielded 8-pin 3 m cable CFB-1A8/5MT Axial shielded 8-pin 5 m cable CFB-1A8/10MT Axial shielded 8-pin 10 m cable Laser pointer...
- Page 59 Instruction manual SB4-T/L/S Series Connection box The CON-BOX connection box facilitates the connection and use of the SB4-T/L/S safety light curtains. Two force-guided contact relays and extractable clamps to ease cabling are available inside the connection box. MODEL DESCRIPTION CON-BOX Muting connection box...
Need help?
Do you have a question about the SB4-T Series and is the answer not in the manual?
Questions and answers