Table of Contents
Advertisement
Quick Links
FULLY RECESSED ELECTRIC FIREPLACE
Model#:
i660E
i800E
i900E
i1000E
OWNER'S MANUAL
Built-in Electric Fireplace
AC 220-240V 50Hz
1400-1600W
Read and understand this entire owner's manual, including all safety
WARNING
information, before plugging in or using this product. Failure to do so could
result in fire, electric shock, or serious personal injury.
Keep this owner's manual for future reference. If you sell or give this
CAUTION
product away, make sure this manual accompanies this product.
Advertisement
Table of Contents

Related Manuals for visionLINE i660E


Summary of Contents for visionLINE i660E
- Page 1 FULLY RECESSED ELECTRIC FIREPLACE Model#: i660E i800E i900E i1000E OWNER’S MANUAL Built-in Electric Fireplace AC 220-240V 50Hz 1400-1600W Read and understand this entire owner’s manual, including all safety WARNING information, before plugging in or using this product. Failure to do so could result in fire, electric shock, or serious personal injury.
-
Page 2: Important Safety Information
IMPORTANT SAFETY INFORMATION! WARNING ⚫ Read all instructions before using this fireplace! ⚫ DO NOT operate any fireplace with a damaged cord or plug, after the fireplace malfunctions, or after the fireplace has been dropped or damaged in any manner. Discard the fireplace or return to an authorized service facility for examination and/or repair. - Page 3 ⚫ ALWAYS check your fireplace cord and plug connections with each use: i) MAKE SURE the plug fits tight in the outlet. Faulty wall outlet connections or loose plugs can cause the outlet to overheat. ii) Fireplaces draw more current than small appliances. Overheating may occur even if it has not occurred with the use of other appliances.
-
Page 4: Parts And Hardware
Parts and Hardware C – Drywall Anchors B – Wood Screws E- Decorative Black Rocks D - Decorative Dark Crystals A – Fireplace F - Black vermiculate RC - Remote Control G - Translucent logs H – Plastic Tray... -
Page 5: Installation And Assembly
Wall Cavity Dimensions Create a wall cavity with the minimum dimensions, shown below, to install the fireplace. Model Number 610mm 330mm 705mm i660E 650mm 330mm 845mm i800E When installing the electric fireplace into a cavity or within a wall, the effectiveness of the thermostat function will be reduced. -
Page 6: Installation
Installation 1. Remove the TWO screws as shown below and take off the black glass fascia with care. 2. Use the screw driver to take off the TWO screws. Have two people take out the glass panel and move it to a clean soft place to avoid the scratching. - Page 7 3. Install the fireplace into the wall opening. Fix the FOUR wall screws in each side of the fireplace box. 4. Place plastic tray on designed slot and then design your own ember bed by placing the desired media like decorative crystals or rocks... on tray and keep them even. 5.
-
Page 8: Operation
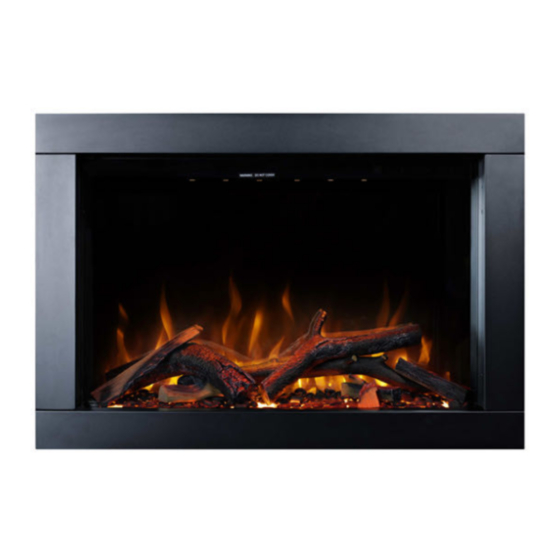
Operation Read and understand this entire owner’s manual, including all safety information, before plugging in or using this product. Failure to do so could result in electric shock, fire, serious injury, or death. Power Plug the power cord into an outlet or hard wire the appliance. If you choose to hard wire the appliance, it MUST have a dedicated isolation switch accessible after installation. - Page 9 Touch Panel & Remote Control Operation BUTTON FUNCTION ACTION & INDICATION Turns the fireplace on/off. POWER Controls flame brightness. Settings: F4-Brightest flame(default) F3-Bright flame FLAME F2-Medium flame F1-Small flame F0-flame off Changes the colour of the flame effect. Settings: F1 - Orange F2 - Blue COLOUR F3 - Yellow...
- Page 10 Controls the temperature. Settings: 64℉ [18℃] 66℉ [19℃] 68℉ [20℃] 70℉ [21℃] 72℉ [22℃] 74℉ [23℃] 76℉ [24℃] TEMPERATURE 78℉ [25℃] 80℉ [26℃] 82℉ [27℃] 84℉ [28℃] 86℉ [29℃] 88℉ [30℃] and OFF Note: To change temperature format from Fahrenheit to Celsius or vice versa, press and hold the temperature button for 5 seconds.
- Page 11 Controls ember bed light settings. Settings: 01-Orange (default) 02-Red 03-Blue 04-Yellow 05-Green 06-Purple 07-Azure 08-Carmine UPLIGHTING COLOUR 09-White 10-Pink 11-Salmon pink 12-Chartreuse 13-Warm yellow 14-Auto-cycle through orange, red, blue, yellow, green, purple, azure, carmine, white, pink, salmon pink, chartreuse and warm yellow.
-
Page 12: Care And Maintenance
When the heater is first turned on, a slight odor may be present. This is normal and NOTICE should not occur again unless the heater is not used for a long period of time. To improve operation, aim the remote control at the front of the fireplace. DO NOT NOTICE press the buttons too quickly. - Page 13 Maintenance Risk of electric shock! DO NOT OPEN any panels! No user-serviceable parts inside! ALWAYS turn the fireplace OFF and unplug the power cord from the outlet before cleaning, performing maintenance, or moving this fireplace. Failure to do so could result in electric shock, fire, or personal injury.
-
Page 14: Troubleshooting
Troubleshooting WARNING DISCONNECT THE APPLIANCE COMPLETELY AND LET COOL PRIOR TO ANY SERVICE. ONLY A QUALIFIED SERVICE PERSON SHOULD SERVICE AND REPAIR THIS ELECTRIC APPLIANCE. Problem Possible Cause Solution 1. Reset switch by turning main 1. Fireplace turns off 1. Fireplace has overheated and will not turn on. - Page 15 7. Heater does not 1. Thermal switch has been 1. Turn unit off and unplug unit provide heat when tripped. for 10 minutes. Plug back in and turned on. turn unit on. If plug cannot be reached, follow directions for tripped circuit breaker.
Need help?
Do you have a question about the i660E and is the answer not in the manual?
Questions and answers