Table of Contents
Advertisement
Advertisement
Table of Contents

Related Manuals for Mahlkonig EK OMNIA


Summary of Contents for Mahlkonig EK OMNIA
- Page 1 EK Omnia ORIGINAL INSTRUCTIONS www.mahlkoenig.com...
-
Page 2: Table Of Contents
Coffee Grinder Contents Overview......3 Grinding coffee beans..16 Scope of delivery / Manual grinding in the Classic mode.....16 Parts ........ .5 Grinding according to recipe General information ... -
Page 3: Overview
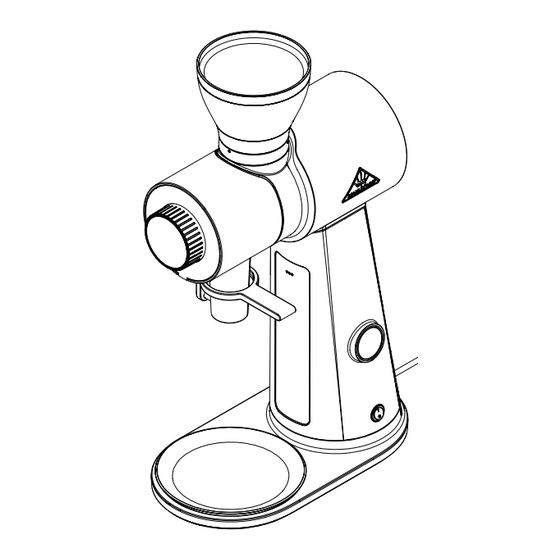
EK Omnia | En Overview A ... - Page 4 Coffee Grinder B C D E ...
-
Page 5: Scope Of Delivery / Parts
EK Omnia | En F G Scope of delivery / Parts No. Name No. Name 13 Locking screw 1 Bean hopper (with lid) (for the bean hopper) 2 Slider 14 Connection for potential 3 Lever for bag clamp / equalization knocker 15 Release button (thermal 4 Start/Stop button overcurrent circuit-breaker) 5 Power cable with power plug... -
Page 6: General Information
Coffee Grinder General information Reading and storing the instructions Before you start using the Coffee Grinder EK Omnia, read through these original instructions and the safety information carefully. Only then will you be able to use the Coffee Grinder EK Omnia safely and without risk. The original instructions are based on the standards and regulations in force in the European Union. -
Page 7: Safety
EK Omnia | En This symbol provides you with useful information about opera- tion or handling. Declaration of Conformity: Products marked with this symbol fulfill all applicable community provisions of the European Eco- nomic area. UKCa mark: Products marked with this symbol comply with the electrical product safety requirements of the United Kingdom of Great Britain and northern ireland. -
Page 8: Safety Information
Coffee Grinder The grinder is specified for use in the commercial sector, e.g. in commercial enterprises, restaurant kitchens, canteens and hospitals but not for continu- ous mass production (continuous operation). The grinder may only be main- tained by trained personnel. However, it may be operated by other persons in a place where use is supervised. - Page 9 EK Omnia | En – never carry the grinder by its power cable. – Keep the grinder and power cable/power plug away from open flames and hot surfaces. – Do not position the power cable in such a way that it could create a tripping hazard.
- Page 10 Coffee Grinder CAUTION! Risk of tipping and injury! incorrect handling of the grinder can result in injury. – Lay out the power cable in such a way that nobody can become entangled in it and cause the grinder to fall. –...
-
Page 11: Functioning Of The Grinder
EK Omnia | En Functioning of the grinder Depending on what you intend to grind, select one of the following three operating modes. Classic mode You manually control the grinding process on the basis of the grinding time in the Classic mode. You also manually set the desired grinding degree by means of the rotary control (11). -
Page 12: Commissioning
Coffee Grinder The grinder does not have an integrated load cell, meaning that a calibra- tion, in which the determined grinding weights are assigned to the preset grinding times, has to be carried out for each bean type first of all (see “Enter- ing the bean type (calibration)”... -
Page 13: Connecting The Potential Equalization
EK Omnia | En Connecting the potential equalization The connection for the potential equalization (14) can be found on the rear of the grinder (see Fig. D). The electrical connection and testing of electronic functionality must be carried out by an electrician. 1. Undo the locknut and remove it. 2. -
Page 14: Removing The Hopper
Coffee Grinder Removing the hopper 1. if the slider (2) has been swiveled out, swivel it all the way in, in order to close the bean hopper (1) towards the grinding mechanism. 2. Grind the coffee beans left in the grinding mechanism in the Classic mode until the grinder runs empty (see “Manual grinding in the Classic mode”... -
Page 15: Selecting The Mode
EK Omnia | En Selecting the mode » Swipe the touchscreen (10) in a vertical direction (up or down) to select the desired mode. » Tap the symbol for the desired mode on the left-hand edge of the touch- screen 1×. Selecting the recipe (Recipe / Library mode) »... -
Page 16: Grinding Coffee Beans
Coffee Grinder Grinding coffee beans NOTE! Risk of overheating! Exceeding the maximum permissible operating cycle can cause the grinder to overheat. – Do not exceed the maximum operating cycle (see “Technical data” section). – Observe the recommended break when the maximum permissible operating cycle is reached (see “Technical data”... -
Page 17: Grinding According To Recipe In The Time Mode
EK Omnia | En 3. Position the collecting container (see “Positioning the receptacle” section). 4. Set the desired grinding degree (see “Setting the grinding degree” section). 5. Press the Start/Stop button (4) to start the grinding process. 6. Swivel the slider out to open the bean hopper towards the grinding mechanism. -
Page 18: Grinding According To Recipe In The Library Mode
Coffee Grinder 7. Press the Start/Stop button (4) to start the grinding process. The grinder grinds, the ground coffee drops out of the spout into the receptacle. The touchscreen shows the increasing grinding time. The grinding process stops automatically after the set grinding time has elapsed. -
Page 19: Pausing Grinding
EK Omnia | En Pausing grinding You can pause the current grinding process at any time irrespective of the selected mode. » Press the Start/Stop button (4) to stop the current grinding process. Changing the bean types 1. Remove the bean hopper (1) from the grinder (see “Removing the hopper” section). -
Page 20: Changing Settings
Coffee Grinder Changing settings Setting the grinding degree The grinder is equipped with the Disc Distance Detection (DDD) function, in which the grinding degree is set on the basis of the distance between the grinding discs (0–800 µm): The higher the µm value, the greater the distance between the grinding disks and the coarser the coffee grinding. -
Page 21: Changing Existing Recipes
EK Omnia | En Changing existing recipes You can change the recipe specifics (= recipe-specific parameters) of existing recipes at any time. 1. if required, select the recipe which you wish to change by swiping the touchscreen in a horizontal direction in the Recipe or Library mode. 2. -
Page 22: Cleaning
Coffee Grinder Cleaning CAUTION! Risk of injury! The grinder can fall over and cause injury when it is being moved. – always place the grinder on a stable surface that will not tilt. – ask another person for help if the grinder is too heavy. NOTE! Risk of short-circuit! Water penetrating the grinder can cause a short-circuit. -
Page 23: Cleaning The Casing
EK Omnia | En 3. Clean the installation surface and the underside of the grinder with a damp cloth and dry the surfaces. The surfaces must be dry and free of oil and grease. 4. Place the grinder back onto the cleaned surface. Cleaning the casing 1. -
Page 24: Cleaning The Hopper
Coffee Grinder Cleaning the hopper The bean hopper must be cleaned daily to remove any coffee oil residue, which can have a negative effect on the taste. 1. Remove the bean hopper from the grinder (see “Removing the hop- per” section). Ensure that the bean hopper is closed towards the grinding mechanism and the beans left in the grinding mechanism have been completely ground before you remove the bean hopper. -
Page 25: Troubleshooting
EK Omnia | En 7. Grind the filled grinder cleaner completely in the Classic mode until the grinder runs empty (see “Manual grinding in the Classic mode” section). 8. Open the bean hopper by swiveling out the slider (2). 9. Remove any leftover cleaning particles by grinding the same amount of beans as the grinder cleaner used. - Page 26 Coffee Grinder Problem Cause Solution The grinder is • The grinding » Set the maximum µm value for the humming but mechanism is coarsest ground coffee. actuate the not grinding. blocked. grinding process in the Classic mode. The grinder will free itself. Then set the desired grinding degree during operation.
- Page 27 EK Omnia | En Problem Cause Solution The grind- • The spout is » Remove the spout or use a brush er’s dosing clogged. Too to clean the spout from the out- accuracy is much ground side with the grinder switched off. decreasing.
-
Page 28: Technical Data
Coffee Grinder Technical data model: EK Omnia Voltage / frequency: 220–240 V; 50/60 Hz 110–127 V; 60 Hz 100 V; 50/60 Hz Power: 800 W Protection type: iPX1 Protection class: Back-up fuse: 16 a-slow/15 a idle speed: 1,500 rpm noise emission (during grinding): 74 dBa Grinding capacity: 11 g/s* max. -
Page 29: Disposal
EK Omnia | En Disposal Disposing of the packaging Dispose of the packaging by correctly sorting the recyclable materials. Dispose of cardboard as paper waste and plastic as recyclable materials. Disposing of the grinder Electrical appliances are labeled with the symbol opposite. Used appliances may not be thrown into commercial/domestic waste! Consumers are legally obliged to dispose of old appliances sepa- rately from commercial/household waste, e.g. -
Page 30: Maintenance And Service
Coffee Grinder Maintenance and service » if service or maintenance is required, contact an authorized customer service center for mahlkönig products. The customer service department can answer any questions you may have regarding repair and mainte- nance of your product or spare parts. Blown-up drawings and information about spare parts are also available https://hemro.net/omnia https://hemro.net_Omnia_SP... - Page 31 Hemro International AG Thurgauerstrasse 80 | 8050 Zurich, Switzerland T: +41 44 864 18 00 | F: +41 44 864 18 01 info@hemrogroup.com | www.hemrogroup.com...
Need help?
Do you have a question about the EK OMNIA and is the answer not in the manual?
Questions and answers