Advertisement
OVERVIEW

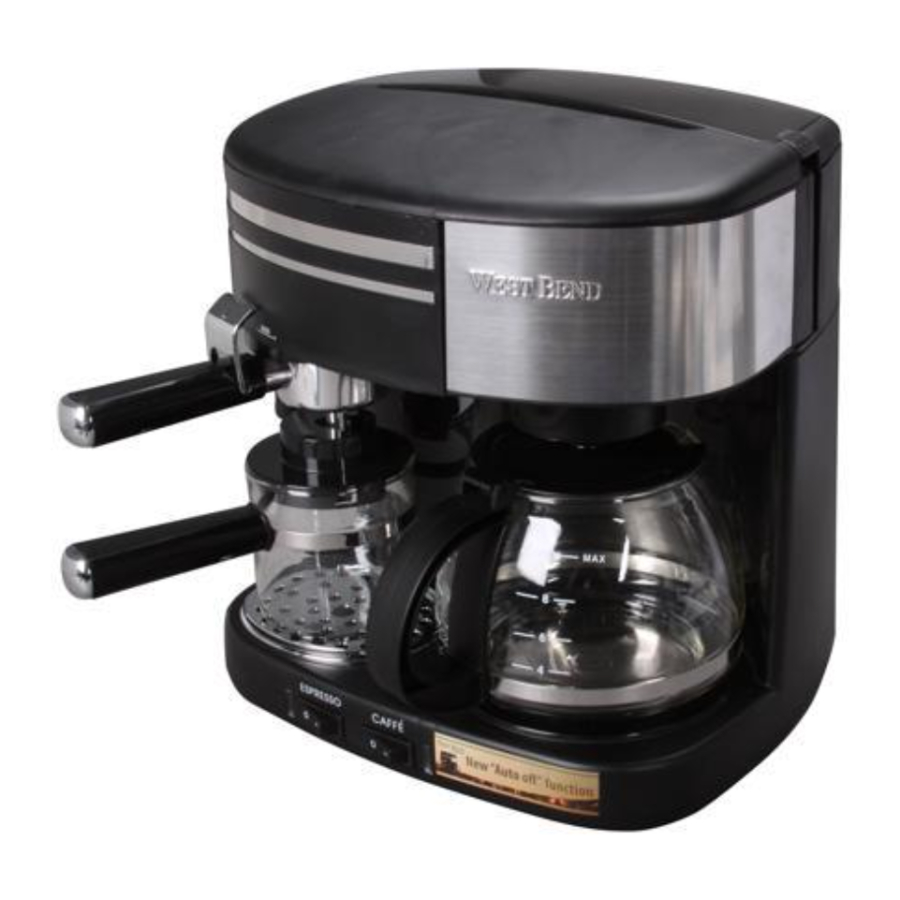
USING YOUR 3 IN 1 COFFEE CENTER
FIRST USE
- Place appliance on dry, level, heat-resistant surface away from any edge.
- With both switches in the "OFF" position, plug cord into a 120 volt AC electric outlet only.
- We recommend that you get familiar with all the parts of your appliance before using it for the first time. Read all instructions, cautions and notes before actually using the appliance.
- Wash all parts in warm, soapy water, rinse thoroughly and dry.
- To remove any residuals of production from the appliance, we recommend making 4 cups of espresso and at least one full pot of coffee with water only, no coffee grounds. During the brewing cycle, open the steam valve for 5-10 seconds to clean the steam wand.
- Small amounts of smoke or odor may occur upon heating due to the release of manufacturing oils – this is normal.
- Some minor expansion or contraction sounds may occur during heating and cooling – this is normal.
OPTIONAL AUTO SHUT-OFF FEATURE
This appliance may be equipped with an Auto Shut-Off feature. When equipped with Auto Shut-Off, the espresso boiler and corresponding indicator will turn off after 10 minutes of continuous use. The Keep Warm feature and corresponding indicator will turn off after 2 hours of continuous use. To "re-start" either the espresso or coffeemaker, switch the corresponding power switch to the "OFF" position and then switch back "ON". Always switch each power switch to the "OFF" position when finished using the appliance.
PREPARING COFFEE
- Place appliance on dry, level, heat-resistant surface away from any edge.
- With both switches in the "OFF" position, plug cord into a 120 volt AC electric outlet only.
- Swivel out the brew basket and place a #4 paper coffee filter into the brew basket. Add desired amount of coffee into the filter. We recommend one measure (measuring spoon provided) of ground coffee for each cup of brewed coffee to start. After using your coffeemaker a few times, adjust the amount of coffee to suit your own taste. Note: The coffee grind should be appropriate for a "drip" coffeemaker. Do not use coffee that is ground to a powder like consistency as this will prevent water from passing through the coffee and may cause hot water or hot to coffee overflow.
- Close the brew basket by pushing in firmly until the basket touches the side of the coffee machine and the basket "clicks" into place. If the brew basket is not closed properly, hot water or hot coffee may overflow. Note: Make sure the filter is seated properly in the basket and does not fold over itself when closing the brew basket as this may cause hot water or hot coffee to overflow or it may allow the water to bypass the coffee grounds, producing a very weak coffee brew.
- Open the hinged water reservoir and pour in the desired quantity of clean cool water for the number of cups you are brewing. Never pour more water into the reservoir than the marked maximum level. For maximum flavor, do not use warm or hot water to fill reservoir.
- Place the coffee carafe with lid in position on the warming plate. Make sure that the coffee carafe sits flat on the inside circle of the warming plate. Note: The lid of the carafe must be properly positioned on the coffee carafe. If the covered carafe is not in place during the brew process hot water or hot coffee may overflow.
- Turn the appliance "ON" by using the CAFFÉ on/off switch. The indicator light will illuminate indicating that the brewing process has begun. Note: As long as the red indicator light is illuminated, the coffee will be kept warm. If the coffee carafe is removed before the end of the brew cycle, it must be returned properly to the warming plate so the coffee may continue to brew and to avoid hot water or hot coffee to overflow.
- Unplug cord from electrical outlet after use and allow the appliance to cool completely before cleaning.
- Using the Pause 'n Serve Feature: The Pause 'n Serve feature allows you to pour a cup of coffee while it is still brewing. For optimum flavor, allow half of the quantity of coffee to finish brewing before removing the carafe. Return the carafe within 30 seconds so the coffee may continue to brew to avoid hot water or hot coffee to overflow. To prevent scald injury, do not remove any part of the appliance, other than the carafe, during the brew cycle.
PREPARING ESPRESSO
The glass espresso carafe has markings for 2 and 4 cups: A cup of espresso is approximately 2 oz. and does not equal an 8 oz. measuring cup. Use the espresso carafe markings for all of the following measurements.
- 2 cups of water = 2 cups of espresso
- 4 cups of water = 4 cups of espresso
- Place appliance on a dry, level, heat-resistant surface away from any edge.
- With both switches in the "OFF" position, plug cord into a 120 volt AC electric outlet only.
- Place the espresso filter basket into the filter holder. Fill with desired amount of ground espresso coffee. The filter basket is marked on the inside for 2 and 4 cups. Press the coffee lightly and clear any excess coffee from the rim of the filter holder. This will assure proper fit to the brewing head. Note: Do not press coffee too tightly or fill more coffee than indicated by the four-cup marking into the filter basket. This may cause clogging or overflow.
- Insert the filter holder into the appliance. To insert the filter holder, line up the arrow located on the thumb guard of the filter holder with the arrow on the left side of the appliance. Flip thumb guard back and out of the way. Raise the filter holder up into brewing head and turn the filter holder firmly to the right until it can go no further. The arrow on the filter holder should be as far right in the lock-range as possible. If the arrow is not at least in the middle of the lock range, remove the filter holder and insert it again as described above until the arrow is within the lock-range. Following this procedure will prevent the filter holder from being dislodged as pressure builds up during the brewing process.
- Open the hinged lid located on the top back of the appliance and unscrew the boiler cap located inside by turning counter clockwise.
Fill the boiler chamber with cold water using the markings indicated on the glass espresso carafe. Note: Never pour water into the boiler chamber while the appliance is "ON" if the tank is hot. Never fill more than 10 oz. (300ml) of water into the boiler chamber. It is very important to fill only the amount of water you need into the boiler chamber. Your appliance will always need to process all the water until the boiler chamber is empty. - Replace and secure the boiler cap by turning it clockwise.
![]()
- Make sure the overflow grid and base are in place. Place the espresso carafe lid on espresso carafe so the lid opening points toward the pouring spout of the carafe. Place the espresso carafe under the filter holder so the spout of the filter holder is positioned in the opening of the carafe. Make sure the steam release valve is fully closed (clockwise). Note: To make espresso directly into two cups, clip the two-cup adapter onto the filter holder and make sure that the cups are placed directly underneath the spouts.
- Turn the ESPRESSO switch to "ON" position. It will take approximately 2 minutes for the water to be heated. The water will then be forced through the ground coffee into the glass carafe or cups. Wail until all the water in the boiler chamber has been used. Switch the ESPRESSO switch to the "OFF" position.

- Do not unscrew the boiler cap while the machine is in operation. Wait until brewing cycle is completed and all water and steam has been used.
- Use caution when removing the filter holder, as the metal parts will still be hot. To remove the filter holder, turn the filter holder to the left, past the "lock" marking until the holder dislodges from the machine.
- Hold thumb guard down while disposing of coffee grounds to keep filter in place.
PREPARING CAPPUCCINO
- 3 cups of water = 2 cups of espresso, plus steam for frothing milk for cappuccino.
- Maximum capacity (bottom of the metal band around the glass espresso carafe) = 4 cups of espresso, plus steam for frothing milk for cappuccino.
- Follow steps 1-7 in the "Preparing Espresso" section of this manual. Note: Do not start brewing until step 3 below.
- Using a stainless steel, ceramic or high temperature glass pitcher, fill with 4 oz. of fresh, cold milk. The pitcher should be wide-mouthed and fit under the steam wand. For best performance, the pitcher should be cool or chilled.
- Turn the ESPRESSO switch to the "ON" position. It will take approximately 2 minutes for the water to be heated. The water will then be forced through the ground coffee into the glass carafe or cups.
- As soon as the espresso has filled the espresso carafe to the foam mark on the carafe, you can start frothing the milk. Immerse the tip of the frothing nozzle half way into the pitcher of milk. Note: Do not open the steam release valve before immersing the steam nozzle into the milk or the milk will splash back.
- Turn the steam release knob counter clockwise to release steam into the milk. Keep the pitcher slightly tilted so that you can always see the position of the nozzle when you froth the milk. The frothing nozzle should be below the surface of the milk but not so far as to allow the top of the frothing nozzle into the milk. Your milk will begin to froth immediately. As the froth rises, keep lowering the pitcher so that the tip of the frothing nozzle is always just slightly beneath the surface of the rising foam.
![]()
- When the milk has doubled in volume, insert the frothing nozzle deeper into the milk in order to heat the milk. If using a beverage thermometer, the ideal temperature of the milk when finished is 150-170ºF or 66º-77ºC. Note: Do not allow the milk to boil. You know this has happened if there is a sudden growth in the volume of milk and large bubbles start to form on the surface of the milk.
- Close the steam release knob by turning it clockwise while the nozzle is still immersed in the milk. This will avoid splattering of the hot milk. If you prefer a "stiff" froth, let the frothed milk stand for a minute.
- Allow the espresso to finish brewing. Move the espresso switch to the "OFF" position.
- Pour the espresso into a cup that is large enough for the espresso and frothed milk combination. Add the steamed milk and spoon on the frothed milk.

- Do not unscrew the boiler cap while the appliance is in operation. Wait until the brewing cycle is completed, all water and steam has been used, and the appliance is switched off.
- Use caution when removing the filter holder, as the metal parts may remain hot for some time.
- Thoroughly clean the steam wand and frothing nozzle after each use to ensure satisfactory and trouble free frothing.
STEAMING/FROTHING WITHOUT ESPRESSO (USING STEAM PLUG)
- Switch both the Espresso and CAFFÉ switches to the "OFF" position. Make sure your appliance is cool enough to handle and the pressure has been released.
- Insert the steam build-up plug into the filter holder then insert the filter holder into the appliance. To insert the filter holder, line up the arrow located on the thumb guard of the filter holder with the arrow on the left side of the appliance. Raise the filter holder up into brewing head and turn the filter holder firmly to the right, until it can go no further. The arrow on the filter holder should be as far right in the lock-range as possible. If the arrow is not at least in the middle of the lock-range, remove the filter holder and insert it again as described above until the arrow is within the lock-range. This procedure will prevent the filter holder from being dislodged as pressure builds up during the brewing process.
- For steam only, do not fill the glass espresso carafe above the 2-cup marking. Fill the boiler chamber with cold water. Have your frothing pitcher with 4 oz. of fresh, cold milk ready to heat.
- Place the glass espresso carafe with lid under the filter holder and turn the espresso switch to the "ON" position. Open the steam release knob immediately.
- Immerse the frothing nozzle half way into the frothing pitcher filled with milk. It will take approximately 30 - 60 seconds after turning the appliance on for the steam to come out from the steam nozzle. Keep the pitcher slightly tilted so that you can always see the position of the nozzle when you froth the milk. The frothing nozzle should be below the surface of the milk but not so far as to allow the top of the frothing nozzle into the milk. Your milk will begin to froth. As the froth rises, keep lowering the pitcher so that the tip of the frothing nozzle is always just slightly beneath the surface of the rising foam.
- When the milk has doubled in volume, insert the frothing nozzle deeper into the milk in order to heat the milk. Note: If using a beverage thermometer, the ideal temperature of the milk when finished is 150-170ºF or 66ºC-77ºC. Do not allow the milk to boil. You know this has happened if there is a sudden growth in the volume of the milk and large bubbles start to form on the surface of the milk.
- When finished, close the steam release knob by turning it clockwise while the nozzle is still immersed in the milk. This will avoid splattering of the hot milk. If you prefer a "stiff" froth, let the frothed milk stand for a minute.
- Move the espresso switch to the "OFF" position.
Notes: If you did not need all the water for steaming, proceed as follows:
- With the appliance off, release the remaining steam pressure into another container.
- Do not close the steam release knob before all steam is released; see "Pressure Precautions" section in this manual.
PRESSURE - CHECKING AND RELEASING
Pressure Checking
- Switch Espresso and CAFFÉ switches to the "OFF" position and unplug the appliance from the electrical outlet.
- Carefully open the steam release valve by slowly turning the knob counterclockwise. If steam comes out of the nozzle, the boiler is still under pressure.
- If there is pressure, close the steam release valve and proceed as follows to release the pressure.
Pressure Releasing
- Hold a pitcher of water under the steam wand and immerse the frothing nozzle into the water.
- Slowly open the steam release valve and allow the steam to vent into the water.
- When the steam wand stops releasing steam, slowly open the boiler cap.
CLEANING YOUR 3 IN 1 COFFEE CENTER
GENERAL
- Position all switches to the"OFF" position, unplug from electrical outlet and allow the appliance to cool completely before cleaning.
- Remove and discard used espresso grounds and disposable filter containing used coffee grounds. Clean brewing head with a damp cloth.
- Remove and clean the espresso filter holder, filter cup, brew basket, overflow grid, grid base, carafes and covers in a solution of warm water and mild liquid soap. Rinse thoroughly and dry.
- If there is water left in the boiler chamber or the coffee water reservoir, empty through the top opening of the unit by turning upside down. Note: Do not clean the inside of the water reservoir or boiler chamber with a cloth or paper toweling as this may leave particles in the chambers that may clog small openings in your coffeemaker. You only need to rinse with cold water periodically.
- Remove rubber-frothing nozzle from the steam wand. Clean the frothing nozzle and the steam wand thoroughly with a solution of warm water and mild liquid soap. Rinse thoroughly and replace the rubber-frothing nozzle onto the steam wand.
- The exterior of the appliance can be wiped clean with a damp cloth.
- Decalcify the appliance periodically. See the "Decalcifying Your 3 in 1 Coffee Center" section.
CLEANING THE STEAM NOZZLE
- Milk residuals will build up in the tip of the steam nozzle after frothing milk. It is very important that after you remove the frothing nozzle, you wipe the steam nozzle clean with a damp cloth after each use. This will help prevent the steam nozzle from clogging and will ensure good frothing results. Should the steam nozzle become clogged, proceed as follows:
- Ensure switches are in the "OFF" position, the appliance is unplugged from electrical outlet, all pressure has been released and the appliance has cooled completely.
- Remove the rubber frothing nozzle and the steam nozzle using the tool on the end of the coffee measure spoon provided with your machine.
- Clean the nozzle with warm water and ensure the small hole in the end is clear.
- Reattach the steam nozzle, tighten steam nozzle securely and slide the rubberfrothing nozzle onto the steam wand.
DECALCIFYING YOUR 3 IN 1 COFFEE CENTER
GENERAL
- Over time, mineral deposits build up on internal parts of the appliance and affect the operation of the appliance causing the need for decalcification. The frequency of decalcification depends on the hardness of your water and how often the appliance is used. Indications that decalcifying is necessary are:
- Increased noise during operation.
- Excessive steaming.
- Longer brewing times.
- The pumping action stops before all of the water has been pumped from the water reservoir.
- If usage is regular, decalcifying should be carried out as follows:
- With soft water, decalcify once per year.
- With medium water, decalcify every three (3) months.
- With hard water, decalcify monthly.
- We recommend the use of vinegar for decalcifying.
DECALCIFYING YOUR 3 IN 1 COFFEE CENTER
Espresso Maker
- Release all pressure and allow the appliance to cool completely before decalcifying.
- Pour 8 oz. (4-cup mark on espresso carafe) of fresh, cool, undiluted white household vinegar into the boiler chamber.
- Following the instructions for "Preparing Espresso," run the vinegar through the espresso making cycle except without the use of coffee grounds.
- Place a cup of cool water under the steam wand. When the solution has pumped through the unit and is at the 2-cup mark on the espresso carafe, insert the steam wand into the water and open the steam release valve for 10-15 seconds. Close the steam release valve and allow the remaining vinegar to be pumped into the carafe.
- Repeat the steps above twice using clear, cool water to rinse any remaining traces of the vinegar from the system.
Coffeemaker
- Release all pressure and allow the appliance to cool completely before decalcifying.
- Pour 20 oz. (4-cup mark on coffee carafe) of fresh, cool undiluted white household vinegar into the water reservoir.
- Following the instructions for "Preparing Coffee," run the vinegar through the coffee making cycle except without the use of coffee grounds.
- Repeat the steps above twice using clear, cool water to rinse any remaining traces of vinegar from the system.
PROBLEMS AND CAUSES
- Coffee or water leaks from coffee filter basket:
- Filter is not properly placed or is folded over.
- Basket is not properly closed.
- Coffee carafe or carafe cover is not in place.
- Too much coffee in filter.
- Filter basket valve is dirty, broken or missing.
- Coffee does not come out or comes out very slowly:
- No water is in the coffee water reservoir.
- No coffee is in the filter holder.
- Basket is not properly closed.
- Coffee carafe or carafe cover is not in place.
- Filter is clogged because coffee is ground too finely or is packed too tightly.
- Appliance needs to be decalcified.
- Espresso leaking from the espresso filter holder:
- Missing espresso filter.
- Filter holder is not properly inserted.
- Filter holder is not in "locked" position.
- Coffee grounds are not cleaned off the edge of the filter and holder.
- Internal gasket in espresso head is dirty and needs to be cleaned.
- Internal gasket in espresso head damaged and needs to be replaced.
- Espresso does not come out or comes out very slowly:
- No water is in the boiler reservoir.
- No coffee is in the filter holder.
- Filter is clogged because coffee is ground too finely or packed too tightly.
- Appliance needs to be decalcified.
- Steam does not come out of steam wand:
- No water or not enough water is in the boiler chamber.
- No coffee or steam plug in espresso filter holder.
- Clogged steam or frothing nozzle.
- Appliance needs to be decalcified.
- Not enough froth when frothing milk:
- Frothing nozzle is too deep in milk or touching bottom of pitcher.
- Top openings of frothing nozzle are immersed in the milk.
- Pitcher is not cold enough.
- Milk is not fresh or cold enough.
- Milk is too thick.
- Clogged steam or frothing nozzle.
IMPORTANT SAFEGUARDS

To prevent personal injury or property damage, read and follow all instructions and warnings.
When using electrical appliances, basic safety precautions should always be followed including the following:
- Read all instructions, including these important safeguards and the care and use instructions in this manual.
- Do not use appliance for other than intended use.
- Do not leave appliance unattended while plugged into electrical outlet.
- Do not place on or near a hot gas or electric burner, or a heated oven.
- Do not operate if the appliance is not working properly or if it has been damaged in any manner. For service information see warranty page.
- The use of accessory attachments not recommended by Focus Electrics may result in fire, electric shock or injury to persons.
- Do not attempt to repair this appliance yourself.
- For household use only.
To prevent burns, personal injury or property damage, read and follow all instructions and warnings.
 HEAT PRECAUTIONS
- Do not touch hot surfaces, use handles or knobs.
- Do not move an appliance containing hot food or hot liquids.
- Do not refill the water reservoir or the boiler while the appliance is on. Turn the appliance off and allow to cool before refilling with water.
- Make sure the brew basket is closed properly during the brewing process. If the brew basket is not closed properly, hot water or hot coffee may overflow.
- Make sure glass carafe is in place when brewing coffee. If the glass carafe is not in place this will cause hot water or hot coffee to overflow.
- Do not remove any part of the appliance, other than the carafe, during the brew cycle as scalding could occur.
- The lid of the carafe must be in place and properly positioned on the carafe during the brew process or hot water or hot coffee may overflow.
- Always use the proper grind of coffee. Too fine of a grind could clog the filter and cause hot water or hot coffee to overflow.
- Use caution when removing the espresso filter holder. The metal parts remain hot after operation. See Pressure Precautions section.
- Allow appliance to cool completely after use and before putting on or taking off parts and before cleaning or storing.
- Scalding may occur if the lid is removed during the brew cycle.

To prevent electrical shock, personal injury or property damage, read and follow all instructions and warnings.
 ELECTRICITY PRECAUTIONS
- To protect against fire, electric shock and injury to persons, do not immerse cord, plugs, or other electric parts in water or other liquids.
- Do not operate any appliance with a damaged cord or plug.
- Do not use this appliance outdoors.
- Do not plug cord into electrical outlet unless both switches are in "OFF" position.
- Always position both switches to "OFF" position and unplug the appliance from electrical outlet when not in use and before cleaning. Allow to cool before putting on or taking off parts and before cleaning.
- A short power-supply cord is provided to reduce risks resulting from becoming entangled in or tripping over a longer cord.
- Longer, detachable power-supply cords or extension cords are available and may be used if care is exercised in their use. While use of an extension cord is not recommended, if you must use one, the marked electrical rating of the detachable power-supply cord or extension cord should be at least as great as the electrical rating of the appliance. If the appliance is of the grounded type, the extension cord should be a grounding-type 3-wire cord. The longer cord should be arranged so that it will not hang over the counter top or tabletop where it can be pulled by children or tripped over.
- This appliance has a polarized plug (one blade of the plug is wider than the other). To reduce the risk of electric shock, this plug is intended to fit into a polarized outlet only one way. If the plug does not fit fully into the outlet, reverse the plug. If it still does not fit, contact a qualified electrician. Do not attempt to modify the plug in any way.
- Do not use an outlet or extension cord if the plug fits loosely or if the outlet or extension cord feels hot.
- Keep the cord away from hot parts of the appliance and hot surfaces during operation.
To prevent burns or other personal injury, read and follow all instructions and warnings.
PRESSURE PRECAUTIONS
- Always check to see if system is under pressure before touching the boiler cap or the espresso filter holder.
- Make sure the espresso filter holder is in the locked position before operating the espresso function of the appliance.
- Make sure the boiler cap is properly and fully tightened before operating the espresso function of the appliance.
- Do not touch the boiler cap at any time during the espresso brewing process or until pressure is completely relieved.
- Do not touch the espresso filter holder at any time during the brewing process or until pressure is completely relieved.
To prevent burns or other personal injuries to children, read and follow all instructions and warnings.
PRECAUTIONS FOR USE AROUND CHILDREN
- Close supervision is necessary when this appliance is used by or near children.
- Do not allow cord to hang over any edge where a child can reach it. Arrange cord to avoid pulling, tripping or entanglement.
GLASS CARAFE CAUTIONS
- The carafes are designed for use with this appliance only. Do not use the carafes provided with this appliance for any other appliance or application.
- Do not place carafes on hot surfaces, on a range top, or in a heated oven.
- Do not put a hot carafe on a wet or cold surface.
- Do not use a cracked carafe or a carafe having a loose or weakened handle.
- Do not clean carafes with cleansers, steel wool pads, or other abrasive materials.
Register this and other Focus Electrics products through our website: www.focuselectrics.com
Documents / Resources
References
Download manual
Here you can download full pdf version of manual, it may contain additional safety instructions, warranty information, FCC rules, etc.
Download West Bend 55108, 55109- 10 Cup 3 IN 1 COFFEE CENTER Manual
Advertisement


Need help?
Do you have a question about the 55108 and is the answer not in the manual?
Questions and answers