Table of Contents
Advertisement
Available languages
Available languages
Quick Links
Baby Trend, Inc.
13048 Valley Blvd.
Fontana CA 92335
1-800-328-7363
(8:00 a.m. ~ 4:30 p.m. PST)
www.babytrend.com
TS06xxxC_2L_011724
Read all instructions BEFORE assembly and USE of product.
KEEP INSTRUCTIONS FOR FUTURE USE.
Lea todas las instrucciones ANTES de armar y USAR el
producto. CONSERVE LAS INSTRUCCIONES PARA USO FUTURO.
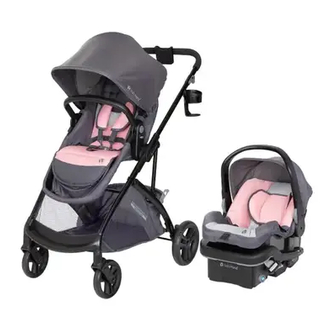
Sonar Switch Modular Travel System
Instruction Manual
Manual de Instrucciones
with EZ-Lift
™
PLUS
infant car seat
TS06xxxC
Advertisement
Table of Contents

Related Manuals for BABYTREND Sonar Switch TS06 C Series


Summary of Contents for BABYTREND Sonar Switch TS06 C Series
- Page 1 CONSERVE LAS INSTRUCCIONES PARA USO FUTURO. Sonar Switch Modular Travel System with EZ-Lift ™ PLUS infant car seat Instruction Manual TS06xxxC Manual de Instrucciones Baby Trend, Inc. 1-800-328-7363 (8:00 a.m. ~ 4:30 p.m. PST) 13048 Valley Blvd. Fontana CA 92335 www.babytrend.com TS06xxxC_2L_011724...
-
Page 2: Warranty
Customer Service Department can be contacted at 1 (800) 328-7363 Monday through Friday between 8:00 a.m. and 4:30 p.m. (PST). Return Authorizations are required prior to returning product(s) to Baby Trend®. Please visit http://babytrend.com/pages/ limited-warranty for complete warranty details. GARANTIA NO DEVUELVA SU PRODUCTO A LA TIENDA. - Page 3 PARTS WARNING WARNING: Check that you have all the parts for this model before assembling the stroller. Please follow all of these instructions to ensure the safety of your child. Keep these instructions for future reference. WARNING: Failure to follow these instructions could result in serious injury or death.
- Page 4 ASSEMBLY ASSEMBLY IMPORTANT! REAR WHEELS To ensure safe operation of your stroller, please follow these instructions carefully. Please keep these • Attach the rear wheels onto the stroller instructions for future reference. frame until it clicks into place (Fig. 2). IMPORTANT! NOTE: Pull on the rear wheel assembly Before assembly and each use, inspect...
- Page 5 ASSEMBLY ASSEMBLY ATTACHING THE SEAT • Attach the seat by lining up the seat anchors on the side of the seat with • Unfold the toddler seat fully (Fig. 4a). the anchors on the stroller frame and pushing them together until they click •...
-
Page 6: Bumper Bar
ASSEMBLY ASSEMBLY BUMPER BAR TO ADJUST SEAT WARNING: WARNING: The upright Do not use position should be used only bumper bar to lift or carry seat for a child that is at least 6 with child inside. The bumper months old. bar is not a carrying handle. - Page 7 ASSEMBLY ASSEMBLY REMOVABLE CANOPY PARENT PHONE HOLDER • To attach the removable canopy: Slide the • To attach the parent phone holder: Slide the clip canopy clips on the inside of the corresponding on the phone tab located on the stroller handle slots on the stroller frame (Fig.
- Page 8 SAFETY SAFETY BRAKES TO SECURE THE CHILD WARNING: WARNING: Always set Avoid serious brakes when the stroller is not injury from falling or sliding out. being pushed so that the stroller Always use the safety harness. will not roll away. NEVER leave STRANGULATION stroller unattended on a hill or incline as the stroller may slide...
- Page 9 SAFETY SAFETY TO RELEASE THE CHILD TO FOLD STROLLER Type 1 WARNING: Type 1 Care must be taken when folding and unfolding • To release, push the button on center clasp and the stroller to prevent finger the two harness buckles will pop free (Fig. 12). Center Clasp Fig.
-
Page 10: Infant Car Seat
INFANT CAR SEAT INFANT CAR SEAT THE INFANT CAR SEAT REMOVING THE CAR SEAT: WARNING: • NOTE: Set handle to the carry To avoid serious injury from falling, position (Fig. 16b). Squeeze the ALWAYS use the safety belt to secure the car seat. release handle located at the Top- rear of the car seat and lift away ATTENTION:... -
Page 11: Maintenance
MODES MAINTENANCE RIDING POSITIONS - 6 MODES FRONT WHEEL REMOVAL If adjustment or replacement is necessary: If replacing the front wheel you will • need to release the front wheel *Rear view* from the stroller frame. Push TODDLER SEAT MODE the release button on the rear of the wheel hub and pull wheel Face in either direction, front or... - Page 12 PIEZAS ADVERTENCIA ADVERTENCIA: Verifique que tenga todas las piezas para este modelo antes de montar el carrito. Por favor, siga todas estas instrucciones para garantizar la seguridad de su hijo. Conserve estas instrucciones para referencia futura. ADVERTENCIA: El incumplimiento de estas instrucciones podría ocasionar una lesión grave o la muerte.
-
Page 13: Montaje
ADVERTENCIA MONTAJE PRECAUCIÓN: • Este carrito está diseñado para un niño solamente. El uso con más de un niño Retire el carrito de la caja. Antes del podría provocar inestabilidad y lesionar o dañar a su hijo. SE DEBEN instalar las ruedas •... - Page 14 MONTAJE MONTAJE RUEDAS TRASERAS CÓMO ENCAJAR LA SILLITA • Sujete las ruedas traseras al armazón del carrito • Desdoble completamente el asiento para hasta que hagan clic y se traben (Fig. 2). niños pequeños (Fig. 4a). NOTA: Tire de la rueda trasera para cerciorarse de que esté...
- Page 15 MONTAJE MONTAJE LA BARRA FRONTAL • Instale la sillita alineando las anclas que están a los lados de la sillita con las anclas del ADVERTENCIA: armazón del carrito y empújelas hasta que se encajen de forma segura (Fig. 4e). La sillita puede quedar mirando hacia cualquiera de No use la barra frontal para las direcciones, ya sea hacia adelante o hacia...
- Page 16 MONTAJE MONTAJE PARA AJUSTAR EL ASIENTO PORTA TELÉFONO PARA PADRES ADVERTENCIA: • Para sujetar el porta teléfono para padres: Deslice el gancho de la lengüeta para el teléfono que se posición erguida se debe usar encuentra en el manubrio del carrito hasta que esté únicamente para un niño de bien sujeto (Fig.
- Page 17 MONTAJE SEGURIDAD CUBIERTA REMOVIBLE FRENOS ADVERTENCIA: • Para añadir la cubierta removible: Deslice Siempre aplique los frenos los ganchos de la cubierta que se encuentran dentro de las ranuras correspondientes en el cuando el carrito no esté armazón del carrito siendo empujado, para (Fig.
- Page 18 SEGURIDAD SEGURIDAD PARA SUJETAR AL NIÑO Typo 1 Buckle • Coloque cuidadosamente al niño en el asiento del carrito y pase el arnés de seguridad por la ADVERTENCIA: cintura del niño y por encima de los hombros. Coloque la correa de la entrepierna entre las Evite lesiones graves por piernas del niño.
-
Page 19: Plegar / Desplegar
SILLITA PARA EL AUTOMÓVIL PLEGAR / DESPLEGAR PARA PLEGAR EL CARRITO LA SILLITA PARA EL AUTOMÓVIL ADVERTENCIA: ADVERTENCIA: Evite una lesión grave por Se debe caídas o resbalones, siempre use el arnés de la Sillita ser prudente al plegar y desplegar el para el automóvil. - Page 20 SILLITA PARA EL AUTOMÓVIL MODOS RETIRADA DE LA SILLA DE AUTO: POSICIONES DIFERENTES PARA PASEAR - 6 MODOS • NOTA: Coloque el manubrio en la posición de traslado (Fig. 16b). Apriete el manubrio de liberación ubicado en la parte Superior trasera de la sillita Prensa MODO DE ASIENTO PARA para el automóvil y levántelo para...
-
Page 21: Mantenimiento
MANTENIMIENTO DESMONTAJE RUEDA DELANTERA Si es necesario un ajuste o reemplazo: Si va a cambiar la rueda • delantera, deberá soltar la rueda delantera del bastidor del carrito. Presione el botón *Vista trasera* de liberación en la parte trasera del cubo de la rueda y tire el conjunto de la rueda del cubo (Fig. - Page 22 Copyright © 2024, Baby Trend Inc., All Rights Reserved. Todos los derechos reservados. Copyright © 2024, Baby Trend Inc., All Rights Reserved. Todos los derechos reservados.
Need help?
Do you have a question about the Sonar Switch TS06 C Series and is the answer not in the manual?
Questions and answers