Vertiv Avocent ACS800 Installer/User Manual
Advanced console system
Hide thumbs
Also See for Avocent ACS800:
- User manual (54 pages) ,
- Technical note (6 pages) ,
- Mounting installation manual (4 pages)
Table of Contents
Advertisement
Quick Links
Advertisement
Table of Contents

Related Manuals for Vertiv Avocent ACS800


Summary of Contents for Vertiv Avocent ACS800
- Page 1 Avocent ® ACS800/8000 Advanced Console System Installer/User Guide...
- Page 2 The products covered by this instruction manual are manufactured and/or sold by Vertiv. This document is the property of Vertiv and contains confidential and proprietary information owned by Vertiv. Any copying, use or disclosure of it without the written permission of Vertiv is strictly prohibited.
-
Page 3: Table Of Contents
Vertiv™ Avocent® ACS800/8000 Advanced Console System Installer/User Guide TABLE OF CONTENTS 1 Introduction 1.1 Features and Benefits 1.1.1 Access options 1.1.2 Web user interface (web UI) 1.1.3 IPv4 and IPv6 support 1.1.4 Flexible users and groups 1.1.5 Security 1.1.6 Authentication 1.1.7 VPN based on IPSec with NAT traversal... - Page 4 Appendix D: SSH Setup Allowing RSA Keypair Authentication Instead of a Username/Password Appendix E: Port Information for Communication with the Vertiv™ Avocent® DSView Software Appendix F: Accessing a Console System with a Vertiv™ Avocent® DSView Software Installation via Dial-up Appendix G: Internal Analog Modem Appendix H: Regulatory Information Concerning the Analog Modem Installed in This Product Proprietary and Confidential ©2024 Vertiv Group Corp.
-
Page 5: Introduction
UI), the Command Line Interface (CLI utility), the RestAPI or the Vertiv™ Avocent® DSView™ 4 management software to access and configure the console system. NOTE: Unless otherwise noted, all references to Vertiv™ Avocent® DSView software in this document refer to version 4 or greater. -
Page 6: Web User Interface (Web Ui)
Authentication can be performed locally, with One Time Passwords (OTP), a remote Kerberos, LDAP, RADIUS, TACACS+ authentication server or a Vertiv™ Avocent® DSView server. The console system also supports remote group authorizations for the LDAP, RADIUS and TACACS+ authentication methods. Fallback mechanisms are also available. -
Page 7: Vpn Based On Ipsec With Nat Traversal
An administrator can set up data logging, notifications and alarms to alert administrators of problems with email, SMS, SNMP trap or Vertiv™ Avocent® DSView software notifications. An administrator can also store buffered data locally, remotely or with Vertiv™ Avocent® DSView management software. Messages about the console system and connected servers or devices can also be sent to syslog servers. -
Page 8: Restapi Server
(API) User Guide. 1.2 Configuration Examples The following graphic and table illustrate an Avocent ACS800/8000 advanced console system configuration with all possible options. Options vary by model and no model has all the options shown. Figure 1.1 ACS8000 Advanced Console System Configuration with All Options Shown 1 Introduction Proprietary and Confidential ©2024 Vertiv Group Corp. - Page 9 Vertiv™ Avocent® ACS800/8000 Advanced Console System Installer/User Guide Table 1.1 ACS8000 Advanced Console System Configuration Descriptions Number Description Power buttons (dual power supply shown). Cellular antennas for the cellular modem (not available on some models). Connect a phone line to the Modem port for the internal modem.
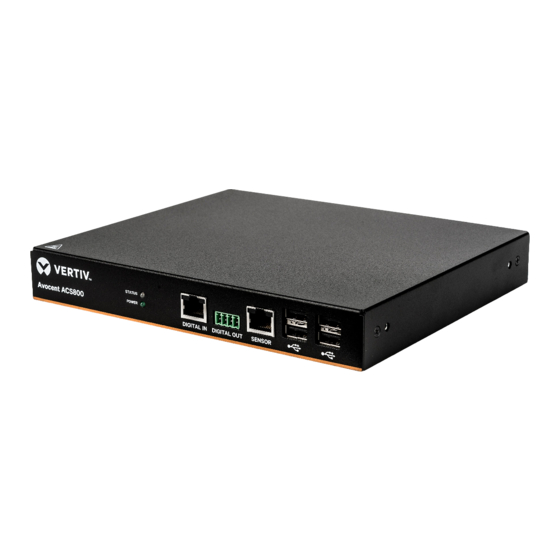
- Page 10 Vertiv™ Avocent® ACS800/8000 Advanced Console System Installer/User Guide Table 1.2 Multi-Protocol Ports and LED Descriptions Number Description Multi-protocol ports. These two ports can accept RS422 and RS485 pin-outs in addition to Cyclades and Cisco pin-outs. LEDs. The STATUS LED is green when the console system is fully booted up and initialized. The P1 and P2 LEDs indicate an active power supply.
- Page 11 Vertiv™ Avocent® ACS800/8000 Advanced Console System Installer/User Guide Table 1.3 Inserting the SIM Card Descriptions Number Description Remove the screw to release the cover. Once the card is inserted, replace the cover and reinsert the screw. Remove the cover to expose the SIM card slot. Replace the cover once the card has been inserted.
-
Page 12: Serial Port Led Status
Vertiv™ Avocent® ACS800/8000 Advanced Console System Installer/User Guide Table 1.4 Typical ACS800 Advanced Console System Descriptions Number Description LEDs. The STATUS LED is green when the console system is fully booted up and initialized. The Power LED is green when power is being supplied to the console system. -
Page 13: Getting Started
Depending on the model, the console system is supplied with single or dual AC or DC power supplies. WARNING! Always execute the shutdown command through the web UI, CLI, RestAPI or Vertiv™ Avocent® DSView software under the Overview/Tools node before turning the console system off, then on again. This will ensure the reset doesn't occur while the file system in Flash is being accessed, and it helps avoiding Flash memory corruptions. -
Page 14: Configuring A Console System
CONSOLE or Ethernet port. All terminal commands are accessed through a terminal or PC running terminal emulation software. NOTE: To configure the console system using Vertiv™ Avocent® DSView software, see the Vertiv™ Avocent® DSView 4.5 Management Software Installer/User Guide. To configure the console system using the web UI, see... -
Page 15: Using Telnet Or Ssh
Vertiv™ Avocent® ACS800/8000 Advanced Console System Installer/User Guide cross adaptor is provided. The terminal settings are 9600 bits per second (bps), 8 bits, 1 stop bit, no parity and no flow control. 2. Turn on the console system. When the console system completes initialization, the terminal will display the login banner plus the login prompt. - Page 16 Vertiv™ Avocent® ACS800/8000 Advanced Console System Installer/User Guide To use SSH in a shell, enter the following command: ssh -l username:port_name [hostname | IP_address] -or- ssh -l username:device_name [hostname | IP_address] -or- ssh -l username:TCP_Port_Alias [hostname | IP_address] -or- ssh -l username IP_Port_Alias To close an SSH session: At the beginning of a line, enter the hotkey defined for the SSH client followed by a period.
-
Page 17: Accessing The Console System Via The Web Ui
3 Accessing the Console System via the Web UI Once you’ve connected your Avocent ACS800/8000 advanced console system to a network, you can access the console system with its web user interface (web UI). The web UI provides direct access to the console system via a graphical user interface instead of a command-based interface. - Page 18 Vertiv™ Avocent® ACS800/8000 Advanced Console System Installer/User Guide To configure network parameters: Select the Network link in the content area. Enter the Hostname, Primary DNS, Domain and MTU in the appropriate fields. Select the IPv4 or IPv6 method for the ETH0 interface. If using Static, enter the Address, Mask and Gateway in the appropriate fields.
-
Page 19: Web User Interface Overview For Administrators
Vertiv™ Avocent® ACS800/8000 Advanced Console System Installer/User Guide 3.2 Web User Interface Overview for Administrators NOTE: For an overview of the web user interface (UI) for regular users, see Web UI Overview for Regular Users on page 79. To log into the web UI: Open a web browser and enter the console system IP address in the address field. -
Page 20: Expert Mode
The console system supports the storage of two firmware images. As the firmware is upgraded, the image not currently running will be overwritten with the new firmware. The latest firmware can be downloaded from the Vertiv website and accessed by the console system using a File Transfer Protocol (FTP), Secure File Transfer Protocol (SFTP) or Secure Copy Protocol (SCP) server. - Page 21 Vertiv™ Avocent® ACS800/8000 Advanced Console System Installer/User Guide Download the file from your desktop by selecting My Computer. a. Click Choose File or Browse to open a window and browse to the file. Click Download. The console system will download the firmware from the specified site and will display a message when the download is complete.
- Page 22 Vertiv™ Avocent® ACS800/8000 Advanced Console System Installer/User Guide -or- Restore from a local file by clicking the Local radio button and entering the filename. -or- Restore the file from your computer by clicking the My Computer radio button, then click Choose File or Browse and browse to where the file is saved on your computer and click Open.
- Page 23 Vertiv™ Avocent® ACS800/8000 Advanced Console System Installer/User Guide To generate a new self-signed certificate: From the sidebar of the Expert tab, click System Tools. Click Generate / Download Certificate. To generate a new certificate, click the Generate Self-Signed Certificate radio button and enter the desired...
-
Page 24: System
A Security Profile determines which services are enabled on the console system. During initial configuration, the console system administrator must configure security parameters to conform with the site security policy. The following security features can be configured either in the web UI, CLI, RestAPI or the Vertiv™ Avocent® DSView software: •... - Page 25 Vertiv™ Avocent® ACS800/8000 Advanced Console System Installer/User Guide 5. Under the Serial Devices heading, select whether port access is controlled by user and group authorization or whether port access settings to apply to all users. Under Bootp Configuration retrieval, enable or disable the service.
- Page 26 Under normal conditions, the Vertiv™ Avocent® DSView software will manage the certificate to clear and replace it with a new certificate as needed. If communication with the software is lost, the Vertiv™ Avocent® DSView server will be unable to clear the certificate and the console system cannot be used. Click the Clear DSView Certificate button to configure the console system in Trust All mode.
- Page 27 Enter the full URL of the online help, ending in /index.html, on the local web server in the Online Help URL field. Click Save. NOTE: Using the online help feature from the Vertiv server is not always possible due to firewall configurations, nor is it recommended.
- Page 28 • A TFTP server must be available on the network • A firmware file must be downloaded from Vertiv and made available on the TFTP server • The boot filename and the IP address of the TFTP server is known To configure boot configuration: Click System - Boot Configuration.
-
Page 29: Network
LTE will be available as a secondary interface but cannot be used as the primary interface. Using the Vertiv™ Avocent® DSView software with a console system will ensure the console system can always be accessible when in a failover situation, because the console system will "phone home" and update its IP address within the Vertiv™... - Page 30 Vertiv™ Avocent® ACS800/8000 Advanced Console System Installer/User Guide To enable Network Failover: From the sidebar of the Expert tab, click Network-Settings. Under the Routing heading, click the Enable Network Failover radio button. Use the drop-down menus to select the primary and secondary interfaces as well as the VPN connection name.
- Page 31 Vertiv™ Avocent® ACS800/8000 Advanced Console System Installer/User Guide Select Host IP Or Network to enter custom settings for Destination IP/Mask. Enter the required Destination IP/Mask Bits with the syntax <destination IP>/<CIDR> in the Destination IP/Mask Bits field. Enter the IP address of the gateway in the Gateway field.
- Page 32 Vertiv™ Avocent® ACS800/8000 Advanced Console System Installer/User Guide Protocol options Different fields are activated for each option in the Protocol pull-down menu. If Numeric is selected from the Protocol menu, enter a Protocol Number in the text field. If TCP is selected from the Protocol menu, a TCP Options Section is activated for entering source and destination ports and TCP flags.
-
Page 33: Ipsec(Vpn)
Vertiv™ Avocent® ACS800/8000 Advanced Console System Installer/User Guide To edit a rule: Select Network - Firewall. Select either IPv4 Filter Table or IPv6 Filter Table as needed. From the chain list, click the name of the chain with the rule you want to edit. - Page 34 Vertiv™ Avocent® ACS800/8000 Advanced Console System Installer/User Guide Table 3.4 IPSec(VPN) Configuration Settings Item Description Connection Name An arbitrary name that is only relevant on the console system to refer to the specific VPN connection. This name does not have to match any setting at the remote side.
- Page 35 Vertiv™ Avocent® ACS800/8000 Advanced Console System Installer/User Guide Table 3.5 IPSec(VPN) Advanced Settings Name Description Protocols used to exchange cryptographic keys. The suite includes algorithms for Encryption (confidentiality), IKE (Internet Key Exchange) Cipher Suite Hash (message authentication) and DH group (key exchange) protocols when setting up the VPN.
-
Page 36: Snmp Configuration
An administrator can configure SNMP, which is needed if notifications are to be sent to an SNMP management application. NOTE: The Avocent ACS800/8000 advanced console system Enterprise MIB text file is available in the appliance at: /usr/local/mibs/ACS8000-MIB.asn. The Avocent ACS800/8000 advanced console system Enterprise TRAP MIB text file is available in the appliance at: /usr/local/mibs/ACS8000-TRAP-MIB.asn. - Page 37 Vertiv™ Avocent® ACS800/8000 Advanced Console System Installer/User Guide 5. Enter a default lease time in hours. This is the time which will be assigned to a lease if the client does not ask for a specific expiration time. Enter a max lease time in hours.
-
Page 38: Ports
Vertiv™ Avocent® ACS800/8000 Advanced Console System Installer/User Guide 3.3.7 Ports An administrator can enable and configure serial ports, internal modem, the CAS Profile and the Dial-In Profile from the Ports tab in the side navigation bar. The console system's serial ports may work in several different roles, depending on the profile configured for a port. - Page 39 Vertiv™ Avocent® ACS800/8000 Advanced Console System Installer/User Guide To enable or disable one or more serial ports: Select Ports - Serial Ports. Click the checkbox for each port you want to enable or disable. Click Enable or Disable. To configure or edit one or more serial ports with the CAS profile: Select Ports - Serial Ports.
- Page 40 Vertiv™ Avocent® ACS800/8000 Advanced Console System Installer/User Guide c. Check the box next to an existing alert and click Delete to delete the string. d. Click Delete Any to delete all strings whether selected or not. Delete Any NOTE: Clicking will delete all alert strings.
- Page 41 Vertiv™ Avocent® ACS800/8000 Advanced Console System Installer/User Guide Table 3.8 CAS Profile Parameters Parameter Description Physical Status Defines the status of the serial port as either enabled or disabled. Default: Disabled. RJ-45 Pin-Out Defines the serial port pin-out as Auto, Cyclades or Cisco. Ports 1 and 2 also support RS-422 and RS-485 pin-outs. Default: Auto.
- Page 42 Displays the type of data buffering: Local - stores the data buffering file in the local file system. NFS - stores the data buffering file in the NFS server. Syslog - sends the data to the syslog server. DSView - sends the data to the Vertiv™ Avocent® DSView software. Default: Type Local.
- Page 43 Vertiv™ Avocent® ACS800/8000 Advanced Console System Installer/User Guide Table 3.9 Dial-in Parameters Parameter Description Status Enables or disables the port. Default: Disabled. Speed The speed that will be used by mgetty to configure the serial device. Default: 38400 bps. Init Chat Chat for modem initialization.
- Page 44 Defines the flow control as none, hardware, software, RxON software or TxON software. Default: None. Power Defines the type or vendor of the UPS connected to the serial port. Vertiv™ Liebert® GXT4 and Vertiv™ Liebert® GXT5 UPSes UPS Type are supported. Default: Auto.
- Page 45 An administrator can enable or disable the Multi-Session Menu. When enabled, users can access the menu from the web UI, CLI or the Vertiv™ Avocent® DSView software, and multiple users can connect simultaneously to a serial port. To connect to a port or start a shared session, the user must have permission to access the port. If more than one session to a serial port is being established, the console system displays the Multi-Session Menu.
- Page 46 Vertiv™ Avocent® ACS800/8000 Advanced Console System Installer/User Guide To configure or edit the internal modem: Select Ports – Internal Modem and check the checkbox for the modem device. Click the Set Dial-In or Set Dial-Out button and use the drop-down menus to configure the settings.
- Page 47 Vertiv™ Avocent® ACS800/8000 Advanced Console System Installer/User Guide To configure the strings for probe/match used by auto discovery: Perform this procedure to change the default settings or the probe or match strings used in auto discovery. Select Ports - CAS Profile - Auto Discovery. The Settings, Probe Strings, Match Strings and Commands options appear in the side navigation bar.
- Page 48 Vertiv™ Avocent® ACS800/8000 Advanced Console System Installer/User Guide a. The specified string need only be present somewhere in the line output by the target device in order to be recognized as a command prompt. It does not have to be at the beginning, end, nor match the entire line.
- Page 49 Vertiv™ Avocent® ACS800/8000 Advanced Console System Installer/User Guide To configure the input/output strings used by auto answer: Select Ports - CAS Profile - Auto Answer. 2. To add an auto answer input and output string, click Add. Enter a new string in the Input String or Output String fields and click Save.
- Page 50 RESTful API and should not be confused with the RestAPI which is used to communicate with and configure the console system itself. For details about the ACS8000 console system RestAPI, see the Vertiv™ Avocent® ACS800/8000 Advanced Console System Application Programming Interface (API) User Guide.
- Page 51 Vertiv™ Avocent® ACS800/8000 Advanced Console System Installer/User Guide To enable the RESTful client: If port access applies to all users, from the side navigation bar of the Expert tab, click System - Security - Security Profile, then under Serial Devices, click the RESTful Menu checkbox and click Save.
- Page 52 Vertiv™ Avocent® ACS800/8000 Advanced Console System Installer/User Guide To configure callback users and phone numbers for ports with the Dial-in Profile: Select Ports - Dial-In Profile - Secure Dial-In - Callback Users. Click Add. Enter the name and phone number used to perform the callback in the appropriate fields and click Save.
- Page 53 Vertiv™ Avocent® ACS800/8000 Advanced Console System Installer/User Guide To enter a list of caller ID numbers: Select Ports - Dial-In Profile - Secure Dial-In - Caller ID. Click Add and enter the caller ID number, range or prefix. Click Save.
-
Page 54: Cellular Modem
Configure the event that will trigger the establishment of the connection: DCD Regards or Always. 3.3.8 Cellular modem The Avocent ACS800/8000 advanced console system cellular modem configuration interface is similar to the internal 56k modem configuration interface. To configure or edit the internal cellular modem: Select Ports –... - Page 55 Vertiv™ Avocent® ACS800/8000 Advanced Console System Installer/User Guide Cell Status The Cell Status line indicates the current state of the cellular modem. The first field on this line indicates if the cellular modem is Disabled, configured for Failover usage, or is Enabled.
- Page 56 Vertiv™ Avocent® ACS800/8000 Advanced Console System Installer/User Guide Keep Alive When Keep Alive mode is enabled, the console system periodically sends a ping across the cellular network to keep the carrier side from disconnecting the connection due to lack of activity. The user can specify the Interval in seconds as well as an IP Address to which to send a ping message.
- Page 57 Vertiv™ Avocent® ACS800/8000 Advanced Console System Installer/User Guide PPP Idle Timeout The PPP Idle Timeout specifies the number of seconds before PPP times out on an idle connection. The default is 0 which means there is no timeout. CHAP Settings This allows changing the CHAP Settings.
- Page 58 Vertiv™ Avocent® ACS800/8000 Advanced Console System Installer/User Guide Using the cellular modem in failover The cellular modem can be automatically brought up and used as a network failover device when the main network interface isn’t working. Set the internal modem to be used for failover: Select Ports –...
-
Page 59: Pluggable Devices
Vertiv™ Avocent® ACS800/8000 Advanced Console System Installer/User Guide 3.3.9 Pluggable devices The console system supports a variety of pluggable devices connected to its USB ports. Some models also support a single SD card in the SD card slot. NOTE: When a pluggable device is not in the current list of supported pluggable devices, the console system may attempt to configure the device with standard settings, allowing it to work normally. - Page 60 Vertiv™ Avocent® ACS800/8000 Advanced Console System Installer/User Guide USB console mapping USB console devices will default to a port based on the number of console system serial ports. The following table shows the default port assignments. Table 3.17 ACS80X USB Console Mapping...
-
Page 61: Authentication
Authentication can be performed locally, with OTP, or remotely on a LDAP, Radius, Kerberos or TACACS+ authentication server. If the console system is managed by a Vertiv™ Avocent® DSView server, Vertiv™ Avocent® DSView software authentication is also supported. The console system also supports remote group authorizations for the LDAP, Radius, Kerberos and TACACS+ authentication methods. - Page 62 Vertiv™ Avocent® ACS800/8000 Advanced Console System Installer/User Guide Duo Push multi-factor authentication Duo Push can be added as a second factor to previously configured appliance authentication. To enable Duo Push multi-factor authentication for the console system: Click Authentication - Appliance Authentication.
- Page 63 Click Save. To configure a Vertiv™ Avocent® DSView authentication server: Select Authentication - Authentication Servers - DSView. Enter IP Address 1 - 4 for the Vertiv™ Avocent® DSView servers in the relevant fields. Click Save. To configure a Duo authentication server: Select Authentication - Authentication Servers - Duo.
-
Page 64: Users Accounts And User Groups
Vertiv™ Avocent® ACS800/8000 Advanced Console System Installer/User Guide 3.3.11 Users accounts and user groups Access to ports and other privileges can be managed based on authorizations that an administrator can assign to custom user groups and individual user accounts. Groups and users can also be authorized to manage power while connected to devices. The console system has two default users (admin and root) and four pre-defined user groups: admin, appliance-admin, shell-login-profile and user. - Page 65 Vertiv™ Avocent® ACS800/8000 Advanced Console System Installer/User Guide 4. From the side navigation bar, click Access Rights - Appliance. The Appliance Access Rights screen appears and lists all access rights available to the user. Available appliance access rights are: •...
- Page 66 Vertiv™ Avocent® ACS800/8000 Advanced Console System Installer/User Guide • Account lockout duration after each failed login: Enter the number of minutes that the appliance should block another login attempt after each failed login. The default of 0 is disabled and is recommended.
- Page 67 Vertiv™ Avocent® ACS800/8000 Advanced Console System Installer/User Guide NOTE: The Serial and Power screens are read-only and cannot be changed. 4. In the side navigation bar, click on Access Rights - Appliance. The Appliance Access Rights screen appears and lists all access rights available to a member belonging to the admin group. All appliance access rights are shown enabled (checked).
- Page 68 Vertiv™ Avocent® ACS800/8000 Advanced Console System Installer/User Guide Managing user groups Administrators and members of the admin group can create custom user groups that contain any users. To create a custom user group: Click Users - Authorization - Groups. The Groups screen is displayed and contains a list of the three default user groups and any additional custom user groups that have been created.
- Page 69 Vertiv™ Avocent® ACS800/8000 Advanced Console System Installer/User Guide Table 3.19 ts_menu Options Command Description Displays TCP port Displays local IPv4 assigned to the serial port Displays local IPv6 assigned to the serial port -u <name> Username to be used in the target session -e <[^]char>...
- Page 70 Vertiv™ Avocent® ACS800/8000 Advanced Console System Installer/User Guide 6. You can specify a custom PDU ID in the field at bottom and assign it a custom PDU ID. NOTE: The custom PDU ID is for assigning user group authorization to manage PDUs that have not yet been connected to the console system.
- Page 71 Vertiv™ Avocent® ACS800/8000 Advanced Console System Installer/User Guide To configure a group in a TACACS+ authentication server: On the server, add raccess service to the user configuration. 2. Define which group(s) the user belongs to in the raccess service following this syntax: group_name = <Group1>[,<Group2,...,GroupN>];...
-
Page 72: Events And Logs
Vertiv™ Avocent® DSView software access rights An administrator can configure how the Vertiv™ Avocent® DSView software's viewer session rights will be mapped to the console system's access rights when a user accesses a target via the Vertiv™ Avocent® DSView software's serial viewer. - Page 73 Under the DSView heading, enter the IP address of the Vertiv™ Avocent® DSView server where event notifications will be sent in the Vertiv™ Avocent® DSView server field. Enter the syslog server port number for the Vertiv™ Avocent® DSView server, the SSH information and the buffer warning information in the appropriate fields.
-
Page 74: Power Management
Liebert® GXT4 or GXT5. The following types of PDUs can be connected to any serial port. • Vertiv™ Geist™ Rack Power Distribution Units (rPDUs). Up to nine PDUs may be chained together and managed from a single serial port. •... - Page 75 Vertiv™ Avocent® ACS800/8000 Advanced Console System Installer/User Guide • Server Technology CDU Series Rack PDUs. One additional level of power devices can be daisy-chained with ServerTech expansion units. • Server Technology PRO1 and PRO2 Series PDUs. One additional level of power devices can be daisy-chained with ServerTech expansion units.
- Page 76 Click Current, Voltage, Power Consumption, Energy Consumption or Environment in the side navigation bar to view a table with appropriate information. Click Reset Values to clear Max, Min and Average values. For a Vertiv™ Geist™ RTS, click Inlets to view information about the power sources. To configure a PDU: Click Settings to expand the side navigation bar.
- Page 77 The following functionalities are supported for Network PDUs: Power Control (turn on, turn off and cycle/reboot) outlets, rename the PDU and rename the outlets. Additional functionality, including monitoring and firmware upgrade, is available for some PDU types, such as Geist (including Vertiv™ Geist™ RTSes), Vertiv and Server Technology. To add a network PDU: Select Power Management –...
-
Page 78: Sensors
• Vertiv™ Liebert® iCOM™ Edge devices The console system supports Vertiv™ Liebert® GXT5 UPS devices with an installed Vertiv™ Liebert® Intellislot™ RDU101 Communications card. These devices, connected to the network with SNMP (read/write) enabled, may be monitored and controlled. The console system enables authorized users to monitor battery information, system input and output information, and to control output receptacles. - Page 79 Vertiv™ Avocent® ACS800/8000 Advanced Console System Installer/User Guide 1-Wire external sensors An external 1-Wire sensor can be connected to the SENSOR port on the front of the console system with a CAT 5 cable. By default, 1-Wire sensor support is enabled. It can be disabled via the Security Profile page.
- Page 80 Vertiv™ Avocent® ACS800/8000 Advanced Console System Installer/User Guide Digital In sensors External Digital In sensors can be connected to the DIGITAL IN port on the front of the console system with a CAT 5 cable. The RJ45 connector contains four digital in signals and has the following pinout: Table 3.20 Digital In RJ45 Pin-Out...
-
Page 81: Active Sessions
Vertiv™ Avocent® ACS800/8000 Advanced Console System Installer/User Guide To configure a Digital Out sensor: From the side navigation bar, click Digital Out. Click the number associated with the position of the sensor to open the settings page. If desired, enter a name for the sensor. -
Page 82: Change Password
Vertiv™ Avocent® ACS800/8000 Advanced Console System Installer/User Guide 3.3.17 Change password An administrator or user can change their own password from this screen. To change your own password: Select Change Password. Enter the old password and new password in the appropriate fields. - Page 83 Vertiv™ Avocent® ACS800/8000 Advanced Console System Installer/User Guide 8. For a Custom script, enter the full command line including any necessary arguments required to run your script or utility. 9. Click Save to save the new task. The Monitoring – Scheduled Tasks page shows a table of all the tasks on the system.
-
Page 84: Diagnostics
As with other events, the user can decide whether to enable or disable individual events and can generate traps, send the events to Syslog, the Vertiv™ Avocent® DSView software, email or SMS. By default, these three events are only set to send messages to Syslog. - Page 85 Vertiv™ Avocent® ACS800/8000 Advanced Console System Installer/User Guide Select any required options. Click Run to execute the diagnostic procedure or start one that continues to run in the background. Click Stop to stop execution of a procedure that runs in the background.
- Page 86 Vertiv™ Avocent® ACS800/8000 Advanced Console System Installer/User Guide This page intentionally left blank Appendices Proprietary and Confidential ©2024 Vertiv Group Corp.
-
Page 87: Appendices
Vertiv™ Avocent® ACS800/8000 Advanced Console System Installer/User Guide Appendices Appendix A: Technical Specifications Table A.1 Technical Specifications for the ACS8000 Advanced Console System Hardware Category Value General Information Dual Core ARM Cortex-A9 @ 766MHz Memory 1GB DDR3L / 16GB eMMC FLASH •... - Page 88 Vertiv™ Avocent® ACS800/8000 Advanced Console System Installer/User Guide Table A.2 Technical Specifications for the ACS800 Advanced Console System Hardware Category Value General Information Dual Core ARM Cortex-A9 @ 766 MHz Memory 1GB DDR3L / 16GB eMMC FLASH • Two dual media 1000Base-TX Copper ports •...
-
Page 89: Appendix B: Zero-Touch Provisioning
Vertiv™ Avocent® ACS800/8000 Advanced Console System Installer/User Guide Appendix B: Zero-touch Provisioning The zero-touch provisioning feature is an extension of the console system's BootP configuration retrieval and is a method for deploying many console systems into an environment. You will need a valid DHCP server and TFTP server to use zero-touch provisioning. - Page 90 Vertiv™ Avocent® ACS800/8000 Advanced Console System Installer/User Guide Table B.1 Setup File Descriptions Parameter Description ONE_TIME_ When the parameter is set to Yes, the configuration file is retrieved by the console system on the initial boot; it is not sent on CONFIG subsequent boots.
- Page 91 Vertiv™ Avocent® ACS800/8000 Advanced Console System Installer/User Guide B.3 Copying the setup file to a server After creating the setup file, it must be copied to a TFTP server. The following example shows what to enter in your system to copy the files to your server and then verify that the console system can download the file.
- Page 92 Vertiv™ Avocent® ACS800/8000 Advanced Console System Installer/User Guide 5. Enter a name for the option in the Name field, select String from the Data type drop-down menu, enter 060 in the Code field and enter a description for the option. Click OK.
- Page 93 Vertiv™ Avocent® ACS800/8000 Advanced Console System Installer/User Guide To enable zero-touch provisioning from the web UI: From the sidebar of the web UI, click System - Security - Security Profile. Under the Bootp Configuration Retrieval heading, check the boxes to enable Bootp and enable Live Configuration Retrieval.
-
Page 94: Appendix C: Bootp Configuration Retrieval
Vertiv™ Avocent® ACS800/8000 Advanced Console System Installer/User Guide Appendix C: Bootp Configuration Retrieval You can set your console system to be reconfigured during boot or at IP renewal. To generate configuration to be retrieved: Click System Tools - Save Configuration and save the configuration to either an FTP site or locally. -
Page 95: Appendix D: Ssh Setup Allowing Rsa Keypair Authentication Instead Of A Username/Password
Vertiv™ Avocent® ACS800/8000 Advanced Console System Installer/User Guide Appendix D: SSH Setup Allowing RSA Keypair Authentication Instead of a Username/Password To set up a client Linux system to access the ACS800/8000 advanced console system: On the console system, create a new admin user. For example: acsadmin. -
Page 96: Appendix E: Port Information For Communication With The Vertiv™ Avocent® Dsview Software
Vertiv™ Avocent® ACS800/8000 Advanced Console System Installer/User Guide Appendix E: Port Information for Communication with the Vertiv™ Avocent® DSView Software The following ports on an Avocent ACS800/8000 advanced console system can accept connections from the Vertiv™ Avocent® DSView management software: •... -
Page 97: Appendix F: Accessing A Console System With A Vertiv™ Avocent® Dsview Software Installation Via Dial-Up
Under normal operating conditions, packets received from the serial viewer would route through the Vertiv™ Avocent® DSView server via Ethernet. In an error state, the Vertiv™ Avocent® DSView server would detect that the normal path to the console system was interrupted and would dial out to the console system, pass authentication and establish a PPP connection. - Page 98 Select DSView Settings - Dial-up and click Save. To configure a console system to receive the dial-up connection within the Vertiv™ Avocent® DSView software: In a Units view window containing appliances, select the ACS800/8000 console system you want to configure.
-
Page 99: Appendix G: Internal Analog Modem
Vertiv™ Avocent® ACS800/8000 Advanced Console System Installer/User Guide Appendix G: Internal Analog Modem Some models of the console system come equipped with an internal analog modem. This modem is used to originate and answer phone calls and establish communication with other modems to transmit data. - Page 100 Vertiv™ Avocent® ACS800/8000 Advanced Console System Installer/User Guide Table G.2 Basic AT Commands Command Description ATA/ Repeat the previous command. Answer. ATB0 CCITT operation at 300 or 1200 bps. ATB1 Bell operation at 300 or 1200 bps (default). Dial. ATD0-9 Dial the DTMF digits 0 to 9.
- Page 101 Vertiv™ Avocent® ACS800/8000 Advanced Console System Installer/User Guide Table G.3 Basic AT Commands (continued) Command Description ATW0 Upon connection, the modem reports only the DTE speed (for example, CONNECT 9600). Subsequent responses are disabled (default). Upon connection, the modem reports the modulation type, line speed, the error correction protocol and the DTE speed. Subsequent ATW1 responses are disabled.
- Page 102 Vertiv™ Avocent® ACS800/8000 Advanced Console System Installer/User Guide Table G.4 Basic AT Commands (continued) Command Description AT%C2 Enables V.42 bis data compression (sets S46 bit 1). AT%C3 Enables V.42 bis and MNP 5 data compression (default). AT%E0 Disables line quality monitor and auto-retrain.
- Page 103 Vertiv™ Avocent® ACS800/8000 Advanced Console System Installer/User Guide G.2 Set telephone extension option This command enables/disables “line-in-use” and “extension pickup” options. Table G.6 Set Telephone Extension Options -STE=n Value Extension Pickup Line-In-Use 0 (default) Disabled Disabled Disabled Enabled Enabled Disabled...
- Page 104 Vertiv™ Avocent® ACS800/8000 Advanced Console System Installer/User Guide Table G.8 Basic Result Code Listing Numeric Verbose Description The modem has received and acknowledged the command. CONNECT Connection made at 300bps or extended result codes are off (X0). RING An incoming ring signal has been detected.
- Page 105 Vertiv™ Avocent® ACS800/8000 Advanced Console System Installer/User Guide The ATH or ATZ commands can also be used to disconnect a call. In order to issue a command to the modem when it is On Line, the modem must be placed into the On Line Command State. This is accomplished by issuing a special escape sequence.
- Page 106 Vertiv™ Avocent® ACS800/8000 Advanced Console System Installer/User Guide TIME = 1346 NMBR = 408 767 8900 NAME = RADICOM RESEARCH RING The CID information can either be presented formatted as shown previously or unformatted. The +VCID and +VRID commands control the modem CID option.
-
Page 107: Appendix H: Regulatory Information Concerning The Analog Modem Installed In This Product
Vertiv™ Avocent® ACS800/8000 Advanced Console System Installer/User Guide Appendix H: Regulatory Information Concerning the Analog Modem Installed in this Product H.1 Analog telecom safety warnings Before servicing, disconnect this product from its power source and telephone network. Also: • Never install telephone wiring during a lightning storm. - Page 108 If trouble is experienced with this equipment, please contact Vertiv at the address shown below for details of how to have the repairs made. If the equipment is causing harm to the telephone network, the telephone company may request that you disconnect the equipment until the problem is resolved.
- Page 109 Vertiv™ Avocent® ACS800/8000 Advanced Console System Installer/User Guide 4. This device is equipped with pulse dialing, while the Telecom standard is DTMF tone dialing. There is no guarantee that Telecom lines will always continue to support pulse dialing. Use of pulse dialing, when this equipment is connected to the same line as other equipment, may give rise to 'bell tinkle' or noise and may also cause a false answer condition.
- Page 110 This page intentionally left blank Proprietary and Confidential ©2024 Vertiv Group Corp. 3 Accessing the Console System via the Web UI...
- Page 111 Vertiv™ Avocent® ACS800/8000 Advanced Console System Installer/User Guide...
- Page 112 Vertiv.com | Vertiv Headquarters, 505 N Cleveland Ave, Westerville, OH 43082 USA © 2024 Vertiv Group Corp. All rights reserved. Vertiv™ and the Vertiv logo are trademarks or registered trademarks of Vertiv Group Corp. All other names and logos referred to are trade names, trademarks or registered trademarks of their respective owners. While every precaution has been taken to ensure accuracy and completeness here, Vertiv Group Corp.
Need help?
Do you have a question about the Avocent ACS800 and is the answer not in the manual?
Questions and answers