Table of Contents
Advertisement
Quick Links
Assembly Instructions
Combustion chamber for FHG/S3 Turbo
(from year 1995)
Translation of the original German installation instructions for technicians
Read and follow the instructions and safety informations!
Technical changes, typographical errors and omissions reserved!
M1410012_en-us | Edition 6/10/2014
Froling GesmbH | A-4710 Grieskirchen, Industriestraße 12 | www.froeling.com
Advertisement
Table of Contents

Related Manuals for Fröling FHG Turbo


Summary of Contents for Fröling FHG Turbo
- Page 1 Assembly Instructions Combustion chamber for FHG/S3 Turbo (from year 1995) Translation of the original German installation instructions for technicians Read and follow the instructions and safety informations! Technical changes, typographical errors and omissions reserved! M1410012_en-us | Edition 6/10/2014 Froling GesmbH | A-4710 Grieskirchen, Industriestraße 12 | www.froeling.com...
-
Page 2: Table Of Contents
Table of contents Table of contents General Disposal information Replacing the combustion chamber Materials supplied Tools/materials required Removing the old combustion chamber Additional steps for boilers constructed between 1995 and 2000 Installing the new combustion chamber Heating up for the first time Froling GesmbH | A-4710 Grieskirchen, Industriestraße 12 | www.froeling.com... -
Page 3: General
General Disposal information 1 General When touching hot surfaces: WARNING Severe burns are possible on hot surfaces and the flue gas pipe! When work is carried out on the boiler: ❒ Shut down the boiler according to procedure ("Off“ operating status) and allow it to cool down ❒... -
Page 4: Replacing The Combustion Chamber
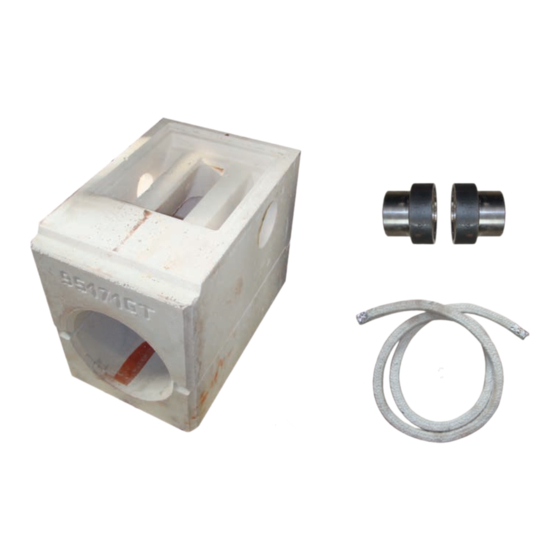
Replacing the combustion chamber Materials supplied 2 Replacing the combustion chamber 2.1 Materials supplied Combustion chamber in two parts (top + bottom) Secondary air bushing Secondary air spacer tube Secondary air seal ring Secondary air seal Combustion chamber seal Adapter pipe (only for fitting in boilers built between 1995 and 2000) 2.2 Tools/materials required The following tools/materials are required for replacing the combustion chamber: - Flathead screwdriver and spanner with AF 17 mm... -
Page 5: Removing The Old Combustion Chamber
Replacing the combustion chamber Removing the old combustion chamber 2.3 Removing the old combustion chamber ❒ Open the insulating door and combustion chamber door ❒ Gently bend open the bottom pin retainer using two flathead screwdrivers and re‐ move ❒ Pull out the door pin ❒... - Page 6 Replacing the combustion chamber Removing the old combustion chamber ❒ Break the top of the combustion chamber into pieces using a hammer and chisel ❒ Remove the combustion chamber pieces from the boiler ❒ Uncover the side secondary air connections using the hammer and chisel and re‐ move ❒...
-
Page 7: Additional Steps For Boilers Constructed Between 1995 And 2000
Replacing the combustion chamber Additional steps for boilers constructed between 1995 and 2000 ❒ Knock out the transport clamp using the hammer ❒ Thoroughly clean the boiler base and boiler casing ❒ Plane the protruding welds from the transport clamp on the boiler base using an angle grinder 2.4 Additional steps for boilers constructed between 1995 and 2000 In combustion chambers constructed between 1995 and 2000 the secondary air pipes... -
Page 8: Installing The New Combustion Chamber
Replacing the combustion chamber Installing the new combustion chamber 2.5 Installing the new combustion chamber NOTICE! Before installing the combustion chamber, note the colour markings. Only stones with a red marking may be installed! ❒ Position the pallet provided in front of the boiler ❒... - Page 9 Replacing the combustion chamber Installing the new combustion chamber ❒ Insert the secondary air seals in the secondary air seal ring and join together with the secondary air spacer tubes and grease as shown ❒ Push the assembled unit with the seal cord facing out on the right and left into the secondary air bushings and secure with sticky tape ➥...
- Page 10 Replacing the combustion chamber Installing the new combustion chamber ❒ Bend the combustion chamber seal up approx. 3-4 cm at each end ❒ Place the seal at the front of the boiler with the turned up end facing up ➥ The turned up end forms the side seal for the triangular stone ❒...
-
Page 11: Heating Up For The First Time
Heating up for the first time 3 Heating up for the first time If the boiler heats up too quickly on initial start-up: CAUTION If the output during the heating-up process is too great, the combustion chamber may be damaged as a result of drying out too rapidly! For this reason the following applies the first time you heat up the boiler: ❒...
Need help?
Do you have a question about the FHG Turbo and is the answer not in the manual?
Questions and answers