Advertisement
Quick Links
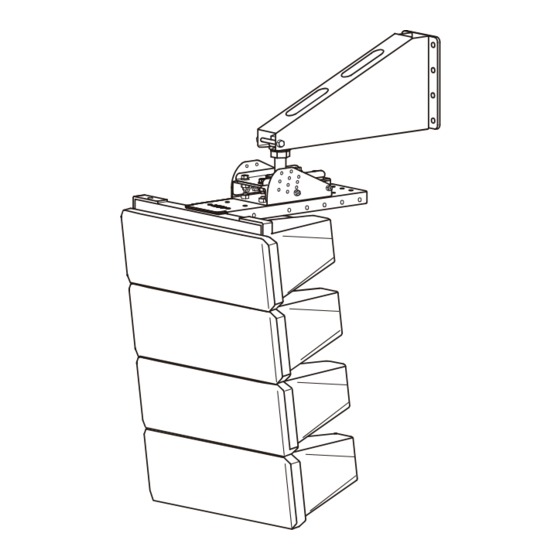
SpeAker rIggINg brAckeTS
Thank you for purchasing TOA's Speaker Rigging Bracket.
Please carefully follow the instructions in this manual to ensure long, trouble-free use of your equipment.
TAbLe OF cONTeNTS
1. SAFeTY precAUTIONS ..................................................................................................................... 1
2. geNerAL DeScrIpTION ................................................................................................................... 2
5. SUSpeNDINg THe SpeAker FrOM A ceILINg (only the T-bracket is used) ............................. 8
6. DIrecT SpeAker ceILINg MOUNTINg (only the T-bracket is used) ........................................ 10
7. SpecIFIcATIONS ............................................................................................................................... 12
1. SAFeTY precAUTIONS
• Before installation or use, be sure to carefully read
all the instructions in this section for correct and
safe operation.
• Be sure to follow all the precautionary instructions
in this section, which contain important warnings
and/or cautions regarding safety.
• After reading, keep this manual handy for future
reference.
WArNINg
Indicates a potentially hazardous situation which,
if mishandled, could result in death or serious
personal injury.
• Refer all installation work to the dealer from whom
the speaker was purchased. Installation for flying
requires extensive technical knowledge and
experience. The speaker may fall off if incorrectly
installed, resulting in possible personal injury.
• Flying Precautions
Be sure to follow the instructions below. Otherwise,
the suspension wires or belts may be off or snap
and the speaker may fall off, causing personal
injury.
· Check to confirm that the suspension wires and
belts are strong enough to withstand the speaker
load.
· The connectors of the suspension wires and belts
must be securely linked with those of the speaker.
INSTALLATION MANUAL
· All parts and components (such as enclosures,
metal pieces, and screws) must be free from any
deformation, crack, and corrosion.
· Be sure to use screws supplied with the optional
flying hardware when installing the speaker using
such hardware.
• Install the speaker only in a location that can
structurally support the weight of the speaker and
the mounting bracket. Doing otherwise may result
in the speaker falling down and causing personal
injury and/or property damage.
• Since the bracket is designed for indoor use, do not
install it outdoors. If installed outdoors, the aging
of parts causes the speaker to fall off, resulting in
personal injury. Also, when it gets wet with rain,
there is a danger of electric shock.
• Owing to the speaker's size and weight, be sure
that at least two persons are available to install the
speaker. Failure to do so could result in personal
injury.
• Do not use other methods than specified to mount
the bracket. Extreme force is applied to the bracket
and the speaker could fall off, possibly resulting in
personal injuries.
• Attach the safety wire to the speaker. If not attached,
it could fall off, resulting in personal injury.
• Use safety wires when installing speakers. If not
used, personal injury could result if a speaker
should accidentally fall.
• Use nuts and bolts that are appropriate for the
ceiling's or wall's structure and composition. Failure
to do so may cause the speaker to fall, resulting in
HY-VM7b
HY-VM7W
Advertisement

Related Manuals for Toa HY-VM7B


Summary of Contents for Toa HY-VM7B
-
Page 1: Table Of Contents
INSTALLATION MANUAL SpeAker rIggINg brAckeTS HY-VM7b HY-VM7W Thank you for purchasing TOA’s Speaker Rigging Bracket. Please carefully follow the instructions in this manual to ensure long, trouble-free use of your equipment. TAbLe OF cONTeNTS 1. SAFeTY precAUTIONS ........................1 2. geNerAL DeScrIpTION ........................2 3. -
Page 2: General Description
material damage and possible personal injury. cAUTION • Tighten each nut and bolt securely. Ensure that the bracket has no loose joints after installation Indicates a potentially hazardous situation which, to prevent accidents that could result in personal if mishandled, could result in moderate or minor injury. personal injury, and/or property damage. • Use the HX-7B or HY-7W Speaker System in combination. - Page 3 3.2. Installation Tighten the bolts securely, as instructed below. Failure to follow instructions precisely could result in a falling speaker and potential personal injury. WArNINg • Ensure that all bolts are securely inserted as far as their threads go, then securely fasten each bolt with a nut. • Tighten all the bolts with the designated tightening torque. For tightening, use a Phillips screwdriver, or open- or box-end wrench. Step 1. Attach the angle bracket to the T-bracket. Use four of the supplied bolts to secure. Angle bracket Note Only when the angle bracket’s angle is set to 25º...
- Page 4 Step 4. Attach the T-bracket to the speaker. Attach with the speaker set above as shown in the figure. Fix the T-bracket to the speaker at all 3 indicated positions. 4-1. Fix the T-bracket to both ends of the side angle plates of the speaker front. Use the supplied bolts (with spring and plain washers) and spacers. 4-2. Fix the T-bracket to the speaker’s rear bracket. Fix to the rear bracket’s endmost hole. Use the supplied bolt (with spring and plain washers), J-spacer, and flange nut. For details, refer to the procedures (1) to (3) as shown below. T-bracket Spacer ø9.2 (0.36") Flange nut for M6 (accessory) (accessory) J-spacer (accessory) (2) Insert. Protection cover Hex head Note bolt M6x12 (1) Lightly secure. Remove the (accessory) protection covers...
- Page 5 Step 7. Fit the HY-WM7B’s or HY-WM7W’s Bracket B bolt into the notch of Bracket A. In this event, a fixed washer must be positioned above the notch, and a plain washer positioned below Owing to the speaker’s size and weight, be sure that at least WArNINg two persons are available to install the unit. Failure to do so could result in personal injury. HY-WM7B or HY-WM7W (Bracket A) Plain washer for M8 Nut for M8 Fixed nut HY-WM7B or HY-WM7W (Bracket B) Fixed washer Safety bolt Notch Tightening torque:...
-
Page 6: Mounting The Speaker To A Ceiling (Using The Optional Hy-C0801 Or Hy-C0801W Bracket)
Step 11. Mount the safety wires and stopper wire. For the safety wire mounting method, refer to the operating instructions supplied with the HX-7B or HX-7W speaker. Safety wire Wall Note Shackle Rear angle bar Secure the safety wire to beams, pillars or other strong structures. Stopper wire Rear bracket Note: Mount to the rear bracket's idle hole. 4. MOUNTINg THe SpeAker TO A ceILINg (using the optional HY-c0801 or HY-c0801W bracket) Mount a single HX-7B or HX-7W Speaker System to a ceiling by using the HY-VM7 in combination with the optional HY-C0801 or HY-C0801W Speaker Ceiling Mounting Bracket. - Page 7 Step 3. Attach the angle bracket of this bracket to the T-bracket. Use four of the supplied bolts to secure. Angle bracket Hex head bolt M6 x 20 with spring and plain washers (accessory) T-bracket Tightening torque: 8 N·m Step 4. Mount the HY-VM7’s T-bracket and angle bracket, and Bracket B of the HY-C0801 or HY-C0801W to the speaker. Subsequent procedures are the same as those described in Steps 2 to 4 in the chapter, "MOUNTING THE SPEAKER ON A WALL" (p. 3 and 4). However, read "HY-WM7B or HY-WM7W" as "HY- C0801 or HY-C0801W."...
-
Page 8: Suspending The Speaker From A Ceiling (Only The T-Bracket Is Used)
5. SUSpeNDINg THe SpeAker FrOM A ceILINg (only the T-bracket is used) The HX-7B or HX-7W Speaker System can be suspended from a ceiling by only using the T-bracket. Tighten the bolts securely, as instructed below. Failure to follow instructions precisely could result in a falling speaker WArNINg and potential personal injury. • Ensure that all bolts are securely inserted as far as their threads go, then securely fasten each bolt with a nut. • Tighten all the bolts with the designated tightening torque. For tightening, use a Phillips screwdriver, or open- or box-end wrench. Step 1. - Page 9 Step 2. Mount eyebolts to the T-bracket. The T-bracket has three M8 eyebolt mounting holes. Be sure to install the eyebolts in these 3 places. Note Eyebolts are not supplied with the bracket. Prepare them separately. Step 3. Attach the suspension wires to the eyebolts, and suspend the speaker at 3 points using chains, anchor shackles, etc. WArNINg Carefully note the following instructions in order to prevent Wire accidental dropping of the speakers, which could potentially result in personal injury. • Do not join together and suspend 5 or more HX-7B or HX- Tightening torque: 8 N·m 7W speaker units in a single cluster. Eyebolt • Ensure that the installation location is structurally capable of supporting the weight of the speakers and their mounting brackets.
-
Page 10: Direct Speaker Ceiling Mounting (Only The T-Bracket Is Used)
6. DIrecT SpeAker ceILINg MOUNTINg (only the T-bracket is used) A single HX-7B or HX-7W Speaker System can be mounted to ceilings or beams by only using the T-bracket. Note Only one HX-7B or HX-7W speaker can be mounted. Two joined speakers cannot be mounted. Step 1. Mount the T-bracket to the ceiling or beam using bolts, etc. Ceiling or beam mounting bolts and nuts are not supplied. WArNINg Use nuts and bolts that are appropriate for the ceiling’s or beam’s structure and composition. Failure to do so may cause the speaker to fall, resulting in personal injury. [Mounting dimensions] Unit: mm 353 (13.9") ø9 (0.35") ø9 (0.35") (with M8 weld nut) (with M8 weld nut) 164.5 (6.48") - Page 11 Step 2. Mount the speaker system to the T-bracket. • Owing to the speaker’s size and weight, be sure that at least two persons are available to install the unit. Failure to do so could result in personal injury. • Tighten the bolts securely, as instructed below. Failure to follow instructions precisely could result in a falling WArNINg speaker and potential personal injury. · Ensure that all bolts are securely inserted as far as their threads go, then securely fasten each bolt with a nut. · Tighten all the bolts with the designated tightening torque. For tightening, use a Phillips screwdriver, or open- or box- end wrench. Mount the speaker system vertically, as shown in the figure. Fix the speaker to the T-bracket at all 3 indicated positions. 2-1. Fix the T-bracket to both ends of the side angle plates of the speaker front. Use the supplied bolts (with spring and plain washers) and spacers. 2-2. Fix the T-bracket to the speaker’s rear bracket. Fix to the rear bracket’s endmost hole. Use the supplied bolt (with spring and plain washers), J-spacer, and flange nut. For details, refer to the procedures (1) to (3) as shown below. T-bracket Spacer ø9.2 (0.36") Flange nut for M6 (accessory)
-
Page 12: Specifications
7. SpecIFIcATIONS Model No. HY-VM7B HY-VM7W Finish Steel plate, black, semi-gloss, paint Steel plate, white, semi-gloss, paint Weight 4.8 kg (10.58 lb) Product Composition T-bracket ... 1, Mounting base ... 1, Angle bracket ... 1 Note: The design and specifications are subject to change without notice for improvement. • Accessories Hex head bolt M6 x 12 with spring and plain washers ..... 2 Hex head bolt M6 x 20 with spring and plain washers ..... 4 Hex head bolt M6 x 30 with spring and plain washers ..... 1 Hex head bolt M8 x 20 with spring and plain washers ..... 4 Spacer ø9.2 (0.36") ..............2 J-spacer ..................1 Flange nut for M6 ..............
Need help?
Do you have a question about the HY-VM7B and is the answer not in the manual?
Questions and answers