Advertisement
Table of Contents
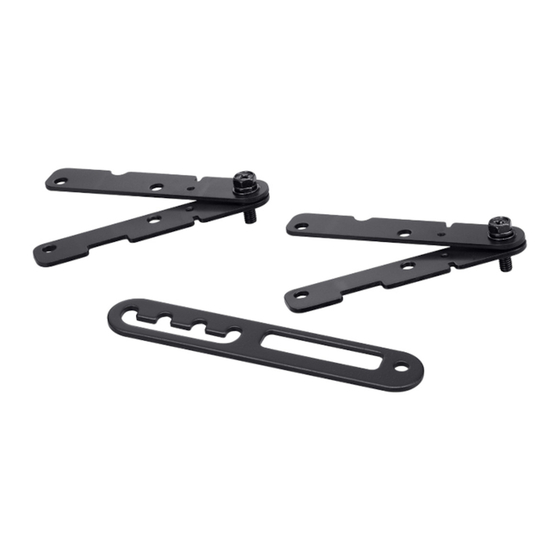
SPEAKER EXTENSION BRACKETS
TOA's HY-CN1 series brackets are used to join 2 HX-5 series speaker systems, typically for the purpose of achieving
better speaker directivity control in lower frequencies. Such directivity control helps achieve clearer and longer-range
sound reproduction in locations where sound efficiency may be hampered by conditions like long reverberation time or a
high level of background noise.
1. SAFETY PRECAUTIONS
• Before installation or use, be sure to carefully read all the
instructions in this section for correct and safe operation.
• Be sure to follow all the precautionary instructions in this
section, which contain important warnings and/or
cautions regarding safety.
• After reading, keep this manual handy for future
reference.
WARNING
Indicates a potentially hazardous situation which,
if mishandled, could result in death or serious
personal injury.
• Install the unit only in a location that can structurally
support the weight of the unit and the speaker. Doing
otherwise may result in the speaker falling down and
causing personal injury and/or property damage.
• (HY-CN1B and HY-CN1W only)
Since the unit is designed for indoor use, do not install it
outdoors. If installed outdoors, the aging of parts causes
the unit to fall off, resulting in personal injury.
• Do not use other methods than specified to mount the
unit. Extreme force is applied to the unit and the speaker
could fall off, possibly resulting in personal injuries.
• Tighten each nut and bolt securely. Ensure that the unit
has no loose joints after installation to prevent accidents
that could result in personal injury.
• Use the specified speaker in combination. Doing otherwise
may cause the speaker to fall off, resulting in personal
injury.
• Do not mount the unit in locations exposed to constant
vibration. The unit can be damaged by excessive vibration,
potentially causing the speaker to fall, which could result
in personal injury.
• Avoid installing the speaker in locations close to the
seashore or in indoor swimming facilities that are not well
ventilated. In such locations the unit may be vulnerable to
corrosion, eventually allowing the speaker to fall resulting
in personal injury.
CAUTION
Indicates a potentially hazardous situation which,
if mishandled, could result in moderate or minor
personal injury, and/or property damage.
INSTALLATION MANUAL
HY-CN1B, HY-CN1W,
HY-CN1B-WP, HY-CN1W-WP
•
Avoid touching the unit's sharp metal edge to prevent
injury.
•
Have the unit checked periodically by the shop from
where it was purchased. Failure to do so may result in
corrosion or damage to the unit that could cause the unit
to fall, possibly causing personal injury.
2. PRECAUTIONS WHEN INSTALLING
THE HY-CN1B-WP AND HY-CN1W-WP
• Only the HY-CN1B-WP and HY-CN1W-WP can be
installed under eaves.
• Only the HX-5B-WP and HX-5W-WP speaker systems
can be installed under eaves.
· All speaker modules must point downward from the
horizontal. Failure to do so could adversely affect
their intended performance as a splash-proof speaker
and their weather-resistant capabilities, leading to
malfunction.
· When installing the HX-5B-WP or HX-5W-WP speaker
outdoors, be sure to mount it under eaves wherever
possible to prevent direct exposure to rain and wind.
Failure to follow this instruction could cause the speaker
to exceed its capabilities as a splash-proof speaker,
potentially leading to malfunction.
3. FINISHED ASSEMBLY DIAGRAM
Unit: mm (inches)
Front bar bracket
(component of HY-CN1 series)
Rear bar bracket
(component of HY-CN1 series)
Advertisement
Table of Contents

Related Manuals for Toa HY-CN1B


Summary of Contents for Toa HY-CN1B
- Page 1 HY-CN1B, HY-CN1W, HY-CN1B-WP, HY-CN1W-WP TOA's HY-CN1 series brackets are used to join 2 HX-5 series speaker systems, typically for the purpose of achieving better speaker directivity control in lower frequencies. Such directivity control helps achieve clearer and longer-range sound reproduction in locations where sound efficiency may be hampered by conditions like long reverberation time or a high level of background noise.
- Page 2 4. SPEAKER EXTENSION [Before joining HX-5 series...] Step 1. Remove the front grill from the speaker module of each HX-5 series by unscrewing 4 bolts with the supplied hex head wrench. Step 2. Remove the front end bars from each module by unscrewing 4 bolts. Note: Use these bolts in Step 4.
- Page 3 [Joining HX-5 series] Set the speakers on their sides, handles facing up. Step 3. Join the HX-5 series using the front bar brackets. Use the removed bolts in Step 2 to attach the front bar brackets. WARNING Bolts can be tightened using either a Phillips screwdriver or a wrench, but be sure to finish the tightening with the wrench to ensure optimum tightness.
- Page 4 HX-5 series. Rear plate 6. SPECIFICATIONS The specifications of this product are available in TOA DATA Library (https://www.toa-products.com/international/). Scan the QR Code at right with your mobile phone camera to access the WEB site and search for this product number.
Need help?
Do you have a question about the HY-CN1B and is the answer not in the manual?
Questions and answers