Table of Contents
Advertisement
Quick Links
Advertisement
Table of Contents

Related Manuals for Autool LM120


Summary of Contents for Autool LM120
- Page 1 AUTOOL LM120/LM120+ Digital Manifold Gauge User Manual www.autooltech.com...
- Page 2 企业标准 / Corporate standard: Q/OR 005-2023...
- Page 3 AUTOOL. The information contained herein is designed only for the use of this unit. AUTOOL is not responsible for any use of this information as applied to other units. ●...
-
Page 4: Table Of Contents
TABLE OF CONTENTS Cautions .................... 2 Warning..................2 Product Introduction ................ 2 Overview ..................2 International electrical symbols ............ 3 Specifications ................3 Product Structure ................5 Structure diagram................. 5 Function Instructions............... 6 1. Refrigerant filling and pressure inspection ....... 6 2. -
Page 5: Cautions
CAUTIONS Warning This manual includes instructions and precautions for operation and maintenance. Failure to use the instrument in accordance with this manual could cause damage to instrument. The pressure measured by the digtal manifold pressure tester is gauge pressure. Pressure testing ranges from -101Kpa to 6Mpa (-0.1bar to 60bar). The limit pressure is 10Mpa (100bar). -
Page 6: International Electrical Symbols
● The instrument uses high-strength engineering plastics and flexible non-slip silicone design, the whole machine is solid and comfortable to hold. Built-in 32-bit digital processing unit and high-precision data acquisition unit, high data and stability. Large-size liquid crystal display, LCD backlight support, data display clear and easy to read, convenient light operation. - Page 7 Pressure Test Accuracy ±0.5%(FS) +5dgt Pressure Overload Limit 10000Kpa(10Mpa; 100bar) Vacuum Test Relative Vacuum Kpa; Mpa; bar; inHg; PSI; Vacuum Test Unit -101Kpa~0Kpa Vacuum Test Range Vacuum Test Resolution 1Kpa Temperature Test Unit °C(Celsius), °F(Fahrenheit) Temperature Test Range -40~150°C(-40~302°F) 0.1°C(-40~99.9°C), 1°C(100~150°C) Temperature Test Resolution 0.1°F(-40~99.9°F), 1°F(100~302°F) Temperature Test Accuracy...
-
Page 8: Product Structure
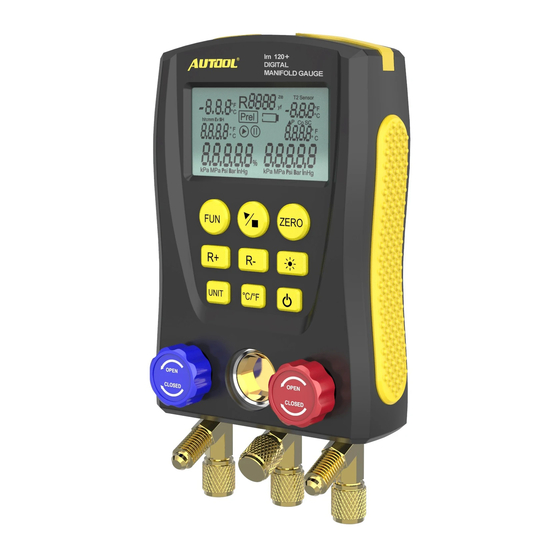
PRODUCT STRUCTURE Structure Diagram T1 Sensor T2 Sensor °C °C °C °C Clamp-on temperature probe socket LCD display Run / Stop button: In Leak Test Mode, Test Control Button Function button: test function mode switch button R+/R-Refrigerant type selection buttons: Switch to select different types of working refrigerants. -
Page 9: Function Instructions
FUNCTION INSTRUCTIONS 1. Refrigerant Filling And Pressure Inspection A-Turn off the blue valve and red valve. ● ● B-Power on the instrument. Then make sure if the LCD displays pressure test status as below picture. If not, press the Function button to switch it. - Page 10 G-Turn on the refrigerant valve and gently press the pressure release ● valve to vent the air in the connecting hose. ● H-When the refrigeration system stops, turn on the high pressure valve (red valve) and fill with a certain amount of refrigerant and then shut the valve quickly.
-
Page 11: Vacuum Operation
T1 Sensor T2 Sensor °C °C °C °C ● The instrument can calculate the SH - Superheat and SC - Subcool- ing as shown below as long as the tested refrigerant is preset and clamp-on temperature probes are connected well. T1 Sensor T2 Sensor °C... -
Page 12: Pressure Leak Test
flowing!!!!! ) (Connected clamp-on temperature probes will not affect the operation..) ● F-Turn on the blue valve and red valve, and start the vacuum pump. G-After the vacuum operation is completed, turn off the blue valve ● and red valve, then shut the vacuum pump. H-At this time, pressure leak test mode can be used to check leakage ●... -
Page 13: Common Problems
hh:mm At this time, the lower left corner records the initial pressure value; ● the lower right corner shows the instantaneous pressure value; the “ΔP” display area shows the difference between initial pressure value and instantaneous pressure value. The time display area shows how long the leak test lasts in the format ●... -
Page 14: Potential Leak Points
4. Potential Leak Points Every hose terminal comes with a nylon pad that is limited a certain ● life of using. Over use or other situation will make it defective, which result in leakage. The instrument refrigerant inlet (the middle port of the instrument ) has a port with valve core , which is used to vent the air in the hoes after connecting the refrigerant to the instrument. -
Page 15: Sensible Heat And Latent Heat
The lower subcooling can make the refrigeration capacity of the ● system better. ● Adding subcooling loop and economizer in the refrigeration system is to increase the subcooling for refrigerant increasing. Every hose terminal comes with a nylon pad that is limited a certain ●... - Page 16 ● Wet bulb temperature: a wet cloth is wrapped around the thermome- ter, and the temperature indicates a drop due to the evaporation of water. The temperature at this time is called the wet-bulb tempera- ture. The device, which has both the dry ball thermometer and the wet ●...
-
Page 17: Maintenance Service
MAINTENANCE SERVICE ● Our products are made of long-lasting and durable materials, and we insist on perfect production process. Each product leaves the factory after 35 procedures and 12 times of testing and inspection work, which ensures that each product has excellent quality and performance. Maintenance To maintain the performance and appearance of the product, it is recom- mended that the following product care guidelines be read carefully:... -
Page 18: Warranty
The product breakdown because the user does not follow product ● instructions to use or maintain the product. We AUTOOL pride ourselves on superb design and excellent service. It would be our pleasure to provide you with any further support or services. Disclaimer ●... -
Page 19: Return & Exchange Service
RETURN & EXCHANGE SERVICE ● If you are an AUTOOL user and are not satisfied with the AUTOOL products purchased from the online authorized shopping platform and offline authorized dealers, you can return the products within seven days from the date of receipt; or you may exchange it for another product of the same value within 30 days from the date of delivery.
Need help?
Do you have a question about the LM120 and is the answer not in the manual?
Questions and answers