Table of Contents
Advertisement
Quick Links
Advertisement
Table of Contents

Related Manuals for Autool LM110


Summary of Contents for Autool LM110
- Page 1 AUTOOL LM110 Digital Manifold Gauge User Manual www.autooltech.com...
- Page 2 Co., Ltd., no company or individual may copy or back up this manual in any form (electronic, mechanical, photocopying, recording, or other forms). This manual is specially designed for the products of AUTOOL, and our company will not be liable to the consequences caused by using this manual as the operation instructions for other equipments.
-
Page 3: Safety Rules And Precautions
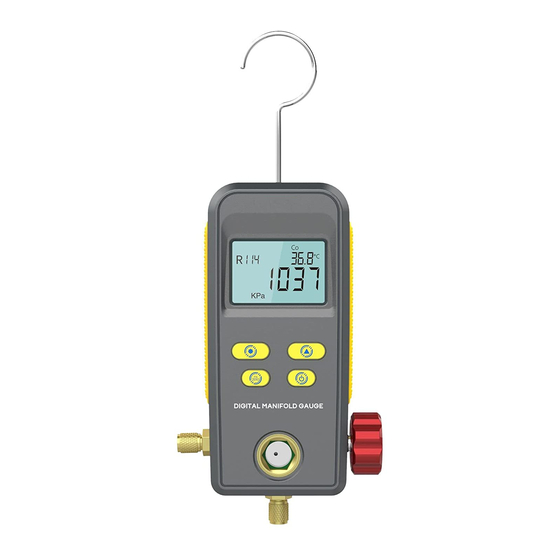
1. Overview This is an auxiliary instrument for installations, testing and maintenance of refrigeration equip-ment such as air conditioners and cold storage. It comes with three main functions with digital readings and multi-unit switching. Build-in 89 refrigeration database drives it provide much more accurate readings. High-strength engineering plastic and flexible non-slip silicone make instrument solid and comfortable to hold. -
Page 4: International Electrical Symbols
3. International Electrical Symbols DC/AC Warning High Voltage(Electric Shock) Earth Double Insulation Fuse Battery 4.Specifications Pressure Test: Gauge Pressure; Pressure Test Unit: Kpa; Mpa; bar; inHg; PSI; Pressure Test Range: 0 Kpa – 6000 Kpa; Pressure Test Resolution: 1 Kpa Pressure; Test Accuracy: +/- 0.5 %(FS) + 5dgt;... - Page 5 Power Supply: 3 X 1.5V (SIZE.AA / LR6); Dimension: 184 X 107 X 45.5mm / 7.3 X 4.3 X 1.8 inch ; Weight(excludes battery): 0.446kg / 1 lb. 5. Descriptions 1- LCD Display; 2- POWER/BACKLIGHT Button: POWER BACKLIGHT (long press)(short press); 3- FUNCTION/ ZERO Button: Pressure Test Zero (long press) Test Function Switch (short press);...
- Page 6 1. Turn off the valve. 2. Press POWER Button to start the instrument. Press FUNCTION Button to select Pressure Test Interface with Evaporation Temperature or Condensation Temperature as below figures. Pressure Test Interface with Pressure Test Interface with Evaporation Temperature Condensation Temperature 3.
- Page 7 3.Long press SETTING button to enter setting mode for adjusting unit.(see 6-4 SETTING) 4.There will be 10 digits displayed after instrument turned on. Long press ZERO button to zero reading. 5.Operate vacuum according to instructive operation of refrigeration system. 6.Obtain test reading of vacuum pressure and vacuum degree. 7.Turn off valve and vacuum source.
- Page 8 Test Time Duration 3.Connect instrument to refrigeration system. Then operate vacuum or fill some refrigerant to system. Shut the valve and start test by pressing SETTING button when reading keeps stable. See below figure with flashing delta signal. 4.At this time instrument records original pressure and test period. Press ARROW button could switch display to see difference value of pressure , original pressure and test time duration respectively.
-
Page 9: Common Problems
3.Flashing parameter in LCD display could be changed by pressing ARROW button. Type of refrigerant selection increment goes forward in single way, such as R1-> R2->R3 Long press ARROW button can change selection direction. 4.Short press SETTING button to switch parameter selection. 5.When all parameters are set, long press SETTING button to save selected item. - Page 10 Superheat: evaporation outlet temperature- evaporation temperature. The lower subcooling can make the refrigeration capacity of the system better. Adding subcooling loop and economizer in the refrigeration system is to increase the subcooling for refrigerant increasing. The degree of expansion of the expansion valve (refrigerant charge) affects the degree of super- heat.
-
Page 11: After-Sale Service
The right of the final interpretation of the products belongs to AUTOOL, and we will not be liable to any loss or damage caused by misunderstanding.
Need help?
Do you have a question about the LM110 and is the answer not in the manual?
Questions and answers