
Related Manuals for HornBlasters OUTLAW 127H


Summary of Contents for HornBlasters OUTLAW 127H
- Page 1 OUTLAW INSTALLATION MANUAL 127H/228H WARNING: To ensure the longevity of your system, reading and following these instructions are recommended. Make sure to change filters and to drain the moisture from your tank on a regular basis.
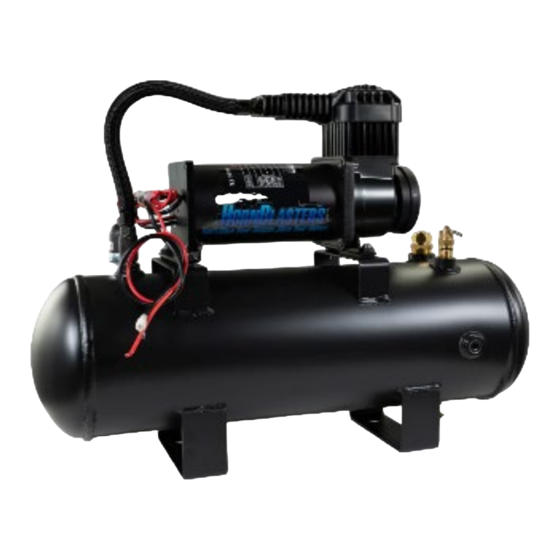
- Page 2 Outlaw 127H / 228H Installation Manual Kit Overview Thank you for your purchase! The Outlaw 127H and 228H kits are designed to bring a true, loud train horn sound to your vehicle. This horn kit includes the necessary components and wiring to install and use this horn within 4-5 hours of your time.
- Page 3 Outlaw 127H / 228H Installation Manual Outlaw 127H / 228H Kit Contents HornBlasters Part # MC-127H or MC-228H Air Source Kit • (127H or 228H) • AH-C3B Outlaw Train Horn • 3/8” Electric Solenoid Valve • VA-6C (preinstalled to horn) Universal Wiring Kit •...
- Page 4 Outlaw 127H / 228H Installation Manual Important Safety Tips and Information Caution: To prevent the risk of shock or electrocution: Do not disassemble any electrical components of this horn kit (air compressor, • air valve, etc.) Do not operate any component where it can fall or be submerged in water of •...
- Page 5 ⅞ ” Wrench Crimp Tool Compatible Add-ons for this horn kit (available @ www.HornBlasters.com) Tire Infl ation K it ......................AA-TIK-H Inflate the tires on your vehicle with the air tank in your horn kit! This kit features a quick connect coupler that is remotely mounted up to 15’ from the air tank. A tire inflation gun is included along with other accessories.
- Page 6 Outlaw 127H / 228H Installation Manual Preparing for the Install APPLYING TEFLON TAPE TO BRASS FITTINGS Before the air tank can be assembled each brass fitting must be wrapped with Teflon tape to prevent air leaks. Teflon tape is used as a sealing material between the brass fitting and the thread on the tank itself so that air doesn’t leak from the small...
- Page 7 Outlaw 127H / 228H Installation Manual Preparing for the Install COMPRESSOR FILTER RELOCATION (not necessary if mounting compressor in enclosed/dry area) Your air system includes an air filter relocation kit, as shown on the right. This kit allows you to relocate the air filter up to 6 feet away, protecting it from the elements and road debris.
- Page 8 Outlaw 127H / 228H Installation Manual PREPARING FOR THE INSTALL PLUMBING THE LINE TO THE AIR TANK Look at the air outlet fitting on your air source. This is a compression-style tube fitting setup for ½” OD line. Start by removing the nut on the fitting by twisting it counter-clockwise.
- Page 9 Outlaw 127H / 228H Installation Manual PREPARING FOR THE INSTALL FINDING THE BEST INSTALL LOCATION FOR THE COMPRESSOR AND TANK The air source can be installed in the trunk of your car or SUV. While this can also fit in the engine bay on some vehicles, it isn’t the ideal location due to the heat generated by the engine.
- Page 10 Outlaw 127H / 228H Installation Manual PREPARING FOR THE INSTALL MOUNTING THE AIR TANK Look at your air source. The air source has two legs with two holes each. These holes are used to secure the air source to the mounting surface we plan on using.
- Page 11 Outlaw 127H / 228H Installation Manual Preparing for the Install Connecting the horn to the tank The air valve on the Outlaw horn is setup with a compression fitting ready to accept the ½” line that came with the horn. The air line will plumb onto this air valve the same way as the air tank.
- Page 12 Outlaw 127H / 228H Installation Manual Wiring the Compressor Preparing the Fuse Holder The fuse holder in your Universal wiring kit is in a loop. Use a sharp pair of scissors to cut the loop in half at the dotted line shown to the right.
- Page 13 Outlaw 127H / 228H Installation Manual Wiring the Compressor Compressor Red Wire / Pin 30 on Relay The red wire on the pressure switch connects directly to pin 30 on the relay. Connect the red wire directly to this pin on the relay.
- Page 14 Outlaw 127H / 228H Installation Manual Wiring the Compressor Relay Ground Lead (pin 85) / Compressor Ground Lead The black wire on the compressor and ground for the relay (pin 85) can be terminated to the same point for simplicity if they are within reach of each other and can be terminated to the frame or other good ground point.
- Page 15 Outlaw 127H / 228H Installation Manual Wiring the Horns Connecting the Train Horn to the Steering Wheel Connecting our train horns to the steering wheel allows you to honk your horns by pressing the wheel like you would for the stock horn. There are two ways you can do this.
- Page 16 Outlaw 127H / 228H Installation Manual CONNECTING THE HORNS TO THE STEERING WHEEL WITH A TOGGLE SWITCH Make sure that you disconnect the stock horn wire before trying to connect the OEM horn lead to the toggle switch. You can pop the OEM horn fuse if you accidentally touch the wire to bare metal.
- Page 17 Outlaw 127H / 228H Installation Manual Finishing the Install Testing the Compressor Go back to your fuse holder from page 11. You can insert one of the included 30- AMP fuses into the fuse holder. Make sure it is seated into the holder all the way, it can take some force.
- Page 18 Outlaw 127H / 228H Installation Manual Troubleshooting Compressor Issues • Compressor Doesn't Turn On: Try connecting directly to a battery. Connect the red wire to the positive terminal. Connect the black wire to the negative terminal. Double-check pin 86 on the relay for 12V power.
- Page 19 Outlaw 127H / 228H Installation Manual Troubleshooting Horn Issues • Horns Won't Honk: Check the air tank for pressure. Inspect the air gauge on the tank. The tank should be filling to ~150 PSI before stopping. Inspect wiring of the horn solenoid valve.
Need help?
Do you have a question about the OUTLAW 127H and is the answer not in the manual?
Questions and answers