Advertisement
Table of Contents
Download the app
& activate product
Warning notices: Before using this product, please read this manual carefully and keep it for future reference.
The design and specifications are subject to change without prior notice for product improvement.
Consult with your dealer or manufacturer for details.
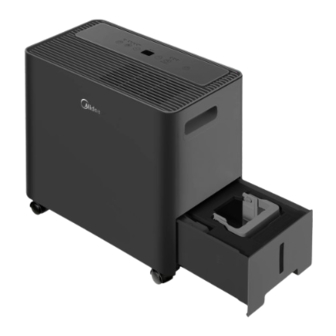
The diagram above is just for reference. Please take the appearance of the actual product as the standard.
Dehumidifier
USER MANUAL
MAD22S1AWWT
MAD35S1AWWT
MAD50PS1AWBL
MAD
Advertisement
Table of Contents

Related Manuals for Midea MAD


Summary of Contents for Midea MAD
- Page 1 Dehumidifier USER MANUAL Download the app MAD22S1AWWT & activate product MAD35S1AWWT MAD50PS1AWBL Warning notices: Before using this product, please read this manual carefully and keep it for future reference. The design and specifications are subject to change without prior notice for product improvement. Consult with your dealer or manufacturer for details.
-
Page 2: Table Of Contents
THANK YOU LETTER Thank you for choosing Midea! Before using your new Midea product, please read this manual thoroughly to ensure that you know how to operate the features and functions that your new dehumidifier offers in a safe way. -
Page 3: Safety Instructions
SAFETY PRECAUTIONS Must read the warning message Read Safety Precautions Before Operation and Installation. To prevent injury to the user or personal and property damage, these instructions must be followed. Incorrect operation due to ignoring of instructions may cause harm or damage. The level of risk is shown by the following indications. Explanation of Symbols WARNING The signal word indicates a hazard with a medium level of risk which, if not avoided, may result... - Page 4 CAUTION • This appliance is not intended for use by persons (including children) with reduced physical, sensory or mental capabilities or lack of experience and knowledge, unless they have been given supervision or instruction concerning use of the appliance by a person responsible for their safety. •...
- Page 5 Electronic Work NOTE DISPLAY The cographs are for explanation purpose only. Your machine may be slightly different. The actual shape shall prevail. POWER MAIN SUPPLY CONTROL CORD WARNING BEFORE PERFORMING ANY ELECTRICAL OR WIRING WORK, TURN OFF THE MAIN POWER TO THE SYSTEM. IMPORTANT NOTE: Read this manual CAUTION:...
- Page 6 WARNING (for using R32 refrigerant) Flammable! Refrigerant R32 is used within appliance. • When maintaining or disposing the appliance, the refrigerant (R32) shall be recovered properly, shall not discharge to air directly. • Compliance with national gas regulations shall be observed. •...
-
Page 7: Get To Know Your Product
GET TO KNOW YOUR PRODUCT Identification of Parts Name of each component of the product Air outlet grille Control panel Handle (both sides) Air filter (Air inlet grille) Front panel Continuous drain hose outlet Water level Pump drainage (only for pump model) window Power plug Side Access... -
Page 8: Product Installation
PRODUCT INSTALLATION Positioning the Unit Safe distance requirements 40cm or more 40cm or more 20cm 20cm or more or more 40cm or more Fig. 2 NOTE Casters (At four points on the bottom of unit) • Casters can move freely. •... - Page 9 When Using Your Product Preparations for product use NOTE When the water in the bucket reaches to a certain level, please be careful to move the machine to avoid it tipping over. First time using Working condition requirement Ensure the water plug Min.
- Page 10 Caster Installation Cushion pad (1 pc) Caster (4 pc) Pull out the side access tank. Take out a cushion pad and four casters from the bucket, then reinstall the side access tank. Before inserting Correctly inserted Tilt the unit on its side and Rotate the unit and hold it with one hand, then Leave the unit hold it with one hand, then...
-
Page 11: Get To Know Your Features
GET TO KNOW YOUR FEATURES Control Panel Features Operation Display NOTE The following control panels are for explanation purpose only. The control panel of the unit you purchased may be slightly different according to the models. Your machine may not contain some indicators or buttons. The actual shape will remain the same. - Page 12 1. POWER ON/OFF Button: Press to turn the dehumidifier on and off. WIRELESS Button Press and hold on the POWER button for 3 seconds to initiate the Wireless connection mode. The LED DISPLAY shows ’AP’ to indicate you can set Wireless connection. 2.
- Page 13 3. MODE Function: Close doors and Windows while operating in this mode. Press the button to select the mode you want, 2. For best results, please ring out excess moisture from as shown: Set → Cont. → Dryer → Comfort. the clothes before using the dryer mode.
- Page 14 7. PUMP Function (only for pump model): More Features Press the button to activate the built-in pump function. Pump Mode Indicator will be on. When AUTO SHUT OFF using this function, the unit will automatically The dehumidifier shuts off when the bucket is full, or pump water out until the water tank is empty.
-
Page 15: Removing Collected Water
REMOVING COLLECTED WATER When Your Bucket Is Full There are different ways to remove collected water. Type 1: Type 3: Type 2: Pump drainage Bucket drainage Water hose drainage (only for pump model) (continuous) Type 1: Bucket drainage • When the unit is off, if the bucket is full, the Full indicator light will turn on. •... - Page 16 NOTE • When you remove the bucket, do not touch any parts inside of the unit. Doing so may damage the product. Be sure to push the bucket gently all the way into the unit. Banging the bucket against anything or failing to push it in securely may cause the unit not to operate.
- Page 17 Type 3: Pump Drainage (only for pump model) To connect pump drain hose: • Press the tightening ring of drainage joint (as shown as Fig. 6); • Keep pressing the grey ring while pulling out the plug. (as shown as Fig. 7); •...
-
Page 18: App Instructions
The app is available for both iOS and Android, however older versions may no longer be compatible. Please keep the app updated with the latest version. Midea makes no guarantee of compatibility and is not responsible for issues arising as a consequence thereof. - Page 19 Using the SmartHome App CAUTION Ensure that your mobile phone is connected to the wireless network. Bluetooth must be turned on. The device must also be powered up. Step 1: Download the SmartHome app Scan the QR code below to download the SmartHome app from app store or search for it directly on the Google Play Store or Apple’s App Store.
- Page 20 2) If no such message appears, proceed as follows: Tap on “+” and select your device in the list of nearby available devices. If your device is not listed, please add your device manually, first selecting the device category e.g. Dehumidifier. 3) Follow the steps in the app to connect your device to the wireless network.
- Page 21 Compliance We, hereby declare that this dehumidifier is in compliance with the relevant provisions of RE Directive 2014/53/EU. Wireless module models: US-SK105: FCC ID: 2ADQOMDNA21 IC: 12575A-MDNA21 This device complies with Part 15 of the FCC Rules and it contains licence exempt transmitter(s) / receiver(s) that comply with Innovation, Science and Economic Development Canada’s licence-exempt RSS(s).
-
Page 22: Cleaning And Maintenance
CLEANING AND MAINTENANCE How To Clean & Care For Your Product Turn the dehumidifier off and disconnect the plug from the power source before cleaning. 1. Clean the Grill and Case • Use water and a mild detergent. Do not use bleach or abrasives. •... - Page 23 When Not Using The Unit For Long Time Periods Step 2 Step 3 Step 1 *Please refer to the actual plug, and the legend is Remove water plug to drain for reference only. any excess water. Remove water from the bucket. Re-insert the water plug.
-
Page 24: Troubleshooting Tips
TROUBLESHOOTING TIPS Malfunction Diagnosis Before calling for service, review the chart below first. This list includes common occurrences that are not the result of defective workmanship or materials in this appliance. Problem What to check Make sure the dehumidifiers plug is pushed completely into the outlet. Check the house fuse/circuit breaker box. -
Page 25: Warranty
Operating Instructions. 2) Damages caused by serviced performed by persons other than those authorized by Midea customer service; or external causes such as abuse, misuse, inadequate power supply or acts of God. -
Page 26: Return Policy
RETURN POLICY Return policy save your receipt Questions about installing or operating your Midea product? • If you still need assistance, please call Customer Service at 1-866-646-4332. • Have your sales receipt, serial number and product model number available when you call. - Page 28 2023 MADSW 16120100A19535...
Need help?
Do you have a question about the MAD and is the answer not in the manual?
Questions and answers
How do you locate and access the evaporator and condenser coils on a Midea MAD50PS1WBL Energy Star Smart dehumidifier in order to clean them? Thank you.
The manual does not provide instructions for locating or accessing the evaporator and condenser coils on the Midea MAD50PS1WBL Energy Star Smart dehumidifier for cleaning.
This answer is automatically generated
Is there a better explanation for installing the casters on model mad22s1awwt
To install the casters on the Midea model MAD22S1AWWT:
1. Remove the dehumidifier from the bucket.
2. Slide each caster into the slot on the bottom corner of the bucket.
3. Place the retaining block into the slot to hold the caster in place.
4. Repeat for all four corners until all casters are installed.
This answer is automatically generated