Table of Contents
Advertisement
Quick Links
Advertisement
Table of Contents

Related Manuals for d&b audiotechnik SL


Summary of Contents for d&b audiotechnik SL
- Page 1 XSLi Rigging manual 1.2 en...
- Page 2 General information XSLi Rigging manual Version: 1.2 en, 09/2023, D2756.EN .01 Copyright © 2023 by d&b audiotechnik GmbH & Co. KG; all rights reserved. Keep this document with the product or in a safe place so that it is available for future reference. We recommend you to regularly check the d&b website for the latest version of this document.
-
Page 3: Table Of Contents
Contents Contents Safety..................4 1.1 Intended use................4 1.2 d&b ArrayCalc................4 1.3 General safety................4 1.4 System components and weights/Load capacity..... 5 1.4.1 Wind loads................5 1.5 Operational safety..............5 Rigging concept and components......... 6 2.1 Mounting frames and adapter........... 6 2.1.1 Z5787.000 XSLi Top mounting frame........ -
Page 4: Safety
In addition, d&b provides related video tutorials which can also be found on the d&b website at www.dbaudio.com www.sl-series.com. 1.3 General safety ▪ Installation and setup should only be carried out by qualified and authorized personnel observing the valid national Rules for the Prevention of Accidents (RPA). -
Page 5: System Components And Weights/Load Capacity
Safety 1.4 System components and weights/Load capacity System components and weights Load capacity Loudspeaker Z0776/Z0777 XSLi8/XSLi12 cabinets 39 kg (86 lb) NOTICE! Z0778 XSLi-SUB cabinet 66 kg (146 lb) Z5787.000 XSLi Top mounting frame Rigging components The Z5787.000 XSLi Top mounting frame is designed to support a Z5787.000 XSLi-TOP Mounting frame 10 kg (22 lb) total system weight of 500 kg (1100 lb) - SWL including all... -
Page 6: Rigging Concept And Components
Rigging concept and components Rigging concept and components 2.1 Mounting frames and adapter The d&b XSLi cabinets are supplemented by two dedicated mounting frames (Z5787.000 XSLi Top Mounting frame and Z5788 XSLi-SUB Mounting frame) and the additional Z5780 XSLi-SUB Adapter frame. These components allow setting up the following array configurations: XSLi-TOP array, 8-deep with:... -
Page 7: Z5787.000 Xsli Top Mounting Frame
Rigging concept and components 2.1.1 Z5787.000 XSLi Top mounting frame Intended use The Z5787.000 XSLi Top mounting frame is designed to support a total system weight of 500 kg (1100 lb) - SWL including all rigging components. This allows the suspension of a maximum of 12 x XSLi-TOP cabinets. -
Page 8: Z5788 Xsli-Sub Mounting Frame
Rigging concept and components 2.1.2 Z5788 XSLi-SUB Mounting frame Intended use The Z5788 XSLi-SUB Mounting frame is designed to support a total system weight of 500 kg (1100 lb) - SWL including all rigging components. This allows the suspension of a maximum of 7 x XSLi-SUB cabinets. Scope of supply Please verify the shipment for completeness and proper condition of the items. -
Page 9: Z5780 Xsli-Sub Adapter Frame
Rigging concept and components 2.1.3 Z5780 XSLi-SUB Adapter frame Intended use The Z5780 XSLi-SUB Adapter frame is intended to suspend mixed array setups consisting of XSLi TOP cabinets underneath XSLi-SUB cabinets. Scope of supply Please verify the shipment for completeness and proper condition of the items. -
Page 10: Fixing Bolts
Rigging concept and components 2.2 Fixing bolts WARNING! Potential risk of personal injury and/or damage to material! Ensure all Fixing bolts are fully inserted and secured with their ring cotters [R] before lifting any load. The function of the ring cotters is described in Þ Chapter 2.3 "Ring cotters"... -
Page 11: Rigging Mechanism Of The Cabinets
Rigging concept and components 2.4 Rigging mechanism of the cabinets The cabinets are mechanically connected to the Mounting frames/ Mounting adapter and subsequent loudspeakers using the Front links attached to both sides of the front rigging strands of the cabinets and the central Splay/Rear link on the rear rigging strand of the cabinet. -
Page 12: Splay/Rear Link Mechanism
Rigging concept and components 2.4.2 Splay/Rear link mechanism TOP cabinet 1. Unlock and remove the ring cotters of the fixing bolts. 2. Remove the fixing bolts and fold out the Splay link. SUB cabinet The Rear link of the cabinet is kept in its park position by a spring loaded fixing device. - Page 13 Rigging concept and components T-handle assembly To attach a T-handle, proceed as follows: 1. Press the button to Release the locking mechanism ( [R]). 2. Insert the handle into the respective socket until it is fixed in place. 3. Release the button to Lock the handle ( [L]).
-
Page 14: Suspension Of The Frames
Suspension of the frames Suspension of the frames The center bars of the mounting frames are equipped with a hole grid allowing either single or dual pickpoint suspension using the enclosed 1 t shackles. With single pickpoint suspension, the position of the shackle defines the vertical aiming of the entire array. -
Page 15: Xsli Arrays And Assembly Procedures
XSLi arrays and assembly procedures XSLi arrays and assembly procedures Overview XSLi-TOP array, 12-deep with: XSLi-SUB colum, 6-deep, 2.5° splay with: Mixed array configuration with: Z5787.000 XSLi Top Mounting frame Z5788 XSLi-SUB Mounting frame Z5788 XSLi-SUB Mounting frame Z5780 XSLi-SUB Adapter frame Refer to: Refer to: Þ... -
Page 16: Xsli-Top Array
XSLi arrays and assembly procedures Inspections before setup Before setting up the array, carry out a visual inspection of all system components for faults. This also includes the loudspeakers and in particular the rigging parts of the cabinets (Front and Splay/Rear links). - Page 17 XSLi arrays and assembly procedures 4. At the rear, insert the first fixing bolt into the [0°] hole and secure the bolt with its ring cotter. 5. Insert the second fixing bolt into the [2°] hole and secure the bolt with its ring cotter. 3.
- Page 18 XSLi arrays and assembly procedures 5. Splay link of the last TOP cabinet To avoid either rattling during operation or damage to the Splay link of the last cabinet, we recommend you to remove the link and store it in a safe place. To remove the link, proceed as follows: 1.
-
Page 19: Xsli-Sub Column
XSLi arrays and assembly procedures 4.3 XSLi-SUB Column 4.3.1 Remarks and limitations NOTICE! In connection with the Z5788 XSLi-SUB Mounting frame, a maximum of 7 x XSLi-SUB cabinets can be flown. 4.3.2 Order of assembly 1. Prepare the first cabinet Þ... - Page 20 XSLi arrays and assembly procedures 4. Add further SUB cabinets 1. Prepare the Front and Rear links of the next cabinet as described in Þ Chapter 2.4 "Rigging mechanism of the cabinets" on page 11. 2. On the rear rigging strand of the SUB cabinet, release and remove both ring cotters and fixing bolts.
-
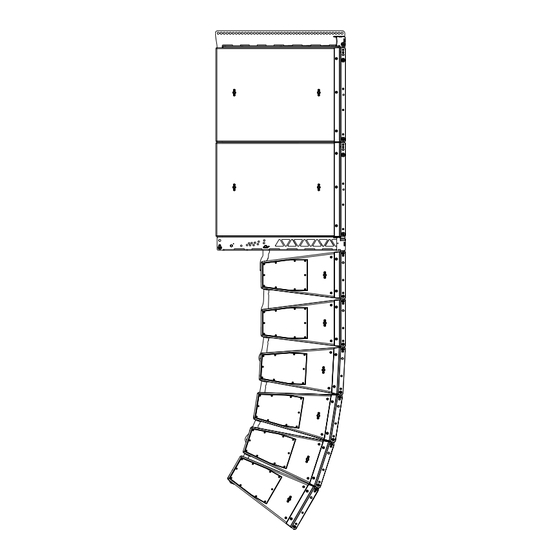
Page 21: Mixed Array Configuration
XSLi arrays and assembly procedures 4.4 Mixed array configuration 4.4.1 Remarks and limitations NOTICE! For a mixed setup, the Z5788 XSLi-SUB Mounting frame must always be used as a suspension device while the Z5780 XSLi-SUB Adapter frame is required in addition. The Z5788 XSLi-SUB Mounting frame allows mixed array configurations with a maximum total system weight of 500 kg (1100 lb) - SWL including all rigging components. - Page 22 XSLi arrays and assembly procedures 3. Attach the first TOP cabinet to the Adapter frame To attach the first cabinet to the frame, proceed as follows: 1. Lift the assembly to a suitable working height. 2. Prepare the Front and Splay links of the first cabinet as described in Þ...
-
Page 23: Rechecking, Hoisting And Secondary Safety
Rechecking, hoisting and secondary safety Rechecking, hoisting and secondary safety Safety and system checks Hoisting Before hoisting the array to its operating position, recheck the actual status of the assembly as follows: WARNING! Potential risk of personal injury and/or Mechanical setup damage to material! ▪... -
Page 24: Care And Maintenance
Care and maintenance Care and maintenance 6.1 Visual and functional inspections WARNING! Potential risk of personal injury and/or damage to material. To eliminate the risk of accident due to malfunctioning of a component, regularly inspect all system components. Cabinet enclosure ▪... -
Page 25: Manufacturer's Declarations
Manufacturer's declarations Manufacturer's declarations 7.1 Conformity of rigging components This declaration applies to: d&b XSLi loudspeaker cabinets (with integrated rigging components.) ▪ Z0776 XSLi8 ▪ Z0777 XSLi12 ▪ Z0778 XSLi-SUB d&b XSLi rigging components (including all additional components.) ▪ Z5787.000 XSLi Top mounting frame ▪... - Page 26 www.dbaudio.com...
Need help?
Do you have a question about the SL and is the answer not in the manual?
Questions and answers