Advertisement
VC-A53 Quick Installation Guide
1. I/O interface
Lock
PC
USB 3.0
Power Supply
Ethernet
Ethernet Switch
2. Install the camera on the ceiling
2.1
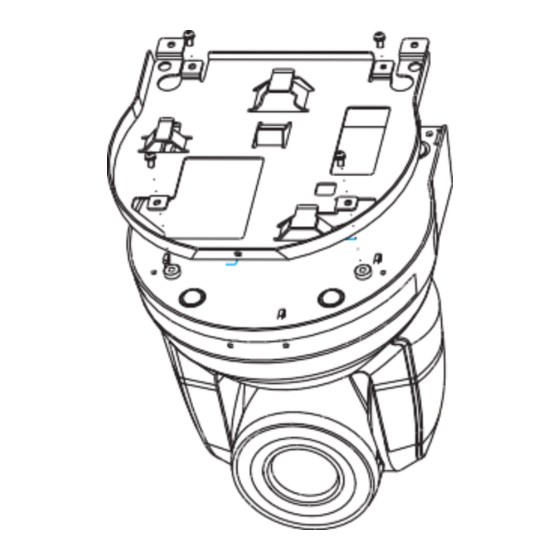
Fix the metal plate A on the camera base with 4 M3 silver screws.
Metal Plate A
Reset
Microphone
Audio IN
HDMI
3G-SDI
RS-232/ RS-422
OUT
OUT
IN / OUT
Display
Display
Controller/ Control Equipment
2.2
Lock the metal plate B on the ceiling
*Caution:
(1) Please use a hanger that has obtained UL security approval.
(2) Please do not block the cable hole.
2.3
Attach metal plate A to metal plate B
Raise the camera and metal plate A to the ceiling and then move it to
the right to snap it on to metal plate B.
Finally, secure with 2 M3 silver screws and 1 M3 black screw.
*As the camera is inverted, press the [Mirror] button on the remote control to flip
the image [Flip]
Lock
3. About the Power Supply
Connect the DC 12V power adapter for power supply
Connect to a Ethernet Switch that supports
network cable
PoE
Switch
www.MyLumens.com
Metal Plate B
Cat5e cable
Camera
PoE (IEEE802.3af)
using a
Advertisement
Table of Contents

Related Manuals for Lumens VC-A53


Summary of Contents for Lumens VC-A53
- Page 1 VC-A53 Quick Installation Guide www.MyLumens.com Lock the metal plate B on the ceiling 1. I/O interface *Caution: (1) Please use a hanger that has obtained UL security approval. (2) Please do not block the cable hole. Lock Reset Microphone Attach metal plate A to metal plate B ...
- Page 2 HDMI / 3G-SDI Image Output RS-232 / RS-422 Connect an HDMI or SDI cable to output camera video. RS-232 *VC-A53 default resolution HDMI 2160p 59.94/ SDI 1080p 59.94 RS-232 USB Image Output RS-232 Connect to computer with a USB cable to view live image. Camera can...
Need help?
Do you have a question about the VC-A53 and is the answer not in the manual?
Questions and answers