
Related Manuals for Lumens VC-A50PNW


Summary of Contents for Lumens VC-A50PNW
- Page 1 VC-A50PN PTZ Video Camera Installation Guide - English [Important] To download the latest version of Quick Start Guide, multilingual user manual, software, or driver, etc., please visit Lumens http://www.MyLumens.com/...
-
Page 2: Table Of Contents
Table of Contents Copyright Information ..................... 2 Chapter 1 Safety Instructions ..................3 Chapter 2 Package Contents ..................5 Chapter 3 Product Overview ................... 6 Overview ............................6 Description of LED indicator ......................6 Chapter 4 Instruction for installation ................7 Preparation before installation ....................... -
Page 3: Copyright Information
Lumens is a trademark that is currently being registered by Lumens Digital Optics Inc. Copying, reproducing or transmitting this file is not allowed if a license is not provided by Lumens Digital Optics Inc. unless copying this file is for the purpose of backup after purchasing this product. -
Page 4: Chapter 1 Safety Instructions
Chapter 1 Safety Instructions Please use the product following the safety instructions below: 1 Operation 1.1 Please use the product in the recommended operating environment. 1.2 Do not place Light Engine in tilted position. 1.3 Do not place the product on an unstable trolley, stand or table. 1.4 Do not use this product near water or source of heat. - Page 5 FCC Warning This HD Camera has been tested and found to comply with the limits for a Class A digital device, pursuant to Article 15-J of FCC Rules. These limits are designed to provide reasonable protection against harmful interference in a commercial installation. This digital apparatus does not exceed the Class A limits for radio noise emissions from digital apparatus as set out in the interference-causing equipment standard entitled "Digital Apparatus,"...
-
Page 6: Chapter 2 Package Contents
Chapter 2 Package Contents VC-A50PN Instruction for installation Remote Control Power Cord Power Adapter RS-422 Connector Appearance may vary depending on country/region Metal Plate A Metal Plate B M3 Screws English - 5... -
Page 7: Chapter 3 Product Overview
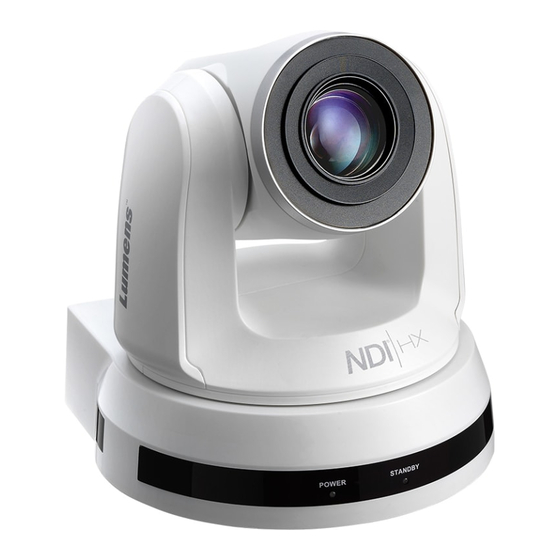
Chapter 3 Product Overview 3.1 Overview Front View 1. Camera lens 2. Power LED indicator 3. Standby LED indicator 4. Audio In 5. USB port (for FW update) Back View 6. Power input NDI|HX / Network port (supporting IEEE 802.3at PoE+ power) 8. -
Page 8: Chapter 4 Instruction For Installation
Chapter 4 Instruction for installation 4.1 Preparation before installation Installation and connection of VC-A50PN HD camera requires special skills. To install by yourself, please follow necessary steps, ensure steady and tight installation of the device, and pay attention to your safety to avoid any accident. 4.1.1 Ensure the safety of the installation environment. - Page 9 4.2.2 I would like to install VC-A50PN on the ceiling 4.2.2.1 Prepare for the parts and equipment required during the installation 1. Accessories of VC-A50PN in the box (metal plates A,B, M3 screw silver x 8, black x 2) 2. Screw for locking on ceiling mounted hanger x 4 3.
- Page 10 4.2.2.4 Size Diagram 1. Metal plate A - machine side Metal plate A locking screw Metal plate A - machine side English - 9...
- Page 11 2. Metal plate B - ceiling side Metal plate B locking Metal plate B locking screw bolt M3 threaded hole M3 threaded hole M3 threaded hole Metal plate B - ceiling side English - 10...
- Page 12 3. Bottom of machine 4.2.2.5 Precautions for installation 1. Before installation, please confirm the orientation of the machine relative to the object to be captured 2. It is recommended that the machine should be set at a distance of more than 1 meter away from the object to be captured.
- Page 13 4.2.2.6 Installation steps 1. Please adjust resolution on DIP switch at first <Remark> Please refer to Chapter 8 DIP Switch Setting for the relevant descriptions on DIP switch. 2. Fix the metal plate A on the machine base with 4 M3 silver screws 3.
-
Page 14: Connecting Devices
4.2.2.7 How to remove 1. Remove the connecting wires from the camera 2. Uninstall the camera together with the ceiling, loosen the three screws that fix the metal plates A and B and push to the left to remove the machine 3. - Page 15 Connecting to an HDTV/computer monitor (HDMI) 4.3.1.2 HDMI cable Monitor HDTV Connecting to Internet 4.3.1.3 Ethernet cable Router or Hub <Remark 1> VC-A50PN can be used with browsers, VLC and QuickTime after it is connected to the Internet. <Remark 2> VC-A50PN supports PoE power supply when coupled with an IEEE 802.3at router or hub.
- Page 16 Connecting AUDIO IN 4.3.1.4 Audio audio mixer <Remark 1> Set the [Audio In] in the OSD to reflect the input device 4.3.2 Controlling VCs with the computer Connecting to one computer for connection between VCs (RS-232 in/out) 4.3.2.1 <Remark> With RS-232 in/out, at most 7 VCs can be connected. Connecting to one computer for connection between VCs (RS-422) 4.3.2.2 <Remark>...
- Page 17 4.3.3 Use of VC-A50PN with Internet Connection 4.3.3.1 Setup before use Connecting the screen through HDMI output. Press [MENU] on the Remote Control to display the OSD menu. Shift down to [Ethernet] to modify and confirm the IP address DHCP: Enable/disable the dynamic host configuration protocol IP Address: Confirm or modify the IP address of VC-A50PN Subnet mask: 255.255.255.0...
-
Page 18: Chapter 5 Remote Control And Setting Menu
Chapter 5 Remote Control and Setting Menu 5.1 Functions of remote control <Remark> The below functions are listed alphabetically. Item Description ,,, Move the lens Back Light Turn on/off back light compensation Camera Choose 1 ~ 3 of VC-A50PN select Focus- Turn on manual focus to adjust the focal Manual /... -
Page 19: Setting Menu
5.2 Setting Menu <Remark> Press [Menu] on the remote control to enter the setting menu; the bold underlined values in the following table are defaults. 1st Level 2nd Level 3rd Level Function Descriptions Major Items Minor Items Adjustment Values 1. Full Auto 2. - Page 20 1. F1.6 2. F2 3. F2.2 4. F2.7 5. F3.2 6. F3.8 7. F4.5 8. F5.4 Iris Pri Iris setting 9. F6.3 10. F7.8 11. F9 12. F11 13. F13 14. F16 15. F18 1. 0dB 2. 2 dB 3. 4 dB 4.
- Page 21 1. F1.6 2. F2 3. F2.2 4. F2.7 5. F3.2 6. F3.8 7. F4.5 8. F5.4 Manual Iris Manually set the iris 9. F6.3 10. F7.8 11. F9 12. F11 13. F13 14. F16 15. F18 1. 8 dB 2. 10 dB 3.
- Page 22 Adjustable when the white balance Manual Blue 0~ C~128 mode is set to Manual 1. Off Picture effect Set the picture effect 2. Neg 3. B & W Sharpness Adjust the sharpness of the image 0~ C~15 1. Auto 2. Off 3.
- Page 23 On/Off Pan Flip Activate the reverse Pan command On/Off Activate the reverse Tilt command Tilt Flip 1. 5 per second 2. 25 per second Set the rotation speed of the cradle Preset Speed 3. 50 per second head when Preset is executed 4.
- Page 24 When the function is enabled, the Motionless screen will Freeze when Preset is On / Off executed. Freeze will be released after Preset Preset is completed. Tally Lamp Enable / Disable Turn on/off the Tally Mode English / Chinese Language Language Last MEM / 1st Initial position...
-
Page 25: Chapter 6 Descriptions Of Major Functions
Chapter 6 Descriptions of Major Functions 6.1 I would like to switch to VC-A50PN 1. Press [Camera 1 ~ 3] on the remote control to select VC-A50PN. Camera 1 ~ 3 is selected with IR SELECT. 6.2 I would like to save the current lens position data 1. -
Page 26: I Would Like To Set The Image Mode
to quick focus. When the environment is too dark to enable auto focus or fixed objects have to be shot in different brightness, AF Sensitivity can be set to [Low]. 1. Press [MENU] to activate the setting menu. 2. Press [] or [] to select [Auto Focus]. 3. -
Page 27: Chapter 7 Network Function Settings Description
Chapter 7 Network Function Settings Description 7.1 Web System Requirements Web Browser: Internet Explorer 8 ~ 11 7.2 Online IP Camera 7.2.1 Connecting to Internet Two common connection methods are shown below 1. Connecting via switch or router Network cable Network cable VC-A50PN Computer... - Page 28 7.2.3 Use RTSP player In addition to browser, other RTSP methods can be used for connection, such as VLC and Quick Time RTSP connection address: RTSP main stream (h264)=>rtsp://VC IP Address:8557/h264 RTSP second stream (h264) =>rtsp://VC IP Address:8556/h264 ...
-
Page 29: Web Page Function Description
7.3 Web Page Function Description 7.3.1 Login Screen Username: Enter user account Password: Enter user password Select Language: Select language from English, Traditional Chinese and Simplified Chinese Remember password: Remember the password so that you do not need to type it next time Login: Log into the administrator screen on the website... - Page 30 7.3.3 Account management screen VC-A50PN 1. Enter new username and password 2. Set the permissions: Description for permissions is listed in the following table 3. Apply 4. List of accounts: Edit: Change password and permission of new account Delete: Delete new account <Remark>...
- Page 31 7.3.5 Settings –Advanced Video Setting VC-A50PN 1. IP Ratio: Set IP Ratio, from 1 to 60 2. Force I Frame : Check this item to insert IDR frame into specified series flow and apply its setting. User’s setting will be reserved and displayed in GUI interface 3.
- Page 32 7.3.6 Setting - camera VC-A50PN 1. Rotate camera lens angle 2. Save/Read preset 3. Adjust image size 4. Adjust camera settings. Please refer to 7.3.7 Settings - Advanced Camera Setting 5. Preset Save 7.3.7 Settings –Advanced Camera Setting 1.. Exposure: ...
- Page 33 Shutter Speed: Shutter settings 2. White Balance: Mode: Select the color temperature mode Open Push Trigger: Single color temperature execution adjustment Manual Red/Blue: Manually adjust blue/red color temperature 3. Focus: Mode: Select manual/automatic focus Focus Range: Set focus range ...
- Page 34 12. Sharpness: Adjust the sharpness of the image 7.3.9 Settings – Audio Setting VC-A50PN 1. Turn on/off sound 2. Set MIC In/Line In 3. Adjust the Volume 4. Set audio delay 5. Set Encode Type (ACC / G.711) 6. Set Encode Sample rate 7.
- Page 35 automatic adjustment of daylight saving 3. Preset Save <Remark> SNTP server address: Please change in network setting 7.3.11 Setting -- Network and Port Setting 1. Network address of camera: Change of setting is available only when DHCP function of camera is turned off;...
- Page 36 7.3.12 Maintenance VC-A50PN 1. Firmware Upload 2. Error Log 3. Factory Reset 4. Set ONVIF command as “standard” or “custom” English - 35...
-
Page 37: Chapter 8 Dip Switch Setting
Chapter 8 DIP switch setting <Note> Please turn off the machine before changing DIP switch setting. 8.1 DIP SWITCH 8.1.1 OUTPUT Switch Output Mode Setting Output Mode Setting 1920x1080/60p 1920x1080/50p 1920x1080/30p 1920x1080/25p 1920x1080/60i 1920x1080/50i 1280x720/60p 1280x720/50p 1080/59.94p 1080/59.94i 1080/29.97p 720/59.94p 8.1.2 IR SELECT Setting 8.1.3 Camera Address Selector... -
Page 38: Rs-422 Connection
8.1.4 System Switch Setting Function Descriptions RS-232C/RS-422 selector DIP 1 OFF : RS-232C / ON : RS-422 Infrared signal output switch DIP 2 OFF : Off / ON : On Communication baud rate selector DIP 3 OFF : 9600 / ON : 38400 DIP 4 Reserved 8.2 RS-422 Connection... - Page 39 8.2.2 Use RS-422 Connection 1. Hold the two sides of RS-422 connector and pull out in the direction shown by the arrow in the figure below 2. Peel off a section of copper wire (AWG Nos.28 to 18) and insert it into the connector hole; then use flat screw driver to fix it 3.
-
Page 40: Chapter 9 Troubleshooting
Chapter 9 Troubleshooting This chapter describes problems you may encounter while using VC-A50PN. If you have questions, please refer to related chapters and follow all the suggested solutions. If the problem still occurred, please contact your distributor or the service center. Problems Solutions Boot without power...
Need help?
Do you have a question about the VC-A50PNW and is the answer not in the manual?
Questions and answers