Advertisement
Quick Links
08/2023
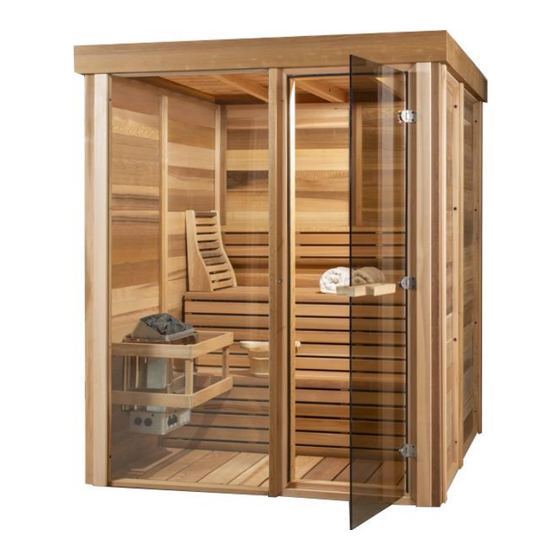
PU550/PU552
Pure Cube Indoor Sauna Assembly Instructions
*Shown with optional semi privacy panel
Requirements:
2 People (recommended)
Rubber Mallet
Tape Measure
Cordless Drill
Phillips & Robertson Drill Bits
Hex Key Set
Staple Gun
1 ¼" Staples
Step Ladder
View the assembly process on
Manufactured by:
tel: 888-923-9813 | info@leisurecraft.com| web: www.leisurecraft.com
Advertisement

Related Manuals for leisurecraft Pure Cube PU550


Summary of Contents for leisurecraft Pure Cube PU550
- Page 1 *Shown with optional semi privacy panel Requirements: 2 People (recommended) Rubber Mallet Tape Measure Cordless Drill Phillips & Robertson Drill Bits Hex Key Set Staple Gun 1 ¼” Staples Step Ladder View the assembly process on Manufactured by: tel: 888-923-9813 | info@leisurecraft.com| web: www.leisurecraft.com...
- Page 2 *Always ensure that you have the correct screw length so that there will be enough thread to hold, and especially, so that the screw does not go all the way through the material and come out the other side. Manufactured by: tel: 888-923-9813 | info@leisurecraft.com| web: www.leisurecraft.com...
- Page 3 Bench Front Enclosures Electric Heater & Guard Hardware Fig 2b 2 ½” (63mm) 2 ½” (63mm) 2 ¾” (70mm) Threaded Cap 2 ¾” (70mm) Finishing Nails Wood Screws Connector Bolts Nuts Connector Lag Bolts Manufactured by: tel: 888-923-9813 | info@leisurecraft.com| web: www.leisurecraft.com...
- Page 4 Fig 2a Connect the narrow panel to the wide panel using 2 ¾” (70mm)connector bolts and a connector cap nut. Fig 2b Using the provided hex keys, snug up all the bolts. Manufactured by: tel: 888-923-9813 | info@leisurecraft.com| web: www.leisurecraft.com...
- Page 5 Using the provided hex keys, snug up all the bolts. Place a corner post flush to the narrow wall panel and secure the wall panel to the post using the 2 ¾” (70mm) Connector lag screws through the predrilled holes. Manufactured by: tel: 888-923-9813 | info@leisurecraft.com| web: www.leisurecraft.com...
- Page 6 Fig 2a Place the last corner post flush to the narrow panel on the opposite wall and secure the narrow wall panel to Fig 2b the post as in the previous step. Manufactured by: tel: 888-923-9813 | info@leisurecraft.com| web: www.leisurecraft.com...
- Page 7 Using an 11/16” (18mm) bit, drill approximately ¾” (19mm) into your predrilled holes to create a cavity for Fig 2b the plugs to sit in later. Manufactured by: tel: 888-923-9813 | info@leisurecraft.com| web: www.leisurecraft.com...
- Page 8 Secure the wall panels to the roof panels using 2 ½” (64mm) screws. Fig 2b Continue to do this to all the panels around the sauna using 2 screws per panel. Manufactured by: tel: 888-923-9813 | info@leisurecraft.com| web: www.leisurecraft.com...
- Page 9 Grab your front trim piece and repeat the same process securing from the inside of the sauna with the 2 ¾” Fig 2b (70mm) Connector lag screws through the pre drilled holes. Manufactured by: tel: 888-923-9813 | info@leisurecraft.com| web: www.leisurecraft.com...
- Page 10 Fig 2a Attach the wider trim pieces over the seams of the sauna using the provided finishing nails. Continue around sauna covering all seams. Manufactured by: tel: 888-923-9813 | info@leisurecraft.com| web: www.leisurecraft.com...
- Page 11 2 ½” (64mm) screws. Fig 2a Repeat on other end. Bring in the top bench and place it on top of the bench supports. Manufactured by: tel: 888-923-9813 | info@leisurecraft.com| web: www.leisurecraft.com...
- Page 12 Fig 2a Repeat for other inner backrest support. Ensure the backrest is level on the backrest supports and secure the backrest by screwing it in between the slats using 2 ¾” (64mm) screws. Manufactured by: tel: 888-923-9813 | info@leisurecraft.com| web: www.leisurecraft.com...
- Page 13 Line up the lower front bench enclosure with the bench supports. Secure the Front bench enclosure to the bench supports between the slats using 2 ½” (64mm) screws. Repeat for top front bench enclosure. Manufactured by: tel: 888-923-9813 | info@leisurecraft.com| web: www.leisurecraft.com...
- Page 14 Hang the electric heater on the screws. Screw 2 more screws in the bottom holes of the heater and once the heater is level, you can tighten up all 4 screws. Manufactured by: tel: 888-923-9813 | info@leisurecraft.com| web: www.leisurecraft.com...
- Page 15 Fig 2a Place assembled heater guard around electric heater and screw to wall using (4) 2 ½” (64mm) screws. Fig 2b *Make sure heater guard is level before securing. Manufactured by: tel: 888-923-9813 | info@leisurecraft.com| web: www.leisurecraft.com...
- Page 16 For Saunas with wood heaters, get the inlet as close as possible to the wood heater and the outlet high in the opposite corner. Inlet holes drilled under electric heater on side wall Outlet vent high on opposite wall of heater. Manufactured by: tel: 888-923-9813 | info@leisurecraft.com| web: www.leisurecraft.com...
- Page 17 1 ½”(38mm) screws. Install the cedar vent cover over the outlet holes on the inside of the sauna with a 1 ½” screw. * Tighten screw enough that the vent cover still rotates smoothly. tel: 888-923-9813 | info@leisurecraft.com| web: www.leisurecraft.com...
-
Page 18: How To Take A Sauna
Never use ammonia or harsh cleaners as they can turn the wood gray. WARRANTY LeisureCraft warrants our saunas against defects in materials and workmanship under normal/residential use for a period of five (5) years, as applicable, from the date of receipt of the product by the original end-user consumer. This warranty does not apply to normal wear and tear and/or natural weather conditions.
Need help?
Do you have a question about the Pure Cube PU550 and is the answer not in the manual?
Questions and answers