Table of Contents
Advertisement
Quick Links
Download this manual
See also:
Operator's Manual
Advertisement
Table of Contents

Related Manuals for Xerox FreeFlow 665E


Summary of Contents for Xerox FreeFlow 665E
-
Page 1: Getting Started
FreeFlow Scanner 665E Getting Started For the DocuColor 8000/7000 Digital Press 701P44150 Version 1.0, September 2005... - Page 2 Other company brands and product names may be trademarks or registered trademarks of the respective companies and are also acknowledged. While every care has been taken in the preparation of this material, no liability will be accepted by Xerox Corporation arising out of any inaccuracies or omissions.
-
Page 3: Table Of Contents
F r e eF lo w S c a nn er 6 65 E G e t ti n g Star te d Table of contents Conventions Symbols ..........v Writing style conventions . - Page 4 Scanner hardware overview ......1-5 Scanner components ......1-5 Overview of FreeFlow applications.
- Page 5 Preventive maintenance intervals ....7-2 Contacting Xerox ........7-3 Telephone numbers and World Wide Web address .
- Page 6 F r e eF lo w S c a nn er 6 65 E G e t ti n g Star te d...
-
Page 7: Conventions
Symbols F r e eF lo w S c a nn er 6 65 E G e t ti n g Star te d Conventions Standardized conventions have been used in this manual to assist you in visually locating and identifying information quickly. CAUTION: This symbol alerts you to an action that may cause damage to hardware, software, or result in the loss of data. -
Page 8: Writing Style Conventions
Co n v en ti o ns Writing style conventions The 1 2 3... symbol indicates the beginning of a task or work process you should use to complete a procedure and is followed by the first step of a numbered procedure, task, or work process. NOTE: This symbol calls your attention to information that is helpful, but not essential to complete a procedure or task. -
Page 9: Safety Notices
F r e eF lo w S c a nn er 6 65 E G e t ti n g Star te d Safety notices This Xerox product and the recommended supplies are designed and tested to meet strict safety requirements. These include safety agency approval and compliance to established environmental standards. -
Page 10: Disconnect Device
If any of the following conditions occur, immediately switch off the power to the machine and disconnect the power cord from the electrical outlet. Call an authorized Xerox service representative to correct the problem. •... -
Page 11: Laser Safety
This product contains laser warning labels. These labels are intended for use by the Xerox Service Representative and are placed on or near panels or shields that require special tools for removal. Do not remove any of the panels. There are no operator serviceable areas in these covers. -
Page 12: Europe (Eu) And Other Markets
This product contains laser warning labels. These labels are intended for use by the Xerox Service Representative and are placed on or near panels or shields that require special tools for removal. Do not remove any of the panels. There are no operator serviceable areas inside these covers. -
Page 13: Maintenance Safety
There are no parts behind these covers that you can maintain or service. Do not perform any maintenance procedures unless you have been trained to do them by a Xerox representative, or unless a procedure is specifically described in one of the manuals included with your press. -
Page 14: Ozone Safety
Xerox installation procedures, ensures that concentration levels meet safe limits. If you need additional information about ozone, request the Xerox publication, OZONE by calling 1-800-828-6571 in the USA. For a French language version, call 1-800-828-6571 in the USA, then press 2. -
Page 15: Notices
Changes or modifications to this equipment not specifically approved by the Xerox Corporation may void the user’s authority to operate this equipment. WARNING: Shielded cables must be used with this equipment to maintain compliance with FCC regulations. -
Page 16: Regulatory Information For Rfid
(RFID). This system is certified in compliance with European Council Directive 99/5/EC and applicable local laws or regulations as applicable. This Xerox product is in compliance with various governmental agencies and national safety regulations. All system ports meet the Safety Extra Low Voltage (SELV) circuits for connection to customer-owned devices and networks. -
Page 17: Certifications In Europe
F r e eF lo w S c a nn er 6 65 E G e t ti n g Star te d The CE marking that is applied to this product symbolizes Xerox Declaration of Conformity with the following applicable Directives... -
Page 18: It's Illegal In The Usa
No ti c e s It’s illegal in the USA x v i WARNING: In order to allow this equipment to operate in proximity to Industrial, Scientific, and Medical (ISM) equipment, the external radiation from the ISM equipment may have limited or special mitigation measures taken. - Page 19 F r e eF lo w S c a nn er 6 65 E G e t ti n g Star te d Bonds. (U.S. Savings Bonds may be photographed only for publicity purposes in connection with the campaign for the sale of such bonds.) Internal Revenue Stamps.
- Page 20 No ti c e s x v i ii Passports. (Foreign Passports may be photographed.) Immigration Papers. Draft Registration Cards. Selective Service Induction Papers that bear any of the following Registrant’s information: Earnings or Income Court Record Physical or mental condition Exception: United States military discharge certificates may be photographed.
-
Page 21: It's Illegal In Canada
It’s illegal in Canada F r e eF lo w S c a nn er 6 65 E G e t ti n g Star te d Parliament, by statute, has forbidden the reproduction of the following subjects under certain circumstances. Penalties of fines or imprisonment may be imposed on those guilty of making such copies. -
Page 22: Environmental Notices For The Usa
Xerox ENERGY STAR equipment is preset at the factory. Your machine will be delivered with the timer for switching to Low Power Mode from the last copy/print output, set at 15 minutes. -
Page 23: Environmental Notices For Canada
Currently, Environmental Choice has more than 1600 approved products and 140 licensees. Xerox has been a leader in offering EcoLogo approved products. In 1996, Xerox became the first company licensed to use the Environmental Choice EcoLogo for its copiers, printers, and fax machines. -
Page 24: Product Recycling And Disposal
In the United States, you may also refer to the Electronic Industries Alliance web site: www.eiae.org. If your product is not part of the Xerox program and you are managing its disposal, please follow the instructions provided in the above paragraph. -
Page 25: Overview
F r e eF lo w S c a nn er 6 65 E G e t ti n g Star te d Overview We know you’re anxious to start using on your FreeFlow Scanner 665E for the DocuColor 8000/7000 Digital Press! This booklet will help you become familiar with your FreeFlow Scanner 665E before your trainer arrives. -
Page 26: What Happens At Installation And Setup
Your Xerox Service Representative also installed FreeFlow Scanner 665E software on the PC. A test job was sent from the scanner to the Digital Press to ensure all connections were working correctly. We recommend that you print all the Scanner Customer Documentation and keep it close to the press in the 3-ring binder. -
Page 27: Media Documentation
The online Help is discussed in more detail on page 1-11. The Xerox FreeFlow Scanner 665E is a Xerox color-enabled scanner that interfaces with FreeFlow software. The scanner is an optional accessory that is used in conjunction with the DocuColor 8000/7000 Digital Press. -
Page 28: What's Your Job
1- 4 The Key Operator or User is the person or persons who are the everyday user of the FreeFlow Scanner 665E. This person(s) performs any daily, basic operations associated with scanning and/or printing the scanned documents. The Key Operator/User also may perform any necessary jam clearance activities. -
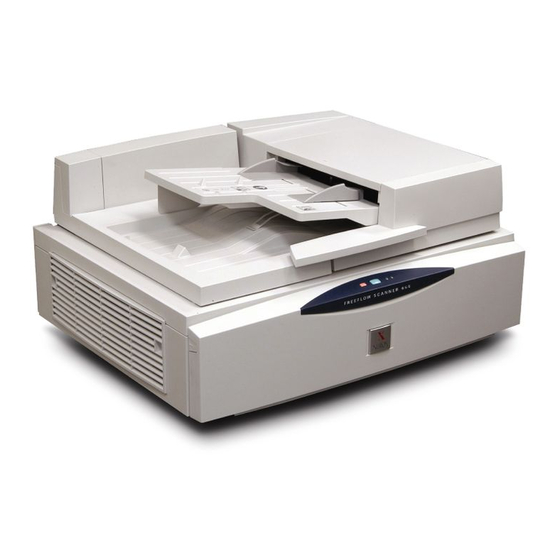
Page 29: Scanner Hardware Overview
F r e eF lo w S c a nn er 6 65 E G e t ti n g Star te d The Xerox FreeFlow Scanner 665E is a high quality, high volume scanner. Teamed with scanning software and a personal computer, the scanner is a powerful tool for capturing and manipulating graphics and text. - Page 30 SCSI stands for Small Computer System Interface. SCSI is the protocol that lets your PC communicate with the Xerox Scanner. The SCSI connection is located on the middle of the rear panel.
- Page 31 SCSI cable Power cord: Plug the power cord into the scanner at the left rear panel. Power cord F r e eF lo w S c a nn er 6 65 E G e t ti n g Star te d...
-
Page 32: Overview Of Freeflow Applications
The job ticket options available for your document are listed in the Job Setup dialog box. This application is available on the scanner and also can be installed and executed from client workstations on which have the required PC platform software loaded. -
Page 33: Powering On/Off The System
Power on the workstation. If required, log into the network. NOTE: All FreeFlow software applications are found by selecting from the Windows task bar the following: Start: Programs: Xerox FreeFlow Software. Follow these steps when powering off the system. From the Windows tasteable select Start: Shut Down; the Shut Down Windows dialog box appears. -
Page 34: Rdo Files
1. O ve r v i e w RDO files For DocuSP users: 1- 1 0 RDO is the three-letter extension for the Raster Document Object file type. As stated earlier, the RDO file type is used primarily with FreeFlow, but you can use RDOs with other FreeFlow applications, or convert them to PostScript or PDF files. -
Page 35: Freeflow Help
F r e eF lo w S c a nn er 6 65 E G e t ti n g Star te d The FreeFlow Scanner 665E online Help system is an excellent source of information about the features available and how to use them. - Page 36 1. O ve r v i e w 1- 1 2 Select the Index tab to display an alphabetical list of Help topics. As you enter text into the Type in the keyword to find text box, topics associated with the words you type display.
- Page 37 F r e eF lo w S c a nn er 6 65 E G e t ti n g Star te d Double-click on the Enhance Image settings topic in the Select Topics to display list box. The topic displays in the text window on the right.
-
Page 38: Using The Document Glass
If desired, make additional selections from Advanced Scanning. The Advanced Scanning application is discussed in the online Help and in the FreeFlow Scanner 665E Operator Manual. NOTE: If scanning a 2-sided document, be sure to select the 2-sided option from Scan and Print/Advanced Scanning. -
Page 39: Scanning A Bound Document
Scanning a bound document F r e eF lo w S c a nn er 6 65 E G e t ti n g Star te d To scan a bound document: Raise the document feeder. Place the bound document on the Document Glass, registering it on the front center edge, as indicated by the icon on the document glass frame. -
Page 40: Using The Adf
1. O ve r v i e w Using the ADF 1- 1 6 The ADF enables you to scan 1-sided and 2-sided documents quickly, and returns them in a stack in the same order you placed them in the input tray. Use the ADF for rapid scanning of up to 100 pages. - Page 41 F r e eF lo w S c a nn er 6 65 E G e t ti n g Star te d From Advanced Scanning, click the SEF/LEF toggle to specify how the document is loaded in the input tray. Make the desired selections from the Advanced Scanning and Scan and Print applications.
- Page 42 1. O ve r v i e w 1- 1 8 F r ee F l o w Sc a n ne r 6 6 5E G et ti n g Sta r te d...
-
Page 43: Production Printer Settings
F r e eF lo w S c a nn er 6 65 E G e t ti n g Star te d Production Printer Settings Before you can print your scanned documents you must set up your printer or printers. This chapter provides step-by-step instructions for setting up and adding a printer. Select Start: Programs: Xerox FreeFlow Software: Printer Production Settings. -
Page 44: Overview
Create a job ticket Job Ticket information is discussed in detail in the FreeFlow Scanner 665E Operator Manual. F r ee F l o w Sc a n ne r 6 6 5E G et ti n g Sta r te d... -
Page 45: Adding A Printer
Adding a printer F r e eF lo w S c a nn er 6 65 E G e t ti n g Star te d KEY POINT: This book uses illustrations showing a DocuColor 8000 Digital Press connected to a Fiery EXP8000 color server. - Page 46 2. P r o d uc t i on P r i n te r S e tt i ng s 2- 4 From the Printer model: drop-down list, select DocuColor 8000: or your site specific printer. From the Print controller/server type: drop-down list, select your site specific print controller/server type.
-
Page 47: Scan And Print
KEY POINT: For detailed and specific information about each of the Scan and Print features, refer to the FreeFlow 665E Operator Manual and the online Help. KEY POINT: This book uses illustrations showing a DocuColor 8000 Digital Press connected to a Fiery EXP8000 color server. -
Page 48: Scan And Print An Original
NOTE: By clicking on the More Options... button, a Job Setup dialog box opens with additional options. This button is discussed in more detail in the FreeFlow Scanner 665E Operator Manual and in the online Help. NOTE: To disable all additional options without having to change each one individually, clear the Apply More Options check box. -
Page 49: Scan And Print A Large Job
You can use Scan and Print to build large copying jobs with the Scan to Job button. Large jobs are defined as those with page counts that exceed the capacity of the scanner’s multisheet feeder. Follow these steps when scanning large jobs. -
Page 50: Scan And Save Documents
PDF by using the Scan and Print application. Follow these steps when scanning and saving documents. With the Scan and Print application open, place the hardcopy document on the scanner glass or into the multisheet feeder. From the Options section, select Save. -
Page 51: Scan, Print, And Save Documents
Follow these steps when scanning, printing, and saving documents. With the Scan and Print application open, place the hardcopy document on the scanner glass or into the multisheet feeder. From the Options section, select Print and Save. Select your job options; refer to Steps 3-8 of the “Scan and print an original”... - Page 52 3. S c a n a nd P r i n t 3- 6 F r ee F l o w Sc a n ne r 6 6 5E G et ti n g Sta r te d...
-
Page 53: Quick Print
8000 Digital Press connected to a Fiery EXP8000 color server. Your system may vary depending on the digital press and color server for your work environment. Use the following procedure to print a single file. Select Start: Programs: Xerox FreeFlow Software: Quick Print. - Page 54 4. Q ui c k P r i n t 4- 2 The Quick Print dialog box opens: Select the file type you wish to print in the Show file type pull-down menu. Browse to the directory where the document is stored and select the file name of the document from the directory tree list.
- Page 55 F r e eF lo w S c a nn er 6 65 E G e t ti n g Star te d NOTE: The Job Setup button is disabled if an Adobe PDF file or an RDO with PDF pages that has been secured against printing.
-
Page 56: Printing A Job With Multiple Files
4. Q ui c k P r i n t Printing a job with multiple files 4- 4 Select the file type you wish to print in the Show file type pull-down menu. Select the List multiple files to print checkbox. The Quick Print window expands to reveal the job list at the bottom of the screen. - Page 57 F r e eF lo w S c a nn er 6 65 E G e t ti n g Star te d Select the appropriate radio button: • Print as one job: Jobs are printed as one job. The default job ticket is applied, but can be modified by clicking the Job Setup button.
-
Page 58: Printing All The Files In A Selected Directory
4. Q ui c k P r i n t Printing all the files in a selected directory 4- 6 To print all the files in a selected directory: Select the file type you wish to print in the Show file type pull- down menu. - Page 59 F r e eF lo w S c a nn er 6 65 E G e t ti n g Star te d Click the Remove button to remove a selected job from the print list, or the Remove All button to clear the list. Select a printer from the Printers pull-down menu.
- Page 60 4. Q ui c k P r i n t 4- 8 Select the appropriate radio button: a. Print as one job: Jobs are printed as one job. The default job ticket is applied, but can be modified by clicking the Job Setup button. b.
-
Page 61: File Manager
What is File Manager? File Manager capabilities F r e eF lo w S c a nn er 6 65 E G e t ti n g Star te d File Manager This chapter discusses the File Manager application and provides instructions on how to copy, move, and delete objects or files. -
Page 62: What Is Displayed In The File Manager Window
5. F il e M a na g er What is displayed in the File Manager window? 5- 2 The File Manager window displays a directory tree and a directory contents list; a directory tree only; or a directory contents list only. •... -
Page 63: Using File Manager Help
Using File Manager Help F r e eF lo w S c a nn er 6 65 E G e t ti n g Star te d The online Help provides in depth, step-by-step instructions for using the various FIle Manager features and functions, including: •... - Page 64 5. F il e M a na g er 5- 4 To access and use the online Help for File Manager, perform the following steps: From Windows Start: Programs, select Xerox FreeFlow Software: File Manager. The File Manage application opens: From the Help drop-down list, select Help Topics.
- Page 65 F r e eF lo w S c a nn er 6 65 E G e t ti n g Star te d The Help dialog is displayed. Select the desired Help topic. When finished, close the Help dialog box by selecting (Close) in the title bar.
- Page 66 5. F il e M a na g er 5- 6 F r ee F l o w Sc a n ne r 6 6 5E G et ti n g Sta r te d...
-
Page 67: Security Certification
Security Certification If your site requires a high security communication and you are connected to a DocuSP color server, you will need to implement the client-side secured FTP and/or Secure IPP security certificate in order to communicate with the DocuSP 4.x/5.x color server. This is discussed in detail in the System Adminstration Guide, Chapter 6, “Installing a security certificate”... - Page 68 6. S e c u r it y C er ti fi c a ti o n 6- 2 Do c u Co l or 8 00 0 /7 00 0 G e t ti n g Sta r te d...
-
Page 69: Maintenance
Maintenance This chapter provides maintenance information and instructions for the various scanner components. Do c u Co lo r 80 0 0/ 70 0 0 G e tt in g Sta r t ed... -
Page 70: Maintenance Intervals
Constant Velocity Transport (CVT) 7- 2 The scanner requires minimal maintenance by the operator. However, it is essential that you perform these tasks when indicated to ensure reliable operation and maximum product life. To avoid any maintenance delays, ensure that you have the necessary spare parts and cleaning supplies on hand. -
Page 71: Contacting Xerox
Internet: Do c u Co lo r 80 0 0/ 70 0 0 G e tt in g Sta r t ed Before contacting Xerox for a service problem, perform the following steps: Also refer to the Online Help for additional information and step- by-step instructions. -
Page 72: Spare Parts And Supplies
7- 4 Part name ADF Feed Roller Assembly Air Filter Kit Xerox Platen Glass Cleaner Do c u Co l or 8 00 0 /7 00 0 G e t ti n g Sta r te d Part number 600K89591... -
Page 73: Troubleshooting
Image quality problems Do c u Co lo r 80 0 0/ 70 0 0 G e tt in g Sta r t ed Troubleshooting This chapter directs you to basic troubleshooting information. This troubleshooting information is found in the online Help (Advanced Scanning/Help menu/Troubleshooting). -
Page 74: Clearing Paper Jams And Misfeeds
Clearing paper jams and misfeeds 8- 2 The online Help provides specific step-by-step procedures for clearing paper jams and misfeeds from the scanner. You can access this information by opening the Advanced Scanning feature (click on the Advanced Scanning button from the Scan and Print dialog box). - Page 76 701P44150...
Need help?
Do you have a question about the FreeFlow 665E and is the answer not in the manual?
Questions and answers