
Related Manuals for Carbatec TS-C250PX


Summary of Contents for Carbatec TS-C250PX
- Page 1 TS-C250PX CARBATEC DELUXE 10" CABINET TABLE SAW I N S T R U C T I O N S M A N U A L CA RBATE C .C O M. AU...
-
Page 2: Introduction
Carbatec to keep you woodworking, as promised. We look forward to sharing in your woodworking journey! If you have any questions about our products or service, please call us on 1800 658 111 or email us at info@carbatec.com.au Find us on social media facebook.com/Carbatec instagram.com/Carbatec... -
Page 3: Table Of Contents
Changes and improvements may be made at any time, with no obligation on the part of Carbatec to modify previously delivered units. Reasonable care has been taken to ensure that the information in this manual is correct, to provide you with the guidelines for the proper safety, assembly and operation of this machine. -
Page 4: Specifications
TS-C250PX SPECIFICATIONS BRAND Carbatec TYPE TEFC, Capacitor Start, Induction 2.3 KW Input / 1.8 Kw Output POWER 10 amp MOTOR SPEED 2850 RPM (50HZ) POWER TRANSFER V-Ribbed Belt Drive Magnetic with Thermal Overload TYPE Protection SWITCH STANDARD Australian MAX. BLADE DIAMETER 254 mm (10") -
Page 5: What's In The Box
TS-C250PX SPECIFICATIONS - WHAT’S IN THE BOX WHAT’S IN THE BOX This machine will require a minimal amount of assembly. Remove parts from all of the cartons and lay them on a clean work surface. DO NOT use acetone, gasoline or lacquer thinner Remove any protective materials and to remove any protective coatings. - Page 6 TS-C250PX WHAT’S IN THE BOX Fig. 3 Fig. 4 Fig. 5 FENCE BOX CONTENTS - Fig. 6 Fence body x 1 Fence x 1 Fig. 6 FOR T EC H N I CAL S UPPORT CAL L 1 800 6 58 111...
- Page 7 TS-C250PX WHAT’S I N THE BOX WHAT’S IN THE BOX UPPER DUST EXTRACTION TUBE CONTENTS - Fig. 7 Over arm x 1 Fig. 7 Flexible hose (length 0.6 m) x 1 Flexible hose (length 1 m) Bracket x 2 RAIL BOX CONTENTS - Fig.
-
Page 8: Key Information
TS-C250PX IMPORTANT DUST COLLECTION: All woodworking machines require effective dust extraction to ensure quality work and longevity of the machine itself. Failure to connect your machine to a suitable dust collector may affect your warranty. The collector required for your machine will depend on several factors including the type of machine and its dust port connection, distance between collector and machine, type and frequency of use and the material being worked. -
Page 9: Safety Instructions - General
Australian/New Zealand Standards to ensure their compliance with all mandatory standards and regulations (applicable at time of original sale). Carbatec Pty Ltd are registered as a responsible supplier with relevant Australian government departments and our products are registered on the EESS & ACMA database. - Page 10 TS-C250PX GENERAL SAFETY Operating a power tool can be dangerous if READ this entire manual. LEARN how to use safety and common sense are ignored. The the tool for its intended applications. operator must be familiar with the operation of this machine.
- Page 11 TS-C250PX SAFETY GENERAL SAFETY WEAR PROPER CLOTHING. NEVER LEAVE A RUNNING TOOL Do not wear loose clothing, gloves, neckties, UNATTENDED. Turn the power switch to the or jewellery. These items can get caught in “OFF” position. Do not leave the tool until it the machine during operations and pull the has come to a complete stop.
- Page 12 TS-C250PX GENERAL SAFETY SECURE ALL WORK. Use clamps or jigs to USE A PROPER EXTENSION CORD IN GOOD secure the work piece. This is safer than CONDITION. Use of extension cords should attempting to hold the work piece with be avoided where possible. When using an your hands.
- Page 13 TS-C250PX SAFETY GENERAL SAFETY NOTE: According to the applicable product liability law the manufacturer of this device is not liable for damages which arise on or in connection with this device in case of: The device and packaging materials are not toys! Children must not be allowed to play with •...
-
Page 14: Safety Instructions - Table Saw
TS-C250PX SAFETY FOR TABLE SAWS ALWAYS USE A GUARD, splitter on all “thru- PROVIDE ADEQUATE SUPPORT to the rear sawing” operations (when the blade cuts and sides of the table saw for wide or long completely through the work piece as in work pieces. -
Page 15: Safety Instructions - Electrical
TS-C250PX SAFETY ELECTRICAL SAFETY This tool must be grounded while in use to CHECK WITH A QUALIFIED ELECTRICIAN protect the operator from electric shock. IN THE or service personnel if you do not completely EVENT OF A MALFUNCTION OR BREAKDOWN,... -
Page 16: Overview
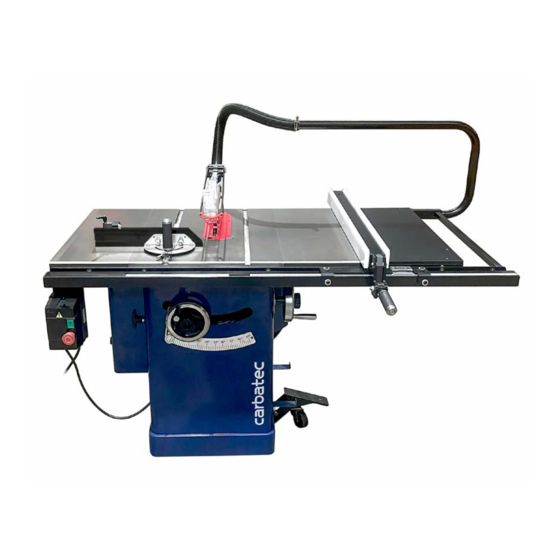
TS-C250PX OVERVIEW TS-C250PX DELUXE 10” CABINET TABLE SAW Left Extension Wing Front Rail & Tube Miter Gauge Blade Tilt Hand Wheel Main Table Cabinet Blade Guard Rear Rail Right Extension Wing Service Door Fence Dust Collection System Magnetic Starter Tool Hooks Motor Cover Dust Port 4"... -
Page 17: Installation
TS-C250PX OVERVIEW - INSTALLATION INSTALLATION TRANSPORTATION • This machine has been well packaged and rust preventive measures have been taken at the factory. Care should still be taken to insure that no damage comes from rough handling while moving. •... - Page 18 TS-C250PX INSTALLATION INSTALLATION Fig. C1 Before beginning assembly, take note of the shipping brace following precautions: • Level floor: Make sure the floor is a level surface. • Working clearances: If any long material is to be cut, it is necessary to have sufficient room both in front of the machine as well as behind it for material infeed and outfeed.
-
Page 19: Assembly
TS-C250PX INSTALLATION - ASSEMBLY ASSEMBLY lock hand- handle knob wheel HAND-WHEEL INSTALLATION Fig. D1 Install the hand-wheel to the cabinet by using the lock knob. Fig. D1. Mount the handle to the hand-wheel. EXTENSION WHEEL INSTALLATION Fig. B4 The machine is equipped with a cast iron extension wing on each side of the main table. - Page 20 TS-C250PX ASSEMBLY RAIL AND EXTENSION TABLE Fig. F1 INSTALLATION Before tightening the rear rail, make sure the top edge of the rear rail is lower than the T-slot. Fig. F1. Ensure that the extension table is coplanar with the main table.
- Page 21 TS-C250PX ASSEMBLY ASSEMBLY Align the the parallelism between the • Fig. F4 fence and T-slot or blade. Fig. F4 adjusts perpendicularity By adjusting the set screw (A), you can adjust the parallelism between the fence and the blade, and you can adjust the locking strength.
- Page 22 TS-C250PX ASSEMBLY INSTALLING THE SWITCH Fig. H1 The switch is mounted on the lower right side of the guide tube by using two sets of bolts which are re-installed on the guide tube. Fig. H1 INSTALLING THE BLADE Remove the table insert.
- Page 23 TS-C250PX ASSEMBLY ASSEMBLY INSTALLING A DUST Fig. L1 COLLECTION SYSTEM A dust collection device should be used and switched on before commencing machining. Secure the dust outlet to the cabinet, and then connect the bellows to the dust outlet Fig. L1 & L2 Note: The mounting hardware of the dust outlet is pre-mounted on the cabinet.
-
Page 24: Adjustments
TS-C250PX ADJUSTMENTS ADJUSTING THE RIP FENCE Fig. O1 Before using the rip fence, the parallelism and perpendicularity must be aligned correctly. Please refer to chapter F, page 20, ‘Rail and extension table installation. ALIGNING THE TABLE T-SLOT PARALLEL WITH T-Slot... - Page 25 TS-C250PX ADJUSTMENTS ADJUSTMENTS To adjust the 90° Positive Stop: Fig. Q1 Loosen the screws of the repair panel on the right side of the machine and take off the repair panel. Loosen the set screw (B) and rotate the 90°...
-
Page 26: Operation
TS-C250PX OPERATION ELECTRICAL OPERATION Fig. R1 “ON” Button: • Start the machine. “OFF” Button: • Stop the machine. Hole for Safety Lock: • While not using the machine, insert the safety pin to prevent accidental start up. Fig. R1 Hole for safety lock... - Page 27 TS-C250PX OPERATION OPERATION CROSSCUTTING cutting across the grain “Crosscutting” means of a natural wood workpiece. In other cutting across the man-made materials, such as MDF or plywood, crosscutting means width miter gauge of the workpiece. Crosscutting requires the use of the to position and guide the work.
-
Page 28: Maintenance
TS-C250PX MAINTENANCE MAINTENANCE Fig. V1 This table saw has TEFC motor and sealed lubricated bearings, which requires very little maintenance other than minor lubrication and cleaning. Please do the maintenance as follows: Lubrication , once a month. Clean off the wood chips on the worm gears and trunnions and apply the grease to keep them lubricated. -
Page 29: Troubleshooting
TS-C250PX MAINTENANCE - TROUBLESHOOTING TROUBLESHOOTING TO PREVENT INJURY TO YOURSELF or damage to the machine, turn the switch to the “OFF” position and unplug the power cord from the electrical receptacle before making any adjustments. PROBLEM LIKELY CAUSE(S) SOLUTION(S) Saw will not start. -
Page 30: Parts Diagram And Parts Lists
TS-C250PX HIGH CONFIGURATION OF MECHANICAL PARTS FOR T EC H N I CAL S UPPORT CAL L 1 800 6 58 111... - Page 31 TS-C250PX PARTS DIAGRAMS & LISTS HIGH CONFIGURATION OF MECHANICAL PARTS Turn HandleM10*100 Block Shot Flat head Screw M5*50 Handle Flat Washer φ8*28*3 Gland HandleWheel Vonnecting Shaft Brake Sleeve Button Head Screw M4*10 Lock Washer φ8 Key A5*12 Lock Washer φ4...
- Page 32 TS-C250PX HIGH CONFIGURATION BOX High Configuration Box 217 218 220 221 217 233 207 243 244 240 241 Strain Relief Dust Suction Port (100) Angle Ruler Dust Suction Port (80) Enlarge Washer φ4 Button Head Screw M6*16 Button Head Screw M4*10...
- Page 33 Hex Bolt M8*20 TS-C250PX Lock Washer 8 Washer 8 Wire WORKTABLE Button Head Screw M6*16 Square Tube AND GUIDE RAIL Flat Head Screw M8*35 F-Angle Iron Nut M8 Locking Ring B-Angle Iron Button Head Screw M6*12 Lock Washer 6 Washer 6...
- Page 34 TS-C250PX BACKING PART OF HIGH C-STEEL PIPE FOR T EC H N I CAL S UPPORT CAL L 1 800 6 58 111...
- Page 35 Miter Guage With Stop Device P-Head Screw M6-8 TS-C250PX T-Solt Washer Miter Bar Washer φ15-φ5-4 Flat Head Screw M5*8 MITER GAUGE Locating Plate Flat Washer φ5 Button Head Screw M5*8 WITH STOP DEVICE Washer φ6-φ12-5 Plug Screw Set Screw M6*20...
- Page 36 TS-C250PX PROTECTIVE COVER FOR T EC H N I CAL S UPPORT CAL L 1 800 6 58 111...
-
Page 37: Wiring Diagram
TS-C250PX PARTS DIAGRAMS & LISTS - WIRING DIAGRAM WIRING DIAGRAM W0708接线图 brown blue yellow/green 13 NO 1 L1 5 L3 3 L2 4 T2 6 T3 2 T1 14 NO MS1-230V 11-14A 2 T1 4 T2 6 T3 blue brown yellow/green motor input 2.3KW/output 1.8KW... - Page 38 TS-C250PX Clear blade guard with dust extraction channel Premium miter gauge Solid cast iron wings with 5° increment stops and table Fully adjustable T-Glide style fence FOR T EC H N I CAL S UPPORT CAL L 1 800 6 58 111...
-
Page 39: Warranty
1. a copy of the order or receipt for the goods; 2. the serial or batch number printed on the A. We warrant that this Carbatec product will be free machinery manufacturing plate; and from defects caused by faulty workmanship or faulty materials for a period of 2 years from date of sale. - Page 40 TS-C250PX CARBATEC DELUXE 10" CABINET TABLE SAW Carbatec P t y Ltd E info@carbatec.com.au AU 1800 658 111 NZ 0800 444 329 128 Ingleston Road, Wakerley, QLD 4154, Australia ABN 84 010 706 242 CAR BATE C .C O M. AU...
Need help?
Do you have a question about the TS-C250PX and is the answer not in the manual?
Questions and answers